DIGITAL ELECTRONIC
The launch of coinlayer, an API that integrates real-time crypto rates on websites and applications, has made it easier for developers to provide exchange rates for over 385 cryptocurrencies.
One of the most-watched markets globally is the cryptocurrency market, and the rising interest of investors has made it crucial to provide reliable cryptocurrency data in real-time.
Due to the extreme uncertainty found in most cryptocurrencies, the price would typically not be the same from day to day. You need an app, service, or platform that can provide rates every hour. Coinlayer offers this kind of service against several fiat currencies for over 385 different coins.
Developers, Blockchain experts, and crypto affiliates can add crypto rates to websites using the coinlayer API. Besides, coinlayer has opened the window of opportunity, being an API that any average person can use.
Introduction to coinlayer

coinlayer is the most trusted and authoritative resource for accurate crypto market data from more than 25 exchange rates. There are three main features in the coinlayer API, including performance, ease of use, and compatibility.
The use of the coinlayer includes:
- An easy REST framework
- Comprehensive and interactive API documentation
- Integration guides
- Real-time Cryptocurrency
- JSONExchange Rates
- Response time up to 20 milliseconds
The best part!
coinlayer is also free to use. However, the free version has certain limitations, and one has to pay the price to go fully featured. Nevertheless, the pricing for coinlayer is not as high as other crypto market data APIs that come with high monthly fees, no customer support, and a low monthly quota.
Check the pricing!
coinlayer Pricing
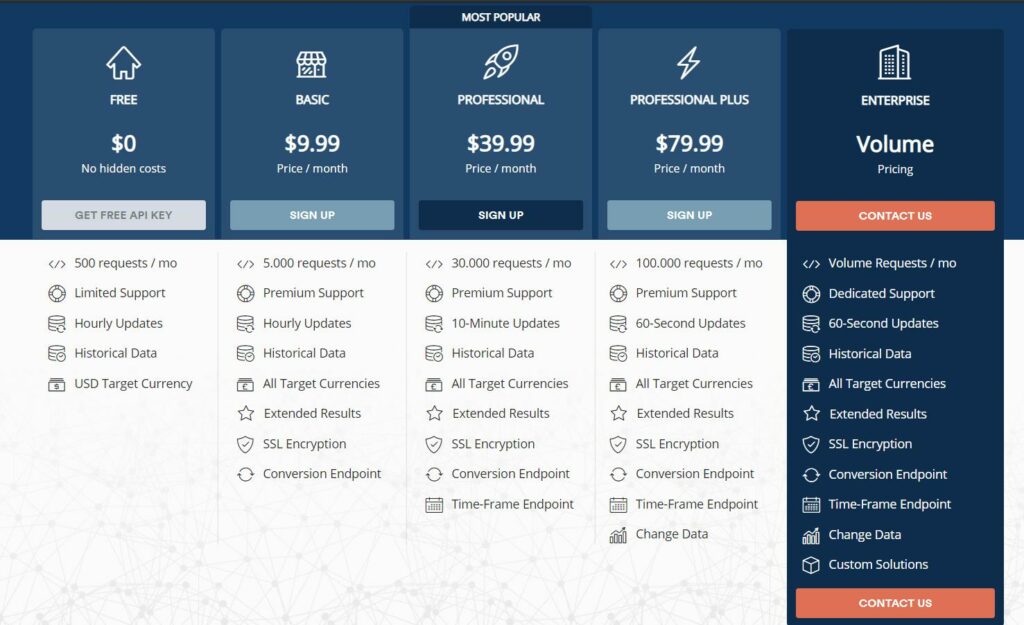
The platform offers different plans for different needs. The free plan undoubtedly is entirely free without any hidden charges. Additionally, as per your requirements, you can opt from the following available premium plans:
- Basis: $9.99 per month/ $95.90 per year
- Professional: $39.99 per month/ $383.90 per year
- Professional Plus: $79.99 per month/ $767.90 per year
- Enterprise: Contact Sales
coinlayer Features
Extensive Cryptocurrency Database
Collect up-to-date data on the cryptocurrency, accessed from 25+ markets, spontaneously on more than 385 coins.
Traditional Data
Examine how the API has been developed for historical data during 2011 by querying cryptocurrency data over time.
Robust JSON API
A solid and highly accessible cloud platform supports the coinlayer API, which delivers the data in milliseconds.
Authoritative Sources
Many reputable crypto-exchange providers influence crypto rates for coinlayer API to ensure maximum precision.
Dedicated Support
The team of experts at coinlayer takes customer support very sternly to help users understand from the basic to the advanced level in cryptocurrency.
Bank-Grade Security
The coinlayer API protects both request and response data transmission through the 256-bit HTTPS industry-standard encryption.
So, let’s get started with understanding how to add crypto rates to your website using coinlayer.
How to Add Crypto Rates to your Website using coinlayer?
coinlayer API
The API for coinlayer comprises a series of endpoints, functionalities, and options. coinlayer obtains crypto data from some of the biggest cryptocurrency exchanges that are requested using HTTP GET. The accuracy and reliability of the crypto data returned by the coinlayer API are the strongest owing to its sophisticated fallback algorithm.
coinlayer Quickstart Tool
The onboarding for beginners is made simple with a Quickstart tool, which displays all of the functionality of the API. If signed up, you can use their Quickstart Tool to evaluate every API endpoint with a tap.
Besides, it would help if you had a free API access key to start using the Quickstart tool.
Achievable Target Currencies
By default, the coinlayer API still converts cryptocurrency rates to American dollars. Using the target API to shift the objective currency to some other approved fiat currency code can be done by customers subscribing to the basic or higher plan.
A total of 166 world currency conversions are supported by the coinlayer API. Contrary to other related APIs where time differences could be required, coinlayer operates out of the box for every marked project.
An example of target currency code for Euro:
[...]

& target = EUR

[...]
You can find a list of all supported target currency codes here.
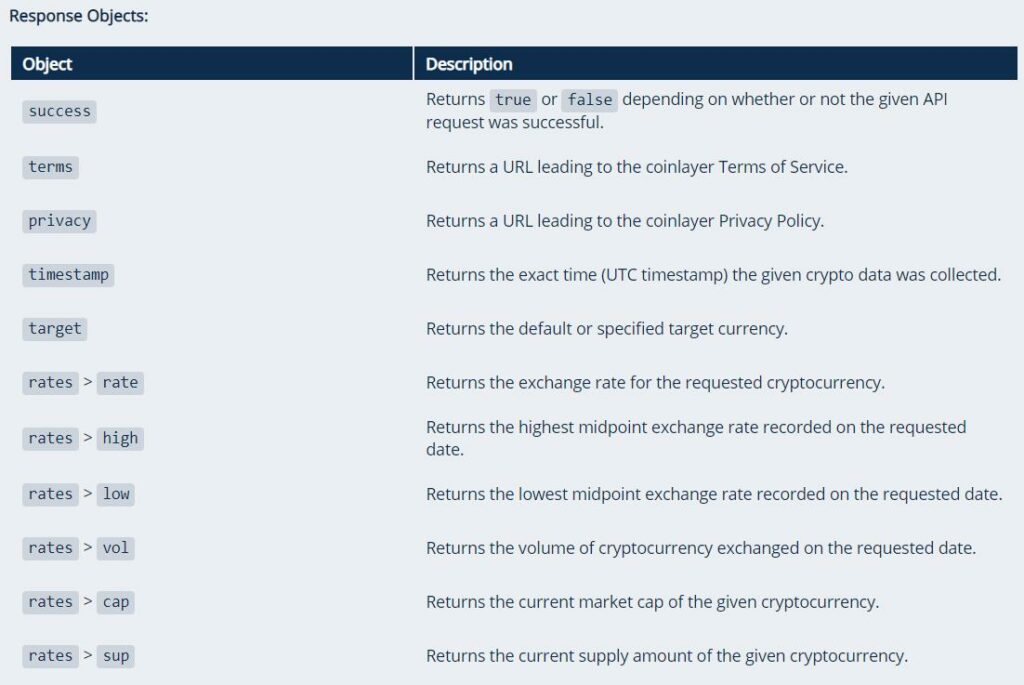
Response Objects
Check out the below list of response objects for coinlayer API and their description:
Getting Started with coinlayer API
API Access Key
Your API access key is the only token for accessing the coinlayer API. By signing in to the dashboard, you must search your API access key.
Upon completion of your registration, a forever free API key will be issued. This is more than enough for training and should be sufficient enough for essential use.
Further, you get a window to validate the API after logging in. The database query will be running, and the data can be expanded through the endpoints for all available JSON cryptocurrencies. For convenience, the required query parameters are highlighted with orange and optional parameters with blue.
To authenticate the API, append the access_key parameter to the API’s base URL and set it to your API access key value.
Base URL: https://ift.tt/3sFVc55
Append your API Access Key:
https://api.coinlayer.com/live
? access_key = YOUR_ACCESS_KEY
The main configuration is the base URL (https://ift.tt/3sFVc55), the endpoint (live, list, convert, etc.), and the API’s permission key. The response returns the question performance status, links to terms and privacy sites, unique endpoint features, destination currencies, and specific endpoint datasets. The coinlayer supports JSON callbacks so that the GET callback optional parameter will wrap the result within a function.
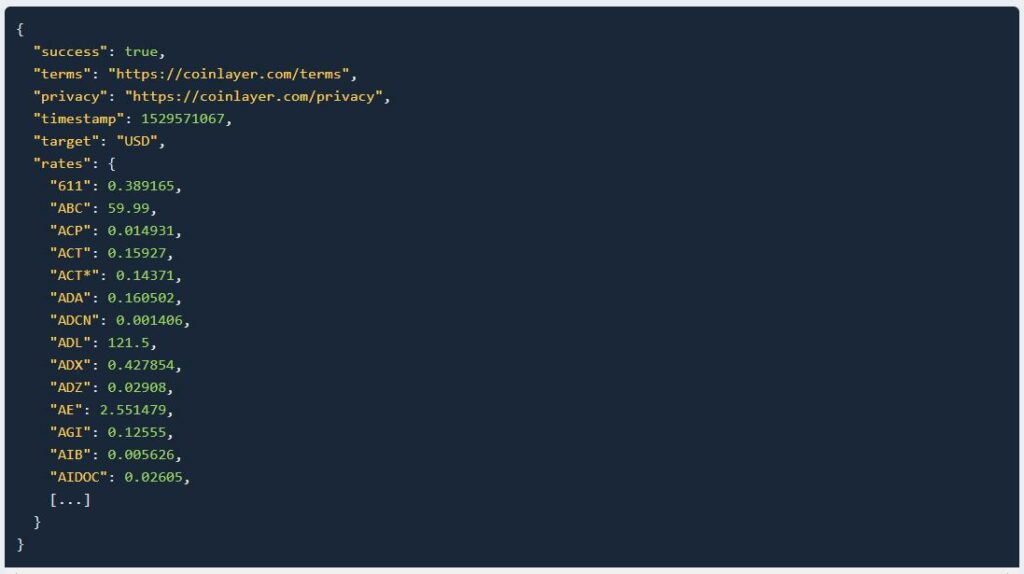
API Response
As you can see above, we have used the Live endpoint while appending the API access key. So, the basic API response for all available cryptocurrencies is shown below in JSON format with the exchange rate data:
Reviewing coinlayer API Endpoints
Overall, six API endpoints, each with different functionality, are available in the coinlayer API.
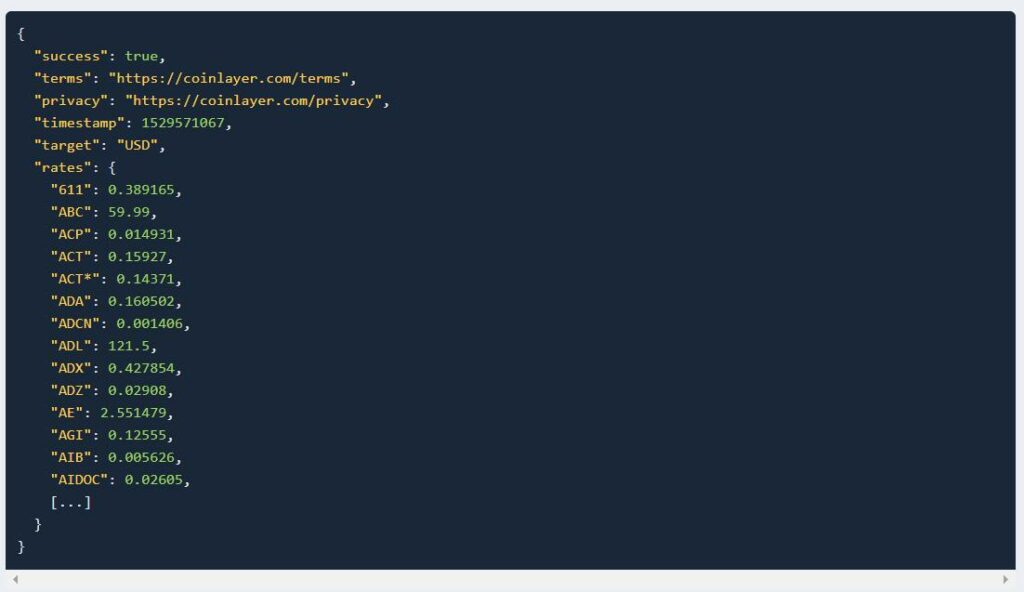
1. Live Data
This endpoint is used to query the API for the latest available exchange rate data.
API Request Example:
https://api.coinlayer.com/live
? access_key = YOUR_ACCESS_KEY
API Response Example:
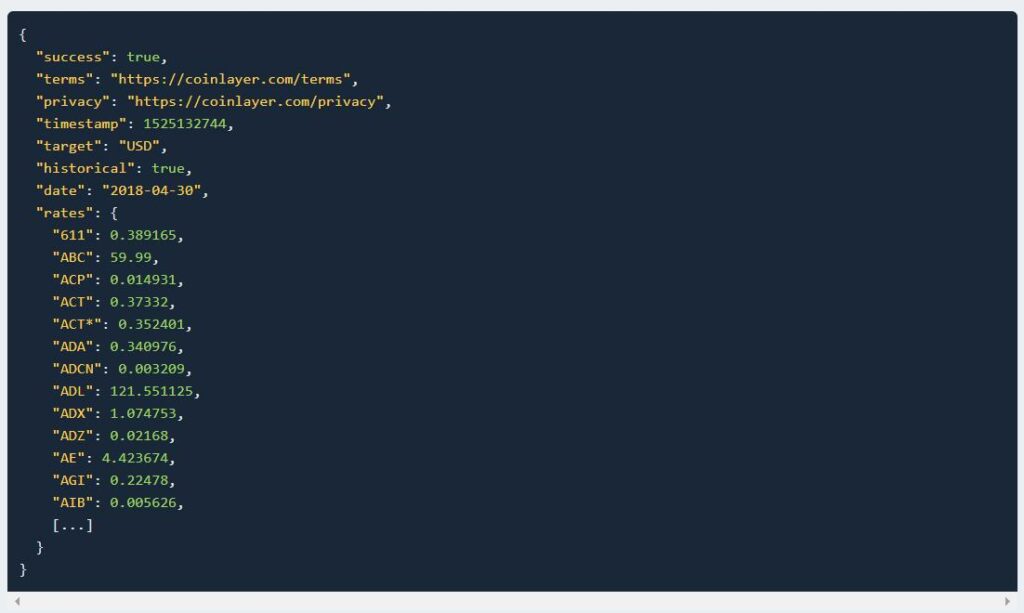
2. Historical Data
By using this endpoint, crypto rates for a specific date can be fetched.
API Request Example:
https://api.coinlayer.com/2018-04-30
? access_key = YOUR_ACCESS_KEY
API Response Example:
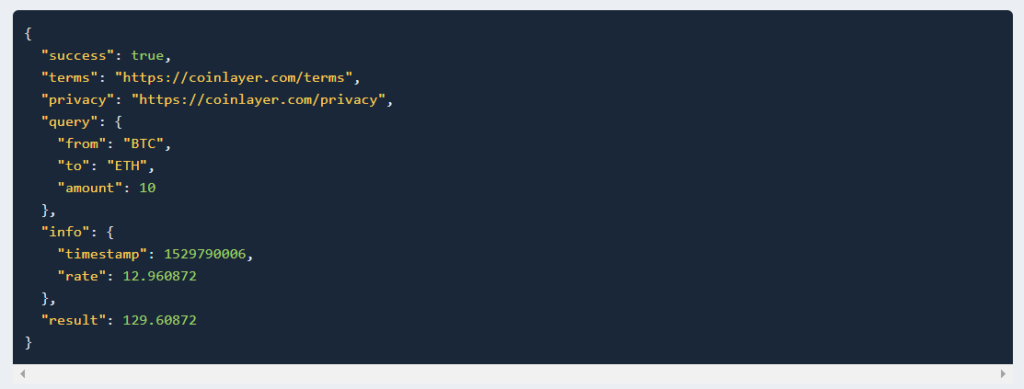
3. Conversion Endpoint
It helps in converting amounts between cryptocurrencies and target currencies.
API Request Example:
https://api.coinlayer.com/convert
? access_key = YOUR_ACCESS_KEY
& from = BTC
& to = ETH
& amount = 10
API Response Example:
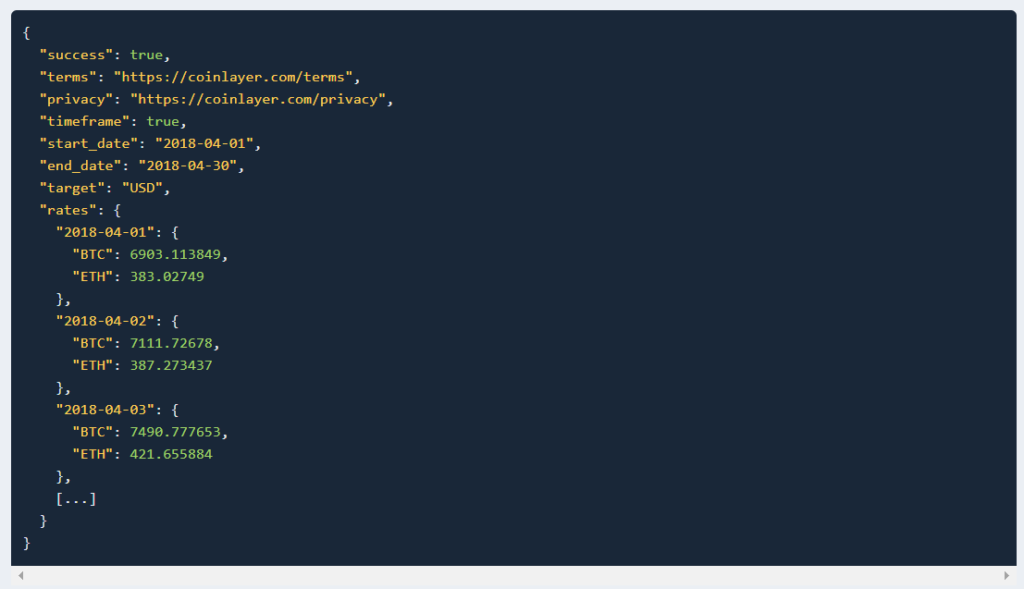
4. Time-Frame Data
To fetch the data for a specific period, Time-Frame data is used.
API Request Example:
https://api.coinlayer.com/timeframe
? access_key = YOUR_ACCESS_KEY
& start_date = 2018-04-01
& end_date = 2018-04-30
& symbols = BTC,ETH
API Response Example:
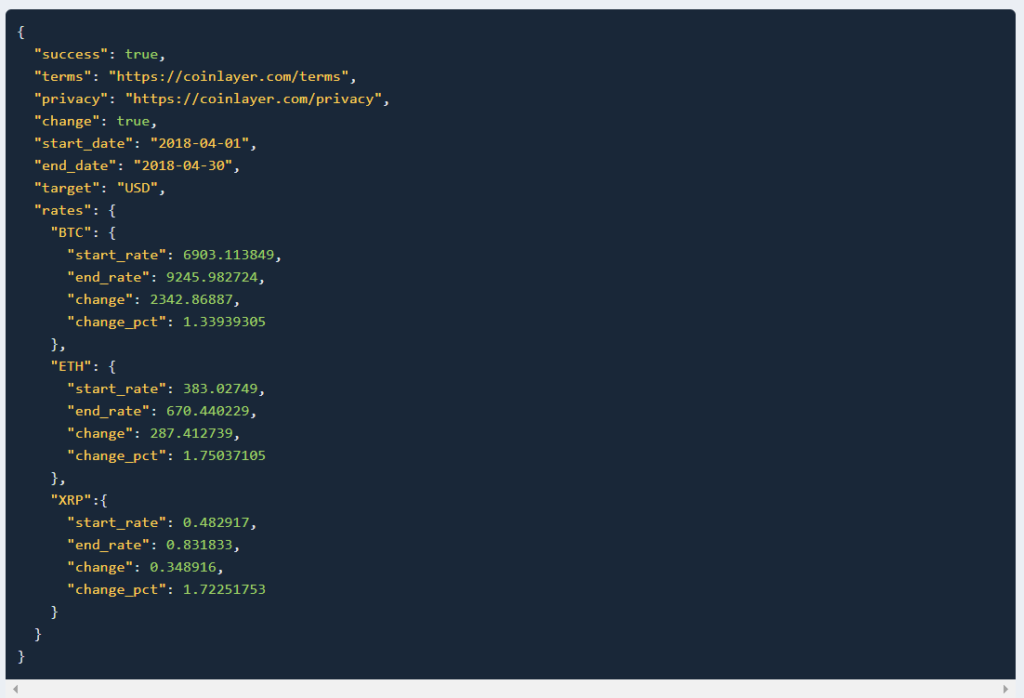
5. Change Data
This endpoint retrieves data about rate fluctuation for a specific period.
API Request Example:
https://api.coinlayer.com/change
? access_key = YOUR_ACCESS_KEY
& start_date = 2018-04-01
& end_date = 2018-04-30
& symbols = BTC,ETH,XRP
API Response Example:
6. List Endpoint
To retrieve a list of all available cryptocurrencies and target currencies, the List endpoint is available.
API Request Example:
https://api.coinlayer.com/list
? access_key = YOUR_ACCESS_KEY
API Response Example:

Conclusion
Developers can use coinlayer for incorporating a feature for crypto-monetary trade into their websites or smartphone applications for a financial or digital money trading firm. Coinlayer is the optimal solution for all applicable cryptocurrencies in real-time, stable exchange rates.
Anyone who seeks to integrate live reference prices into their ventures must take the coinlayer API into account.
Cheers to coinlayer!
The post coinlayer API Review – How to Add Crypto Rates to Your Website appeared first on The Crazy Programmer.
from The Crazy Programmer https://ift.tt/3sH8caF