April 2021

In this article, we will learn about 2-3-4 Trees. We will look at the creation of 2-3-4 trees and look at the operations performed on this trees with examples. We will also look at the time for each operation and its applications.

2-3-4 Tree is a Self-balancing, Multiway Search Tree. It is always perfectly balanced. 2-3-4 Trees are also known by name 2-4 Trees and is a specialization of M-way Tree (M=4). These sometimes also called as 4th order B-trees are useful in indexing and storage in large databases systems.

Properties

Now, let us look at some properties of 2-3-4 trees and its structure:

  • Each Node in the tree can store at most 3 values/keys and 4 references or pointers to child nodes.
  • The values in each node are Ordered or in Sorted form.
  • All leaf nodes are at same level. Hence making it perfectly balanced.
  • An Internal (non-leaf) node can either have 2, 3 or 4 children. To be more precise, nodes can be of the following three types.
    1. 2-Node: Node has two child pointers and 1 data or key value.
    2. 3-Node: Node has three child pointers and 2 data elements..
    3. 4-Node: Node has four child pointers and 3 data elements.
  • A leaf node can have 2, 3 or 4 items but no children. In other words, a leaf is 2-Node, 3-Node or 4-Node where all pointers hold NULL reference.

Now let us look at the the type of nodes in 2-3-4 tree and structure of each node:

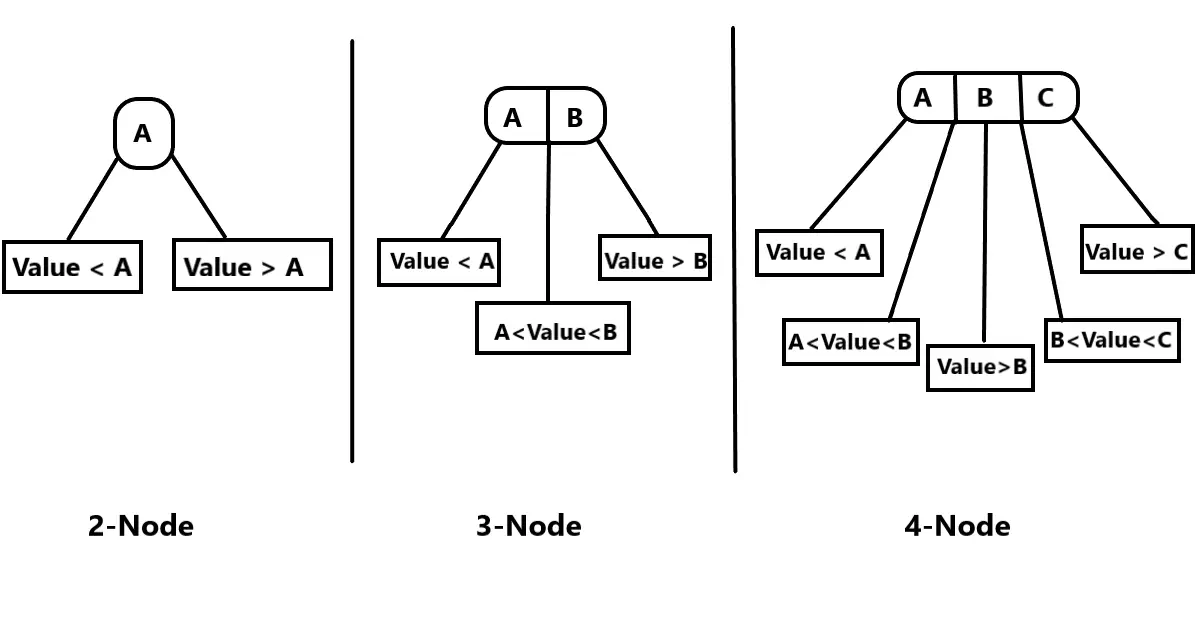
In the above examples, we have shown the Structure of 2-Node, 3-Node, and 4-Node. We can see the 2-Node consists of only one Data/Value (A) and has two pointers to its left and right children, where value of left child is smaller than the parent and value of right child is greater than the parent. In 3-Node there are 2 Values i.e. (A, B) and 3 pointers: The first pointer points to left child with Value smaller than A, the second pointer holds the node with a Value greater than A but lesser than B and the third pointer points to node with a value greater than B. Similarly, in 4-Node the node has 3 Values i.e. (A, B, C) and 4 child pointers as shown in the figure.

Creation of 2-3-4 Tree with Insertion

So, while creating a 2-3-4 tree and for inserting nodes we have to follow some rules:

  • We insert each data item in the node in sorted order. A node can hold maximum 3 values i.e. 4 node.
  • When we try inserting an element in a 4-Node we will split the node and move the middle item to its parent node if the parent becomes a 4-Node we split it again.
  • Once a node is split we cannot insert value in the parent node, we need to traverse to its child nodes and then insert or split the node itself.
  • Usually The Parent Node cannot be a 4-Node so we can accommodate the extra data inside it while inserting.

Let us understand with Step by Step example:

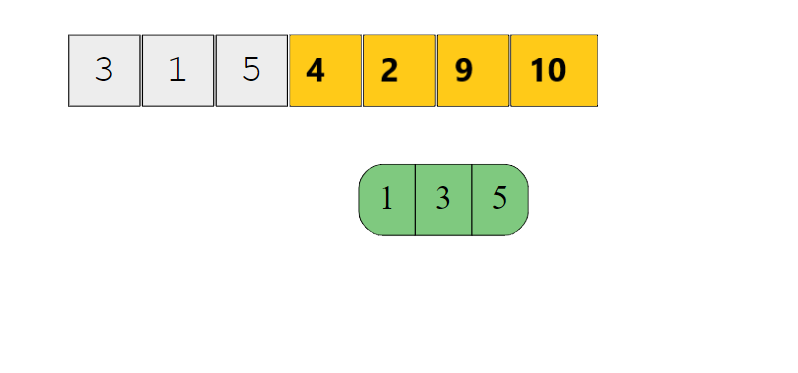
Suppose we are creating a 2-3-4 Tree with random data: [3,1,5,4,2,9,10]. We follow these steps:

Step 1:

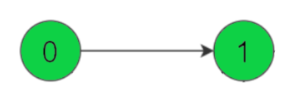
We insert value 3, 1, 5 serially maintaining the order in nodes while insertion. We insert values or data items in node until it becomes a 4-node. After inserting the values the node becomes a 4-Node. 3 gets inserted first, 1 is smaller so is inserted before 3 and 5 being largest is inserted after 3.

Step 2:

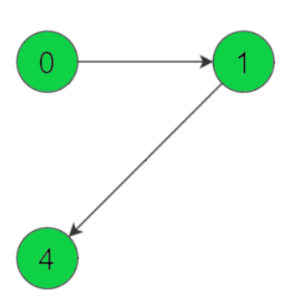
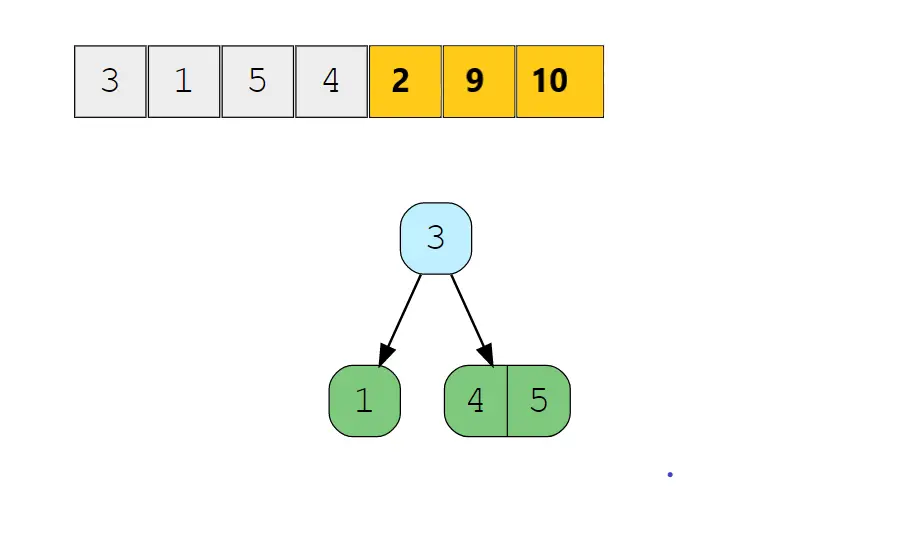
Now, when we try inserting 4, there is no space to insert it so we have to split the node from the middle element (3). Now 3 becomes the parent node (Root) and has left child node 1 and in right child 5, as value 4 is greater than 3 we insert it in its right child with node 5 in sorted order. The tree remains balanced and looks like:

Node marked in blue are Internal Node and in green are Leaf Nodes

Step 3:

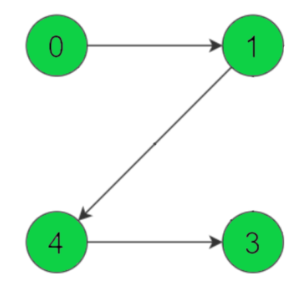
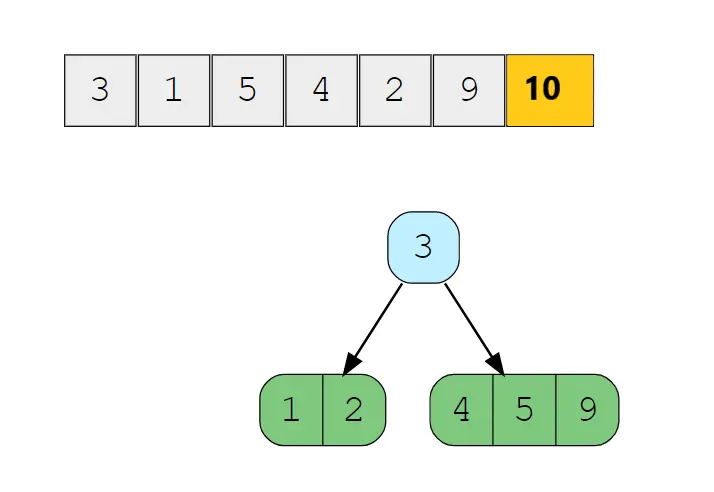
Now, when we insert value 2 into the tree we traverse down comparing value with Present Root 3,we insert value 2 into its left child as it is a 2-Node so we insert after 1. Now when we insert 9 we check again with the root 3 , since the value is greater we traverse down to its right child and then insert in it maintaining the order as the right child is 3-Node and has space to accommodate one more node. The 2-3-4 Tree now looks:
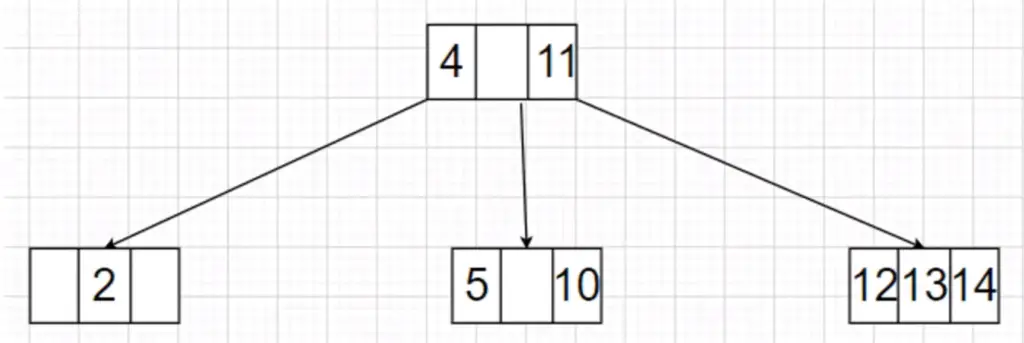
Step 4:

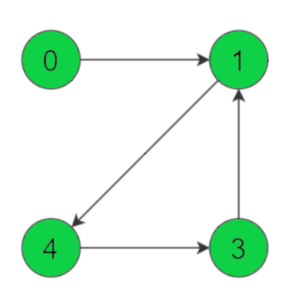
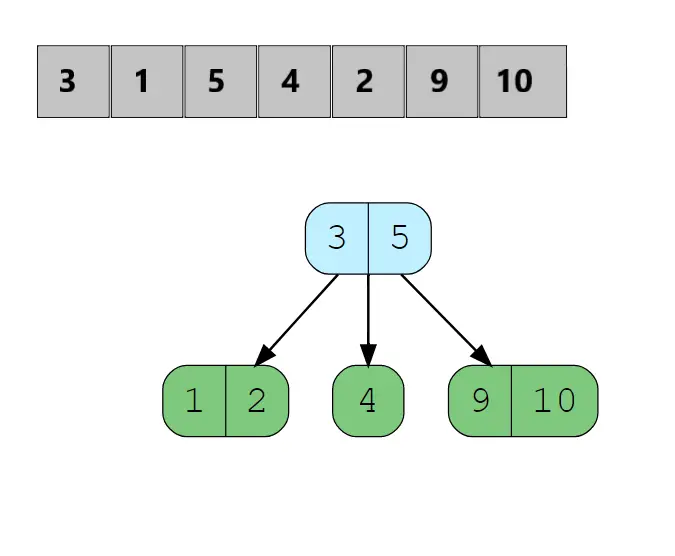
Finally, we try to insert 10 as it is greater than 3 so we go to its right child but the node is already a 4-Node, so we split the node from the middle element again and send node 5 to the parent node as it has space to accommodate (Discussed in Rules) now parent node has values 3 and 5 in it since 4 is less than 5 so it becomes the left child of 5 and right child of 3. Now we can insert 10 in the right child of 5 after 9. So, The 2-3-4 tree now looks like:

Deletion in 2-3-4 Tree

Deletion in 2-3-4 Tree is a complex operation. When we delete items from a tree instead of splitting nodes in Insertion, we will merge them recursively on the way we traverse down. We merge nodes while traversing if their child nodes have less than 2 keys. The Deletion operation can be narrowed down to 3 cases:

Case 1

Element is a Leaf Node with At least 2 Key/Values: If the element to delete in a node is a leaf node and has at least 2 Values in it then we can delete it straight forward. This is an edge case.

Case 2

Element is an Internal Node: If the element to delete is in a Node that is non-leaf or Internal there are again three possible conditions:

  1. If Left Child has 2 Keys then replace the element with its predecessor or value in the left child and then delete it.
  2. Or, If the Right Child has 2 keys then replace it with its successor and then delete it.
  3. Now, If Both Left Child and Right Child have 1 key then merge them to form a balanced node and then delete the element.

Case 3

Element is not an Internal Node: If the element to delete is in a node which is a Leaf Node or Non Internal Node then there are again two possibilities.

  1. If the Node has 1 key then we check its siblings or neighbor nodes if the Sibling has at least 2 keys. Then, we Rotate elements into the parent node and move the element in the parent node to the next node child node then delete it.
  2. If Node has 1 key and both child nodes are siblings with 1 key each then merge the two children and the parent element into the node then delete it.

Let us also understand this with a step by step example:

Consider this 2-3-4 tree:


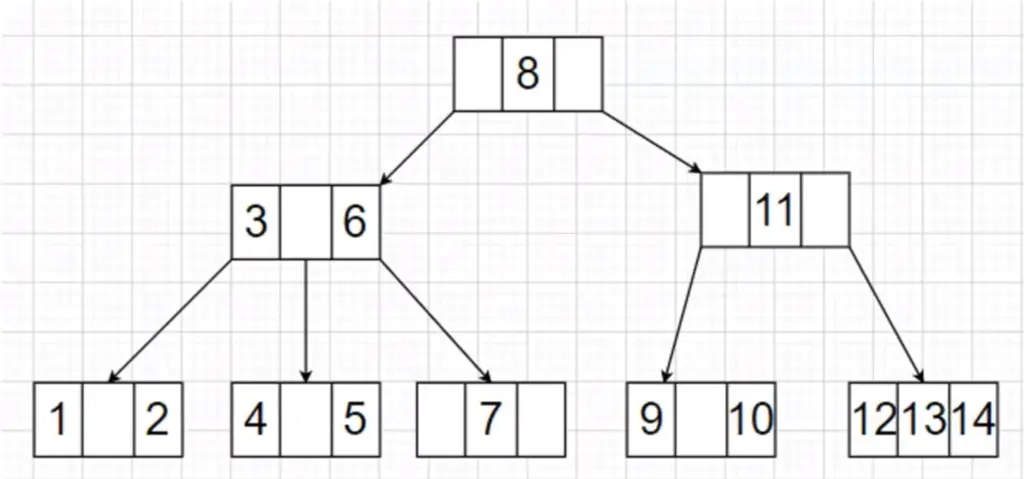
We will perform delete operation in the given sequence: 1, 7, 6, 9, 3, 8. The steps are shown below:

Step 1:

To delete element 1 we traverse down to the node containing the value, it falls under Case 1 since the node is a leaf node and has at least two keys so we delete it. The 2-3-4 tree now is:
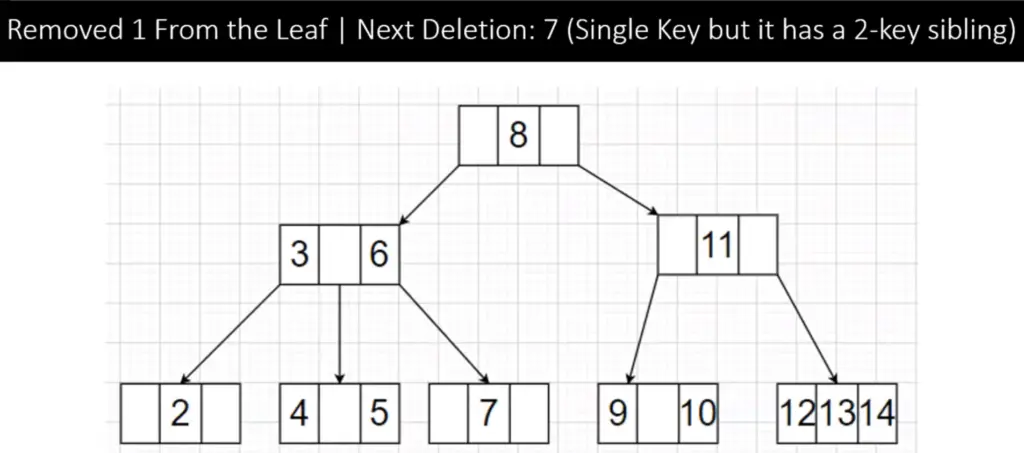
Step 2:

To delete 7, we see it is a leaf node with 1 key so we check its siblings which have two keys (4 and 5) this falls under Case 3 Type 2. So we rotate elements by one from the sibling to parent to the node then delete 7. The tree after rotation  and deletion is shown below:
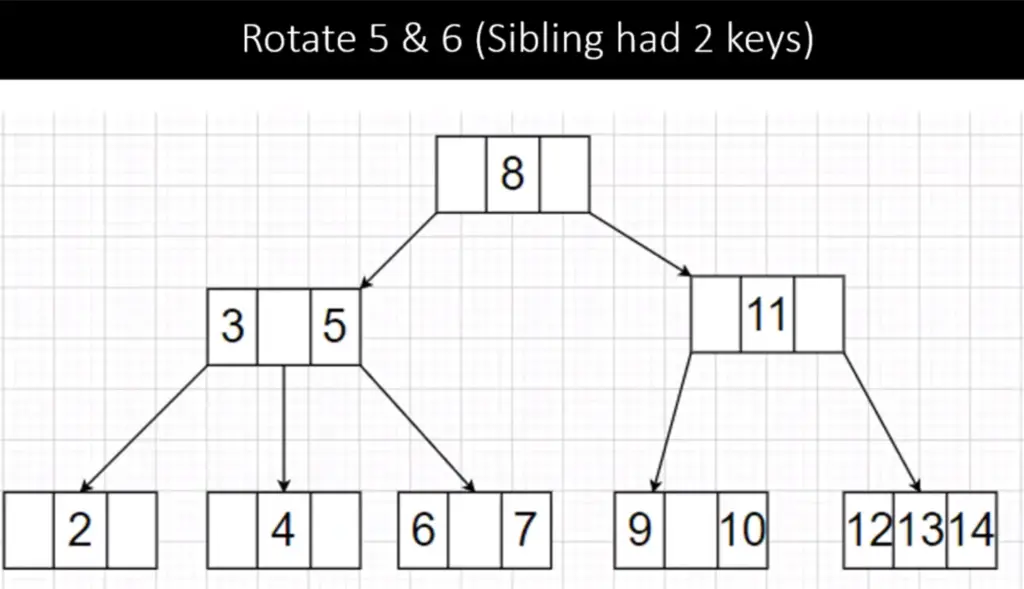
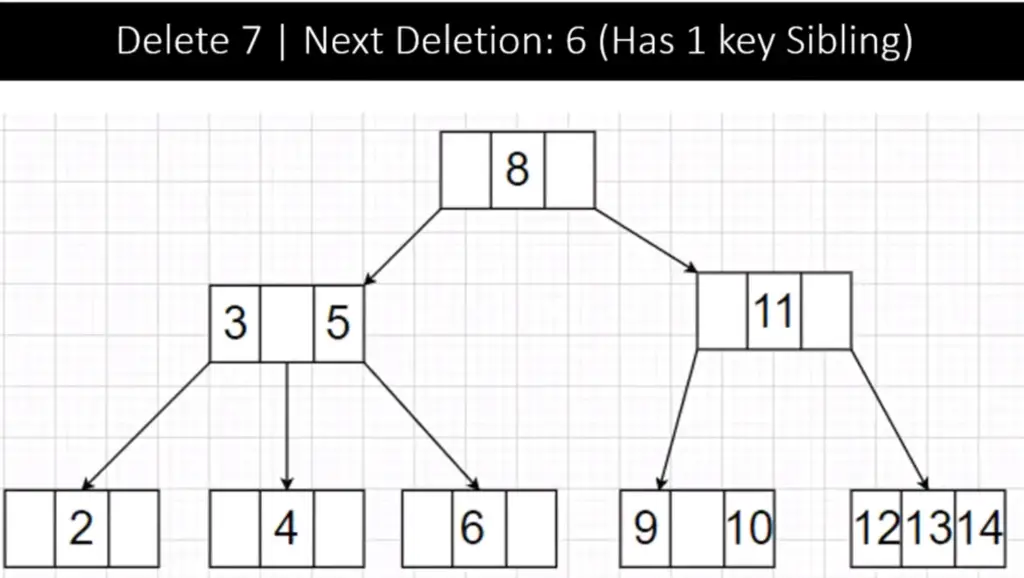
          234 deletion

Step 3:

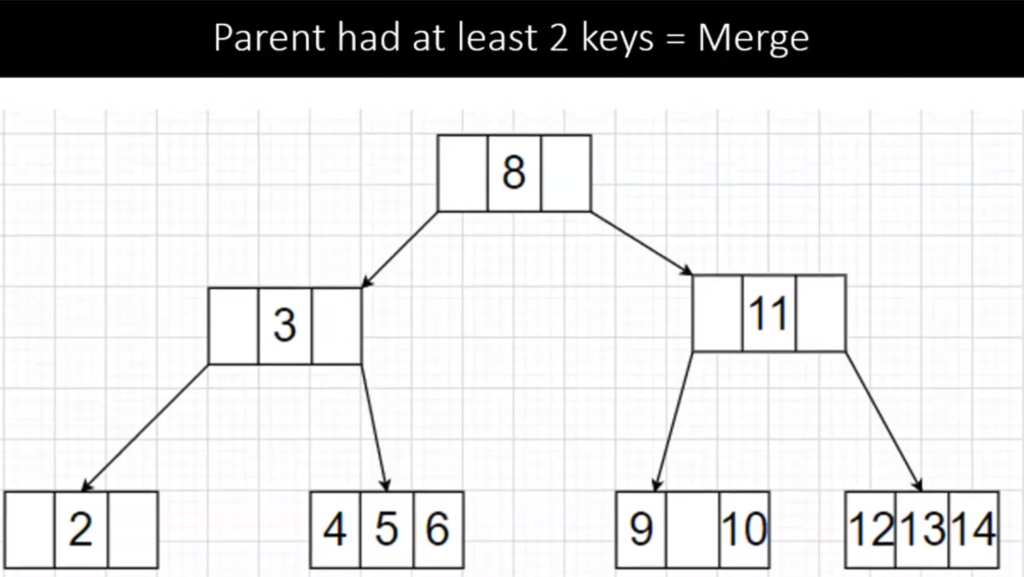
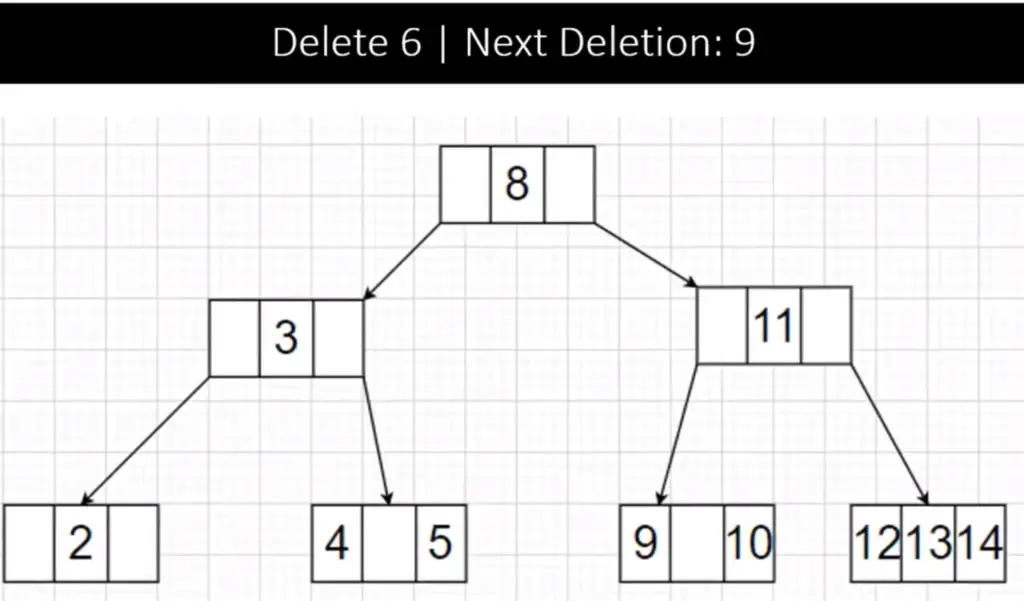
To delete 6, we see the node has 1 key so we check its siblings which also has 1 key, this falls under Case 3 Type 1 so we merge the two nodes with the parent to form a balanced node(4,5 and 6) with 3 keys (4-Node). The tree now looks like:


Step 4:

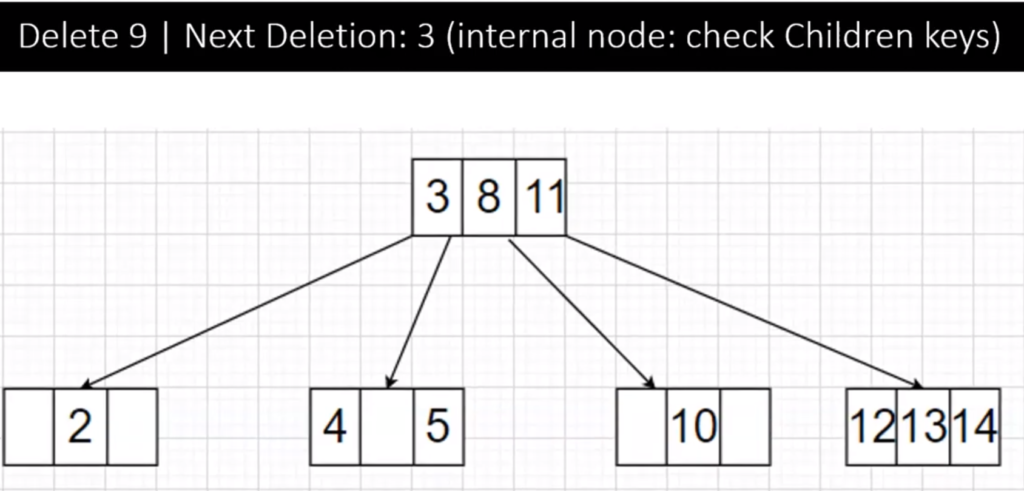
Now, To delete element 9 we traverse down to its node but on the way down since the child of node 8 have single keys so we merge them to a single node(3 8 11) to manage space effectively. Now, the node at 9 is a leaf node and has at least 2 keys (Case 1) so we delete it. The tree after the following operation is:

Step 5:

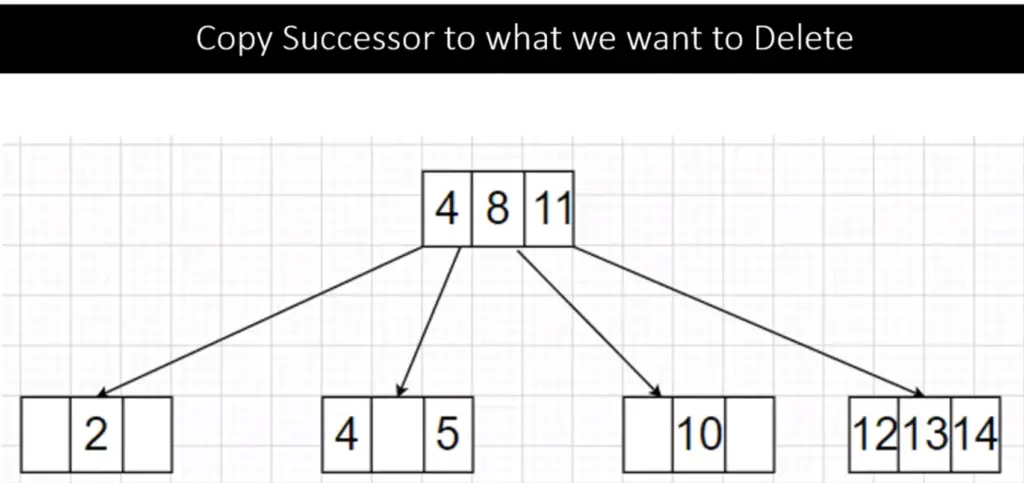
To delete 3, it is a Internal Node and its right child has 2 keys (4 and 5), this is Case 2 Type 2 so we replace 3 with its successor 4 then remove 4 from leaf node. After replacing and deleting 3 the 2-3-4 tree is :


Step 6:

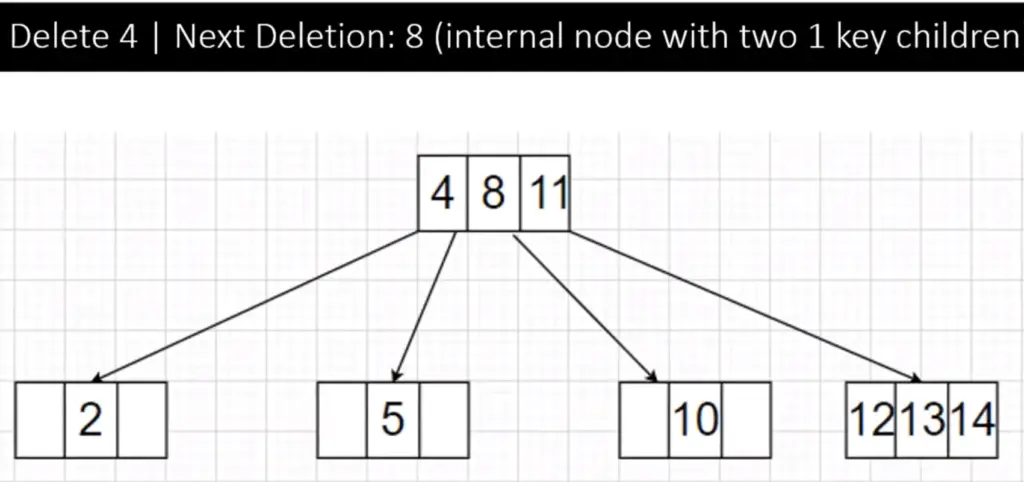
To delete 8, we see it is internal node with both child nodes having 1 key value: Case 2 Type 3, so we merge it with its child nodes then delete it the resultant 2-3-4 tree now after merging and deleting is shown below:

So here, we have seen examples of how to perform delete operations in 2-3-4 tree. You can try out more examples with the cases discussed above.

Time Complexity

  • Insert Operation takes O(log N) as all splits and merges are just local transformations and we don’t need multiple passes on the tree.
  • Deletion takes O(log N) considering rotation/merging are all O(1) operations.

Applications

  • 2-3-4 Tree is a better choice for indexing and storing data in large and complex systems because of its efficient memory management and balancing nature.
  • It is not widely used due to its complex structure and frequent change in structure on updating each node.
  • 2-3-4 trees are mainly used to understand the concept behind Red-Black Trees as they are used more and its implementation is based on this.

So that’s it for the article you can try out the various operations discussed with different examples for clear idea. It is recommended to go through the cases carefully.

Feel free to leave your doubts/suggestions in the comment section below.

The post 2-3-4 Trees – Properties, Insertion, Deletion, Time Complexity & Applications appeared first on The Crazy Programmer.


from The Crazy Programmer https://ift.tt/2QST3VC

Austin, Texas – Apr. 22, 2021  Sencha, a portfolio company of IDERA, Inc., announced the release of 7.4 during its annual virtual developer conference, SenchaCon. Sencha’s Ext JS Web Application Development Platform empowers companies to seamlessly design, develop and test feature-rich, cross-platform web applications. Recent studies indicate that customers using Sencha’s award winning JS Grid outperformed alternative grids in multiple categories.

SenchaCon Virtual Conference

SenchaCon 2021 was kicked off by Kegan Blumenthal, Sencha’s and Idera’s JS Brands General Manager. “We have been pleased by Sencha’s performance during a challenging year for all businesses.” said Blumenthal. “ We grew our business year over year and the increased participation at our annual conference by over 50% demonstrates that we are well positioned for future success.”

Ext JS 7.4 continues Sencha’s quest to build one of the best JS Grids in the industry by introducing multiple new features, including multi-level grouping, an advanced grouping panel, summaries for groups & totals, and a filterbar within the grid. The Ext JS framework builds on the Grid to create a powerful JS application development toolset that delivers hundreds of high quality, professionally developed and maintained JS components.

The Ext JS Grid is core to the Ext JS framework and delivers unmatched functionality in multiple areas, including paging, scrolling speed, initial loading time, and filtering speed even with datasets with 1M+ rows.

“Unlike other JavaScript Frameworks that require developers to mix and match multiple technologies, Ext JS provides a consistent application environment that delivers very high performance, yet it is easy to maintain and upgrade.” said Sanjay Raina, from Celestial Systems. “It is ideal for Enterprise Applications that require robust features and security, which is more difficult to deliver with alternative approaches.”

Sencha also announced other initiatives, including new investments in native React, Ext JS Visual development environment, and Enterprise Training portals. As web development continues to mature more and more companies are turning towards professionally developed tooling that can withstand security vulnerability tests and is easier to maintain and upgrade. Sencha’s efforts are directed to capture this demand and energize its passionate community of developers.

About Sencha

Sencha’s web application development tools power data-intensive web applications for thousands of companies around the world, including 60 percent of the Fortune 100 companies. Our enterprise-class Java and JavaScript frameworks leverage progressive modern standards to deliver data-rich applications for desktops, smartphones, and tablets. They provide developers with over a hundred professionally built and supported JavaScript components, including highly performant grids that are core to some of the most iconic SaaS applications in the world. Sencha plays a key role in Idera, Inc.’s portfolio of Developer Tools solutions together with several other JS tools brands, including Froala and FusionCharts.

About IDERA, Inc.

Kegan Blumenthal

IDERA, Inc. delivers B2B software productivity tools that enable technical users to do more with less — from database administrators, to database and application developers, to test management and dev ops teams.

IDERA, Inc. brands span three business units evangelized by millions of community members and more than 100,0000 customers worldwide, including more than 90% of the Fortune 500.

Kegan Blumenthal, Sencha General Manager

The post Sencha Announces Release of Ext JS 7.4 at Annual SenchaCon Virtual Conference appeared first on The Crazy Programmer.


from The Crazy Programmer https://ift.tt/3naEFEh

In this article, we will look at an interesting problem related to Linked List . ‘Given a Single Linked List, Remove Loop if there exists any’. We will look at different ways to solve this problem and analyze the complexities of our approach.

Now, To Remove a Loop in a Linked List, we need to first Detect a Loop in the linked list. If a Loop exists we remove it with our logic and print the elements of the list. So having a Loop in a Linked List means there is no such node having a NULL pointer or reference. In simpler terms, the Linked list has no end. Let us understand this with an example.

Here, we have a Linked List with 5 nodes, Node 12 is the Head node. We can see a Loop exists in the list connecting nodes 25 and 99. So we need to Remove this Loop such that the last node (25) points to NULL. After removal the List should look like this:

Detect and Remove Loop in a Linked List

We can see the last node now points to NULL and the loop no longer exists. Now, let us look at different approaches to solve the problem.

Note: If the Loop starts from any other node except the last node we need to change its reference to NULL to remove the loop.

Approach 1 (Using Hashing Concept)

  • In this approach we will hash or store the references of each node of the Linked List in a Unordered Set or Hash-Set in Java, which contains Unique elements.
  • So, we will traverse the list node by node add it to our Set, if not present. We will have a Pointer/Variable prev which will hold the previous node reference and every time we add the node to the Set, we update the prev to Current Node’s reference or address.
  • When we encounter a node pointing to a node already present in the Set, we know that we encountered a loop so the set will already have the node when we try to add it.
  • Hence in that case we do not add the node again, we make the last node or prev point to NULL. Thereby, removing the loop in the linked list.

Let us look at the implementation of above in java:

import java.util.*;
 
class Node 
{
    int data;
    Node next;
    Node(int data)
    {
            this.data = data;
            next = null;
    }
}
  
public class LinkedList 
{
 
  static Node head; // head node
 
  // print the linked list elements
  static void printList(Node node)
  {
    while (node != null) 
    {
    System.out.print(node.data + " ");
    node = node.next;
    }
  }
 
  // Returns true if the loop is removed from the linked list else returns false.
    
  static boolean detectandRemoveLoop(Node head)
  {
    Set<Node> hs = new HashSet<Node>();
    Node prev = null;
    Node curr = head;
    
    while (curr != null) 
    {
     // if set contains current node we detect a loop.
     if(hs.contains(curr)) 
     {
      // Make prev which hold the last node point to null.  
      System.out.println("Loop Detected at: "+curr.data);
      prev.next = null;
      return true;
     }
 
    // If we see the node for the first time, add it to our set.
     else 
     {
      hs.add(curr);
      prev = curr;
      curr = curr.next;
     }
     
    }
 
    return false;
  }
 
  public static void main(String[] args)
  {
    Node head = new Node(12);
 
    head.next = new Node(99);
    head.next.next = new Node(37);
    head.next.next.next = new Node(5);
    head.next.next.next.next = new Node(25);
       
    /*Create loop for testing */
    head.next.next.next.next.next = head.next;
 
    if (detectandRemoveLoop(head)) 
    {
     System.out.print("Linked List after Removing Loop: ");
     printList(head);
    }
    
    else
    System.out.println("No Loop Exists");
     
    }
}

Output:

Loop Detected at: 99
Linked List after Removing Loop: 12 99 37 5 25

Time Complexity: We do a single traversal of the Linked List until we get the loop so the complexity is O(n).

Space Complexity: We use a Hash-Set which at most stores all the nodes of the Linked List, so the space complexity is O(n), for n nodes in list.

Approach 2 (Floyd’s Cycle Detection Algorithm)

  • In this approach, we use Floyd’s Cycle Detection Method to detect loop/cycle in our linked list. We use two pointers: One Slow and Another Fast Pointer. We move the slow pointer by one position and the fast pointer by two positions. If they meet at a point then we can say Loop is detected.
  • Now after detecting loop we have two cases to consider: 1. If Fast Pointer or Loop is Detected at Head Node. 2. If Fast Pointer is at any other node.
  • If the Loop is detected at Head Node or the fast pointer is at head node, we move the Slow pointer until it reaches the node before the head node or the node where loop begins and make its reference to NULL.
  • For the 2nd  Case, we bring the Slow to position of the head of list. We then continue moving the slow and the fast pointer until slow.next = fast.next . We then make the Fast pointer reference as NULL, thus removing the loop.

Now let us have a quick look at the implementation in java:

import java.util.*;
 
class Node 
{
    int data;
    Node next;
    Node(int data)
    {
            this.data = data;
            next = null;
    }
}
  
public class LinkedList 
{
 
  static Node head; // head node
 
  // print the linked list elements
  static void printList(Node node)
  {
    while (node != null) 
    {
    System.out.print(node.data + " ");
    node = node.next;
    }
  }
 
    
  static void detectAndRemoveLoop(Node head) 
  {
    // if there are no nodes in list.  
    if(head == null) 
      return;
    
    Node slow, fast;
    
    slow = fast = head;
    
    while(fast.next != null && fast.next.next != null) 
    {
      slow = slow.next;
      fast = fast.next.next;
      if(slow == fast) 
      {
        break;
      }
    }
    // Check whether Loop is detected.
    if(slow == fast) 
    {
      // Case 1    
      if(fast == head) 
      {
        while(slow.next != fast) 
        {
          slow = slow.next;
        }
        System.out.println("Loop Detected at : "+ fast.data);
        slow.next = null;
      } 
      
      // Case 2 
      else 
      {
        slow = head;
        while(slow.next != fast.next) 
        {
          slow = slow.next;
          fast = fast.next;
        }
        System.out.println("Loop Detected at : "+ fast.next.data);
        fast.next = null;
      }
    }
    
  }
  
  public static void main(String[] args)
  {
    // Creating the Linked List with 5 nodes.
    Node head = new Node(12);
 
    head.next = new Node(99);
    head.next.next = new Node(37);
    head.next.next.next = new Node(5);
    head.next.next.next.next = new Node(25);
       
    /*Create loop for testing */
    head.next.next.next.next.next = head.next;
    
    detectAndRemoveLoop(head);
    
    
    System.out.print("Linked List after Removing Loop: ");
    printList(head);
     
    }
}

Output:

Loop Detected at : 99
Linked List after Removing Loop: 12 99 37 5 25

So we have implemented the code for the same example discussed above. We can see the nodes where the loop is detected and removed. Now let us have a quick look at the Complexities for this approach.

Time Complexity: The time complexity is O(n), since we traverse all nodes of the list before we detect the cycle/loop.

Space Complexity: This approach is efficient in terms of space required which is O(1), since we do not use any auxiliary space instead we just used two pointers.

So that’s it for the article you can try implementing the code with different examples. Let us know your suggestions or doubts in the comment section below.

The post Detect and Remove Loop in a Linked List appeared first on The Crazy Programmer.


from The Crazy Programmer https://ift.tt/3amgBcq

Cloud technology is the new normal for tech-savvy people who consider themselves Digital Nomads. With the rise in a shift towards cloud technology, especially IT people, have changed the way they work. Besides, it has made it easier for professionals and even ordinary people to access the data on any device from anywhere.

Shells is one such platform for hosting a Virtual Desktop/ Computer on the cloud.

Virtual desktops are preinstalled copies of operating systems on the cloud. It helps in isolating the desktop environment from the existing system that is accessible on any device.

In layman’s terms, a virtual desktop is a desktop embedded on a remote cloud server that users can use on any device, including smartphones, tablets, gaming consoles, over the internet.

Introduction to Shells

Shells

Shells is a web-based platform that offers a robust virtual desktop environment via a cloud. Users can build their Virtual Cloud Linux Desktop using Shells services.

Additionally, users can run various Linux-based distributions, such as KDE Neon, Ubuntu, Kubuntu, Debian, Linux Mint, and Manjaro, on these cloud computers. This can be achieved for iPad, iPhone, Android smartphone, handheld Android, PlayStation, Smart TV, Xbox, or even an old computer.

It is a virtual reality with a multi-platform that allows you to transform your Playstation, tablet, smartphone, Xbox, or Oculus into a device. You can transform the Shells virtual world into a powerful, cloud-driven workspace with just one click without departing your browser.

The best part!

All of the high-end processing tasks and heavy lifting operating system work is carried out on the cloud and not the existing system. So, if your device is old, it doesn’t have to strain itself. Moreover, you don’t have to push yourself as every task you perform will give you a much better and compelling experience.

Features

Remote Access

Shells make it easier for developers, educators, students, and other professionals to download, store, access, and edit files on any device. You can start a project on one device while you’re traveling or at any other place and continue the same on another machine with your ease.

Cross-functionality of Apps

With Shells, users are not restricted to a particular operating system or device. It allows accessing the desktop version of MS Excel on iPad and a PC-only game on your Android device. Users don’t have to choose between devices (Android or iOS) and operating systems (Mac or Windows), as they get to benefit from both.

Cloud Security

Shells automatically back up users’ data on the cloud with firewall security and end-to-end encryption, ensuring the data always stay safe and private. Besides, the data is stored in the cloud, so users don’t have to stress if their device gets damaged. They can access their data from any other device.

Affordable and Conventional Upgrades

The platform offers multiple pricing and plan options to upgrade the performance, memory, speed, and other factors with just a button click on the go. You don’t have to waste time waiting for data transfers, and the best part, you can upgrade your old device into a powerful Shells computer instead of diminishing it in the trash.

Distinct Features

  • Simple and convenient
  • Flexible
  • Cost-effective
  • Futureproof
  • Interactive user-interface
  • Intel-powered desktop computers
  • Run multiple apps on the browser

Shells is great for whom?

Shells platform is valuable and convenient for everyone seeking to have their own virtual cloud computer. However, the platform has proved to be the most valuable on-cloud service for specific domains and people. Here are a few:

Students

Students from any field can use the Shells platform for high-end PC performance on their tablets or smartphones. Moreover, they are privileged to get top-notch technology at affordable plans by upgrading an old device into a powerful PC.

Professional Workers

Corporate working professionals, freelancers, and other skilled workers can use Shells to simplify and streamline their work. Features such as Windows access from any device, snapshots, and download options can help workers carry out their tasks even outdoors.

Developers

Shells provide developers and coders a platform to write code on any device, anytime, and in any language. Besides, it is a window of opportunity for developers as they get great functionalities, including multiple operating systems, test and deploy on one device, and a library of IDE’s to choose from.

Artists and Content Creators

Shells is also an excellent tool for artists, musicians, and content creators to outperform their artistry tasks with high-end functionalities and services available. They can create music, videos, and other forms of content from any device with professional-grade software. Moreover, it is a fully digital audio studio that lets artists compose in the cloud with industry-standard audio production apps like FL Studio, Mixx, and Audacity.

Shells Pricing

Shells Pricing

Shells comes as low as $4.95 per month and do not offer any free trial or plan. To get started using Shells, one has to spend the minimum amount to take benefits. Nevertheless, if you don’t like it, you can cancel the subscription within 7 days to get a full refund.

The platform offers three pricing plans:

  • Shells Lite: $4.95 per month for 1 processor, 40 GB storage, 2 GB memory, 100 hours
  • Shells Basic: $9.95 per month for 1 processor, 40 GB storage, 2 GB memory, unlimited
  • Shells Lite: $36.95 per month for 4 processor, 160 GB storage, 8 GB memory, unlimited

How to get started with Shells?

You need to sign up, create your account and choose a package to get started with Shells. Once your account is created, you can build your virtual computer, download applications, programs and migrate your work assignments into your personal cloud workplace.

After completing the setup part, now you can log in to Shells servers from any device, including mobile, tablet, or even a TV.

Shells provide users with a Desktop as a Service solution that offers both computing power and resources to install and archive the data in Linux distributions and applications. Shells are server machines built on Intel that are easily accessible at any moment.

In addition, Shells has some additional advantages that make this service much more fascinating, such as auto-save, ransomware tolerance, daily installation backup, and data recovery at every point during the last seven days.

Cheers to Shells!

The post Shells Review – Best Personal Cloud Computer appeared first on The Crazy Programmer.


from The Crazy Programmer https://ift.tt/3g8hMji

Currently, the internet is hugely popular around the globe, and an individual can hardly think about a life without the internet. The solution to each problem is found on the internet today. This is another reason why progressive people of the current generation rely on virtual services to fulfill all their necessities. In addition to it, people can find almost every tiny thing on the internet, ranging from services to products and medicine to education.

Although online shopping has created a wider room for you to fulfill your needs, it has made you lazier. However, this has led to the introduction of more and more online websites. Some of these websites are dynamic, and some are static. Static websites are showcased precisely in the same manner that they are stored in. Moreover, they can be modified by developers only.

On the other hand, dynamic websites are easy to handle. They can be modified and altered by users themselves. The best part is that the users can change it without knowing website design and development.

However, if you reside in Sydney and are wondering about the benefits of custom web design Sydney, here are the top 8 points that indicate the benefits of building a custom web design for your business.

What are the Benefits of Custom Web Design for Your Business?

Adaptability

An ideal custom site will be endorsed with all the features needed for marketing a business. The web designer will assist you by compiling a list of priorities that they will further incorporate into the structure of your website. If you have a low budget, you can discuss such features that you can add to your site later with the designer.

Intriguing design

A custom web design displays unique and intriguing features. To be more precise, no other business or individual would hold a similar or exact design as your website. This will further help your brand to stand out from the rest of the crowd.

Custom-fit

The cost of a custom web design is comparatively less. Furthermore, it enables you to build aesthetic prospects of templates and gives you the functionality of the website, which is particularly tailored to meet your unique business and customer requirements. Also, due consideration is provided to the user’s experience, navigation, overall personality, visual graphics, color scheme, and layout of the website.

Branding

Building a custom website helps you in your business branding as well. With custom graphics, you can effortlessly stand out from the crowd. The best part is, your visitors will still remember you because of your custom site. Know that the visitors are not only reading your website’s content, but this further means that they are staying a little longer on your website. This helps you drive better conversions.

SEO optimized

Opting for a custom website design enables your website to be built following certain SEO techniques. This further creates room for bringing higher rankings to your site on search engines.

Grow the reputation

An online business ultimately depends on attention. You will know that your online business is getting the proper attention if your website attracts quite a lot of visitors. You will attract visitors only when you have an amazing website. Building a customized website helps you establish a rapport for your business, thereby building a unique brand for your company, which enhances its overall look.

Ownership & Control

By building a custom website design, you gain ownership of your web design and code. In addition to it, you gain absolute control over your site.

Scalability

Custom web design enables incorporating an informational architecture that is highly effective for the growth of your business. You can execute further integration and personalization with several other platforms like eCommerce and social networking tools. Although the pricing of custom website designs is higher at the initial stage, these sites provide long-term growth and better ROI.

Conclusion

Apart from the above-listed benefits, there are many other design factors to pay attention to, including creating unified graphics, website management, and content provision. With the help of a custom-made website design, you not only achieve an ideal website that suits your business requirements at present. It also has the appropriate technology to continue assisting your business in the long run.

The post What are the Benefits of Custom Web Design for Your Business? appeared first on The Crazy Programmer.


from The Crazy Programmer https://ift.tt/2QkoCHq

In the present computer, many parallel application processes are required to execute to run the system. This is now the function of the OS to control & control all the processes efficiently and effectively which is conversely the paramount function of the operating system.

To execute multiple programs multi-programming system is used. This type of operating system is capable of executing more than one program on the CPU. Because of this, the system is completely utilized. If only a single program is being executed and other programs wait for getting their turn.

Multiprogramming

When a system is running, multiple processes wait to get performed i.e., they wait for their chance to utilize the CPU and start their execution. Sometimes such processes are called jobs. These processes are kept in a job pool. This is done because the main memory is very little to adjust all of these processes together into it. So, they are stored in the job pool which consists of all the processes waiting for allocation in the CPU and main memory. After accommodating these processes together, the CPU selects a job from the waiting list and transfers it from the job pool to the main memory for starting the execution. The processor continues to execute one job unless it is intervened by any external element or it goes for an Input/Output task.

The main components of a multi-programming system are command processor, I/O control system, file system, and transient area.

The parts of the transient area are sub-segmented to store individual programs and further resource management routines are connected with the basic function of the operating system.

When two or more programs are present in computer memory, concurrently, the processor is shared between them and it is called multiprogramming. By organizing jobs in a single shared processor, CPU utilization is increased so that the CPU always has one program to execute. By identifying and executing jobs on behalf of their priority the Response Time is lowered.

Types of Operating System

  • Simple Batch System
  • Multiprogramming Batch System
  • Multiprocessor System
  • Desktop System
  • Distributed Operating System
  • Clustered System
  • Realtime Operating System
  • Handheld System

Working of Non-multiprogram System

While in this type of system, when a job departs the CPU going for other tasks, the CPU becomes inactive i.e., it waits for the next job or till the old one resumes. Overall, the CPU remains idle for some time which is a drawback because more jobs that are delayed to get carried out might not even get odds as the CPU is still allocated to the previous job. This is a problem because the jobs which are prepared to get executed are not assigned to the CPU which is not utilized in its present job. After all, the job is busy taking input/output tasks. To improve the efficiency of the system altogether the theory of multi programming was devised.

Working of Multi-Program System

In this, just as the job proceeds for a task the OS pauses the job and selects an additional job from the job pool, and gives the CPU to the new job to start its processing. The foregoing job continues its input/output task while the new job performs its execution.

Now let’s consider the next job also proceeds for a task the CPU then selects the further next job and starts executing it. And just as any of the previous jobs completes their Input/Output operation they return and the CPU is assigned to it. So, no CPU time is squandered.

Thus, the overall target of a multi programming system is to keep the CPU occupied till some jobs are present in the job pool. Thus, multiple programs can be carried out on a single processor machine & the CPU never remains inactive.

Difference between Multiprogramming and Multiprocessing

Computer systems with two or more than two CPUs (Processor) are called Multiprocessing systems. So, with the availability of multiple processors, multiple processes can be executed at the same time. These multiprocessors work by sharing memory, clock & peripheral devices. A computer system can be both multi-programmed & multi-processing at the same time. The difference between multiprocessing and multi programming is that in multi programming, the system keeps programs in the main memory and executes them using a single CPU only while Multiprocessing means executing multiple processes at the same time on multiple processors. Multi programming is carried out by switching from one process to another while Multiprocessing is carried out by the means of parallel processing.

Advantages of Multiprogramming Operating System

  • CPU utilization increases and Idle time reduces.
  • Smart utilization of Resources.
  • Reduction in response time.
  • The time required for Short time jobs is reduced.
  • The system can be used by multiple users at once.
  • Total read time is reduced while executing a job.
  • Helps fast monitoring of tasks as they run parallel.

Disadvantages of Multiprogramming System

  • There is a need for CPU scheduling.
  • As all types of jobs are stored in main memory, memory management is required.
  • Log waiting time is required when the system has a large number of pending jobs.
  • Managing all the jobs is very difficult.
  • Highly complex.

The post What is Multiprogramming Operating System appeared first on The Crazy Programmer.


from The Crazy Programmer https://ift.tt/3uHbXxf

In this article, we will learn how to deduce and calculate the Running Time of an Algorithm. Also, we will see how to analyze the Time Complexity of the Algorithm. This is very useful when it comes to analyzing the efficiency of our solution. It provides us with the insight to develop better solutions for problems to work on.

Now, the Running Time of an Algorithm may depend on a number of factors :

  1. Whether the machine is a Single or Multiple Processor Machine.
  2. It also depends on the cost of each Read/Write operation to Memory.
  3. The configuration of machine – 32 bit or 64 bit Architecture.
  4. The Size of Input given to the Algorithm.

But, when we talk about the Time Complexity of Algorithm we do not consider the first 3 factors. We are concerned with the last factor i.e. how our program behaves on different Input Sizes. So, mostly we consider the Rate of Growth of Time with respect to the input given to the program.

Now, to determine the Run time of our program, we define a Hypothetical Machine with the following characteristics: Single Processor, 32 bit Architecture. It executes instructions sequentially. We assume the machine takes 1 Unit of Time for each operation ( E.g. Arithmetical, Logical , Assignment, Return etc.).

We take a few examples and try to deduce the Rate of Growth with respect to the input.

Let’s say we have to write a program to find difference of two integers.

difference(a,b)
{
c = a-b          -> 1 unit Time for Arithmetic Subtraction and 1 unit for Assignment
return c         -> 1 unit Time for Return
}

Explanation:

This is the Pseudocode, if we run this program using the model Machine we defined, the total time taken is Tdiff = 1+1+1 =3 units. So we say irrespective of the size of inputs the time taken for execution is always 3 units or constant for every input. Hence, this a Constant Time Algorithm. So, Rate of Growth is a Constant function. To indicate the upper bound on the growth of algorithm we use Big-O Asymptotic Notation. So, to simplify time complexity is O(1) or constant time because the operations only happen once. Since each of our operations has a runtime of O(1), the Big O of our algorithm is O(1 + 1 + 1) = O(3), which we will then simplify to O(1) as we strip our constants and identify our highest-order term. Hence, the Running time will be O(1) .

Let us look at another example suppose we need to calculate the sum of elements in a list.

sumOfArray( A[], N)               COST      TIMES  
{
 sum=0                         ->   1 units     1
                            
 for i=0 to N-1                ->   2 units    N + 1   ( 1 unit for assignment + 1 for increment i)  
   sum = sum + A[i]            ->   2 units     N    ( 1 unit for assignment + 1 unit for sum)

 return sum                    ->   1 units     1
}

Explanation:

This is the Pseudocode for getting the sum of elements in a list or array. The total time taken for this algorithm will be the Cost of each operation * No. of times its executed. So,  Tsum = 1 + 2 * (N+1) + 2* N + 1 = 4N + 4 .

The constants are not important to determine the running time. So, we see the Rate of Growth is a Linear Function, since it is proportional to N, size of array/list. So to simplify the running time and considering the highest order term we say the Running Time is is : O(N) .

Now, if we have to calculate the sum of elements in the matrix of size N*N. The Pseudocode looks like this.

sumOfMatrix( A[][], N)              COST          TIMES
{
total = 0                            1 Unit          1
for i=0 to N-1                       2 Units       N + 1       
 for j=0 to N-1                      2 Units    (N + 1) * (N + 1)  
     total = total + A[i][j]         2 Units       N * N

return total                         1 Unit           1
}

Explanation:

The 1st for loop executes N+1 times for each row to reach end condition (i=n), the 2nd for loop executes (N+1) * (N+1) times for each cell in a column. So, the total time taken by the algorithm,

TsumOfMatrix = 1 + 2 * (N + 1) + 2 * (N+1) * (N+1) + 2 * N * N + 1 = 9N2 + 6N +6. 

So on ignoring the lower order terms and constant we see the Rate of Growth of Algorithm is a Quadratic Function. It is proportional to N2 or the Size of the Matrix. If we plot a graph for the above three functions, for the time taken with respect to its inputs we see:

The Tdiff graph is constant, Tsum grows linearly with input n and TsumOfMatrix grows as a Square Function giving a Parabolic graph. So, in general, we say Running Time of Algorithm = Σ Running Time of All Fragments of Code.

That’s it for the article, you can try out various examples and follow the general thumb rule discussed to analyze the Time Complexity.

Feel free to leave your doubts in the comments section below.

The post How to Calculate Running Time of an Algorithm? appeared first on The Crazy Programmer.


from The Crazy Programmer https://ift.tt/3fSrC8Q

pdflayer is an API used by developers for seamless automated conversion of high-quality HTML to PDF on any platform (websites, applications).

The lightweight RESTful API enables developers to generate highly customizable PDFs from URLs and HTML. Additionally, the platform offers a robust and sturdy infrastructure with simple and straightforward integration.

Here’s a catch!

The architecture of pdflayer is built using the combination of various powerful PDF rendering engines. This makes the platform most productive, reliable, and cost-effective for developers to process a large number of documents in a shorter span of time.

What makes pdflayer discernible from other APIs?

pdflayer api review

A complete series of customization tools, including document settings, a variety of layout settings, security and protection, interface and branding tweaks, and many more are included in the pdflayer API.

Moreover, the API offers high throughput, with its infrastructure efficient enough to process thousands of requests at a time.

Not restricted with certain limitations, the pdflayer API is compatible with all programming languages. Users merely need to request using the URL structure, and the API will do the residue.

pdflayer Features

High-Quality PDF Conversion

Customized PDFs can be produced with a GET or POST from any URL or brand HTML within seconds.

Robust PDF Engine

pdflayer combines several powerful PDF engines based on browsers running stalwart operating systems.

Powerful CDN

The API uses lightning-fast CDN to store PDF documents that can be retrieved in milliseconds.

Tracking Statistics

Users can track their API statistics and usage every month. Also, the API reminds users with notifications if they are running low.

Bounteous Customization

pdflayer offers full customization as to whatever works for browsers will also work for the API, including HTML, CSS, XML, SVG, JavaScript, margins, headers, footers, page numbers, watermark support, and many more

pdflayer Pricing

pdflayer Pricing

The platform offers a free plan for users to get started. However, for professional and enterprise requirements, there are different plans available:

  • Basic: $9.99 per month/ $95.90 per year
  • Professional: $39.99 per month/ $383.90 per year
  • Enterprise: $119.99 per month/ $1151.90 per year

Now, let’s get started with how to use pdflayer API in the Android application.

How to use pdflayer API in your Android application?

API Access Key and Authentication

After registering, each user receives an API access key, a unique password for requesting the pdflayer API. A base endpoint URL is available where users need to attach the API access key for authenticating pdflayer API.

Here’s the base endpoint URL:

http://api.pdflayer.com/api/convert?access_key=YOUR_ACCESS_KEY

The key features of the pdflayer API are set up for use by HTTP POST. The pdflayer API can also handle GET requests using its simple URL structure for clients who wish to make API requests through HTTP GET.

Getting Started with pdflayer API

Here are the three simple steps for building an API request:

Step 1 | Base URL

Every API request is based on the following URL:

http://api.pdflayer.com/api/convert

Step 2 | Parameters Requirements

Now, authenticate your access key by inserting a URL with the document_url parameter or supplying raw HTML code with the document_html parameter and appending your access key.

Parameters Requirements

Step 3 | Optional Parameters

To fully customize and configure PDFs, developers can make use of optional parameters. Here are some of them:

Optional Parameters

For a complete list of functionalities and parameters, click here.

API Request Example

This API Request uses some of the below-mentioned optional parameters for converting an HTML document into a PDF.

http://api.pdflayer.com/api/convert
? access_key = YOUR_ACCESS_KEY
& document_url = https://pdflayer.com/downloads/invoice.html

URL Encoding

Before transferring URL to any API parameters, it is advised to URL encode URL. However, if the respective URL contains a special character, like ‘&,’ URL encoding is necessary.

URL Example:

http://website.com?parameter=example&file=invoice.html

The above URL is required to be encoded so that it can be processed appropriately.

Query Example:

http://api.pdflayer.com/api/convert
? access_key = YOUR_ACCESS_KEY
& document_url = http%3A%2F%2Fwebsite.com%3Fparameter%3Dexample%26file%3Dinvoice.html
[...]

It shows how the above-given URL has been passed into an API Request.

API Error Codes

If the above query fails to run, the pdflayer API will return “success”: false and state the three-digit error code. Also, it will display an internal error type and a piece of text information, suggesting users how to correct the error.

Consider the example of an error triggered with no URL specified:

API Error Codes

Document Configuration

The pdflayer API-created PDF documents are called ‘pdflayer.pdf’ by default. You can define a custom name of your final PDF document using the document_name parameter of the API.

Example:

https://api.pdflayer.com/api/convert
? access_key = YOUR_ACCESS_KEY
& document_url = http://example.com/document.html
& document_name = MyPDF
[...]

Rate Limits

Here are the rate limits of Requests to the API based on subscription plans:

Rate Limits

Conclusion

The pdflayer API is programmed to automatically translate HTML into PDF easily and efficiently in any application or web app. The API is highly convenient to use even for a non-technical person. Users merely have to authenticate the pdflayer API by appending the access key to the base endpoint URL. The API will do the rest.

pdflayer is the most trusted and authoritative HTML to PDF conversion with lightweight RESTful architecture. The platform offers high flexibility and customizable options to developers. Additionally, the API can be implemented with any programming language because of its high compatibility.

pdflayer generates around one hundred PDFs monthly for free. If your requirements are high, you may opt for any of the subscription plans mentioned above.

Cheers to pdflayer!

The post pdflayer API Review – HTML to PDF Conversion API for Developers appeared first on The Crazy Programmer.


from The Crazy Programmer https://ift.tt/3wyk2WJ

In this article, will look at an interesting algorithm related to Graph Theory: Hierholzer’s Algorithm. We will discuss a problem and solve it using this Algorithm with examples. We will also discuss the approach and analyze the complexities for the solution.

Hierholzer’s Algorithm has its use mainly in finding an Euler Path and Eulerian Circuit in a given Directed or Un-directed Graph. Euler Path (or Euler Trail) is a path of edges that visits all the edges in a graph exactly once. Hence, an Eulerian Circuit (or Cycle) is a Euler Path which starts and ends on the same vertex.

Let us understand this with an example, Consider this Graph :

Hierholzer's Algorithm

In the above Directed Graph, assuming we start from the Node 0 , the Euler Path is : 0 -> 1 -> 4 -> 3 -> 1 -> 2 and the Eulerian Circuit is as follows : 0 -> 1 -> 4 -> 3 -> 1 -> 2 -> 3 -> 0. We can see that the Eulerian Circuit starts and ends on the same vertex 0.

Note: We see some nodes being repeated in the Euler Path. It is so because the above graph is directed so we have to find a path along the edges. If the above graph was Un-directed the Path would be : 0 -> 1 -> 2 -> 3 -> 4.

Necessary Conditions for Eulerian Circuit

Now let us look at some conditions which must hold for an Eulerian Graph to exist in a Directed Graph.

  • Every vertex must have an equal In-degree and Out-degree. In-degree is the number of edges incident on a vertex. Out-degree is the number of outgoing edges from a vertex.
  • There can be at most one such vertex whose Out-degree – In-degree = 1 and one such vertex whose In-Degree – Out-degree = 1.  Hence, if there are more than one such vertex, it means the Eulerian Circuit does not exist for the graph.
  • All of the vertices having non-zero degree should belong to a Single Strongly Connected Component.
  • Hence, The vertices which follow the second condition can act as the starting and the ending vertices of the Euler Path.

If the In and Out degrees of all vertices are equal to each other. Then any vertex can be our starting node. Generally we choose a vertex with smallest Out-degree or an odd degree vertex..

The In-Degree and Out-Degree of the vertices of the above graph is :

Node 0 -> In-Degree: 1 , Out-Degree: 1. For, Node 1 -> In-Degree: 2 , Out-Degree: 2 . Node 2 -> In-Degree: 1 , Out-Degree: 1 . For, Node 3 -> In-Degree: 2 , Out-Degree: 2. Node 4 -> In-Degree: 1 , Out-Degree: 1.

Hierholzer’s Algorithm

Now let us look at how Hierholzer’s Algorithm is useful in finding Eulerian Circuit for the above graph.

  • For the above graph, we choose Vertex 0 as starting node, follow a trail of edges from that vertex until returning back to it. It is not possible to get stuck at any vertex, because In-degree and Out-degree of every vertex is same.
  • If we come again to the start vertex while all the vertices are not visited yet, we backtrack to the nearest node which has a edge to a unvisited node. We will repeat this process and follow the trail along the directed edges until we get to the starting node and then we unwind the stack and we print the nodes.
  • For each node we visit we will decrement the count of its Outgoing Edges or Out-degree by 1, to ensure that we do not visit the same vertex again unless, there exists a node which has to be visited from that vertex only.

Step-by-Step Example

Let us look at a step by step example how we use this Algorithm for the above example graph.

We start from Node 0 which is our starting node to Node 1. We will decrement the count of the source node’s outgoing edge or Out-degree after every node we visit. So Current Outdegree of Node 0 is 0. Hence, The Eulerian Path looks like :

Hierholzers Algorithm 2

After this, we do a normal DFS Traversal for every node so we visit the node 4 and decrement Outdegree of Node 1 . So Outdegree of Node 1 is 1. The Path now is :

Now, 4 has an outgoing edge to Node 3, we visit it and update its Out-degree which is now 0. Thus now the Euler path is :

So, now 3 has an outgoing edge to Node 1 again, we visit it and decrement its Outdegree to 1. We do not visit node 0 because it has no pending nodes to be visited. Along with this, we have to maintain the constraint that discussed in Step 3 of Algorithm above. So the path now is :

Now, Node 1 has an edge to yet unvisited node 2, we traverse to it and update it’s Outgoing edge count = 1-1 =0.  The updated Path is:

Finally, Node 2 has an edge to node 3, we visit it and update its Outdegree to 0. Thereby completing the Euler Path traversing all the nodes. To complete the cycle or Eulerian Circuit we visit Node 0 from Node 3 which results the original graph.

Thus, the Eulerian Circuit is : 0 -> 1 -> 4 -> 3 -> 1 -> 2 -> 3 -> 0 .

Note: There was no Back-tracking done in this example, as we visited every node once except the condition when node 2 was to be visited.

Implementation in Java

For the implementation we use a 2D – List in Java (Vector in C++), to store the nodes along with their outgoing edges. We will use a Map (Hash-Map) to store count of outgoing edges for each vertex. The Key being the vertex and the Value will be the Out-degree of the same vertex. We use a Stack to maintain which nodes are processed at any instant. As soon as we get the Out-degree for any node equal to 0 we add it to our result array or list.

Let us look at the implementation code in JAVA:

import java.util.*;
public class Hierholzer_Euler
{
  public static void main(String args[]) 
  {
    List< List<Integer> > adj = new ArrayList<>();
  
    // Build the Graph
    adj.add(new ArrayList<Integer>());
    adj.get(0).add(1);
    
    adj.add(new ArrayList<Integer>());
    adj.get(1).add(2);
    adj.get(1).add(4);
    
    adj.add(new ArrayList<Integer>());
    adj.get(2).add(3);
    
    adj.add(new ArrayList<Integer>());
    adj.get(3).add(0);
    adj.get(3).add(1);
    
    adj.add(new ArrayList<Integer>());
    adj.get(4).add(3);
    
    System.out.println("The Eulerian Circuit for the Graph is : ");
    
    printEulerianCircuit(adj);
  
    
  }
  
  static void printEulerianCircuit(List< List<Integer> > adj)
  {
    // adj represents the adjacency list of
    // the directed graph
    // edge represents the number of edges emerging from a vertex
    
    Map<Integer,Integer> edges=new HashMap<Integer,Integer>();
  
    for (int i=0; i<adj.size(); i++)
    {
        //find the count of edges to keep track of unused edges
        edges.put(i,adj.get(i).size());
    }
    
    // Maintain a stack to keep vertices
    Stack<Integer> curr_path = new Stack<Integer>();
  
    // vector to store final circuit
    List<Integer> circuit = new ArrayList<Integer>();
  
    // We start from vertex 0
    curr_path.push(0);
    
    // Current vertex
    int curr_v = 0; 
  
    while (!curr_path.empty())
    {
        // If there's remaining edge
        if (edges.get(curr_v)>0)
        {
            // Push the vertex visited.
            curr_path.push(adj.get(curr_v).get(edges.get(curr_v) - 1)); 
  
            // and remove that edge or decrement the edge count.
            edges.put(curr_v, edges.get(curr_v) - 1);
  
            // Move to next vertex
            curr_v = curr_path.peek();
        }
  
        // back-track to find remaining circuit
        else 
        {
        circuit.add(curr_path.peek());
        curr_v = curr_path.pop();
        }
    }
  
    // After getting the circuit, now print it in reverse
    for (int i=circuit.size()-1; i>=0; i--)
    {
        System.out.print(circuit.get(i));
        
        if(i!=0)
        System.out.print(" -> ");
    }
   
  }
     
}

Output:

The Eulerian Circuit for the Graph is : 
0 -> 1 -> 4 -> 3 -> 1 -> 2 -> 3 -> 0

Now, let us have a quick look at the complexities of this Algorithm.

Time Complexity: We do a modified DFS traversal, where we traverse at most all the edges in the graph to complete the Eulerian Circuit so the time complexity is O(E), for E edges in the Graph. Unlike Fleury’s Algorithm which takes O(E*E) or O(E2) time, Hierholzer’s Algorithm is more efficient.

Space Complexity: For extra Space, we use a Map and a Stack to keep track of the edges of each node and the nodes processed respectively. So we at the most store all the vertices of the Graph, so the overall complexity is O(V), where V is the number of vertices.

That’s it for the article you can try out this Algorithm with different examples and execute the code for better understanding.

Let us know your suggestions or doubts (if any) in the comments section below.

The post Hierholzer’s Algorithm with Implementation in Java appeared first on The Crazy Programmer.


from The Crazy Programmer https://ift.tt/3wuJL2g

MKRdezign

Contact Form

Name

Email *

Message *

Powered by Blogger.
Javascript DisablePlease Enable Javascript To See All Widget