Latest Post

Whenever we are working with our code to develop something and we write some code, then it may be possible our code encounters any type of error. One of those error is Typeerror, which indicates that we have not given the type of data required. For example, if we try to add 3 + “five”, then we will encounter an error named typeerror because the summation between an integer and a string is not supported in python.

Whenever this type of error occurs, we have to make sure that we are passing the same type of data that is required to complete the operation.

So, in the above sum we are required to pass an integer to add in 3.

It will eliminate our error and the operation will be successfully performed.

In this article we are going to see what causes the error named typeerror: expected string or bytes like object. Basically, we will encounter this type of error, when we are working with a regular expression and we are trying to replace any value with some other value.

Example 1:

import pandas as pd
import re

data = pd.DataFrame({'Name':["Alpha", "Beta", 12, "Gamma"]})
print(data)

data['Name'] = [re.sub(str(i),"Omega", i) if i == 12 else i for i in                                                                           data['Name']]
print(data)

Output:

PS C: \ Users \ ASUS \ Desktop \ Crazy Programmer Work > python -u " c : \ Users \ ASUS \ Desktop \ Crazy Programmer Work \ test.py "
    
      Name
0  Alpha
1   Beta
2     12
3  Gamma
Traceback (most recent call last):
  File "c :\ Users \ ASUS \ Desktop \ Crazy Programmer Work \ test.py ",  line 8, in <module>
    data['Name'] = [re.sub(str(i),"Omega", i) if i == 12 else i for i in data['Name']]
  File "c :\ Users \ ASUS \ Desktop \ Crazy Programmer Work \ test.py ", line 8, in <listcomp>
    data['Name'] = [re.sub(str(i),"Omega", i) if i == 12 else i for i in data['Name']]
  File "C : \ Program Files \ Python382 \ lib \ re.py", line 208, in sub
    return _compile(pattern, flags).sub(repl, string, count)
TypeError: expected string or bytes-like object

Here we have a DataFrame in which there are some data. In the initial stage when we are trying to print it, it is printed successfully.

Let us suppose we want to change the value of 12 in the Name column.

When we are trying to change it, it is giving the same error as we have discussed earlier.

So we have to check our code that whether the bug is there. As I described earlier this error occurs when we are trying to give any other datatype value different from its normal type which is required in the operation.

Here we are using a regular expression to replace the integer value with a string value.

So, we have to make a simple change in our code to execute it successfully.

As we can see from the documentation of regular expression that re.sub() function required its third parameter as a string but in the code we have passes it as integers.

Solution:

To resolve it, we have to pass the third parameter named I as a string. We have to write str(i) instead of I to remove this error.

import pandas as pd
import re

data = pd.DataFrame({'Name':["Alpha", "Beta", 12, "Gamma"]})
print(data)

data['Name'] = [re.sub(str(i),"Omega", str(i)) if i == 12 else i for i in data['Name']]
print(data)

Output:

PS C: \ Users \ ASUS \ Desktop \ Crazy Programmer Work > python -u " c : \ Users \ ASUS \ Desktop \ Crazy Programmer Work \ test.py "
    Name
0  Alpha
1   Beta
2     12
3  Gamma
    Name
0  Alpha
1   Beta
2  Omega
3  Gamma

As we can see that after passing the third parameter as string, we are successfully able to perform the desired operation using regular expression.

We have successfully changed the value of integer 12 to string Omega.

Example 2:

import re
list1 = ['Alpha', 'Beta', 'Gamma', 40, 30]

list1 = [re.sub(str(item), "this", item) if item in range(10, 41) else item for item in list1 ]

print(list1)

Output:

PS C: \ Users \ ASUS \ Desktop \ Crazy Programmer Work > python -u " c : \ Users \ ASUS \ Desktop \ Crazy Programmer Work \ test.py "
Traceback (most recent call last):
  File "c :\ Users \ ASUS \ Desktop \ Crazy Programmer Work \ test.py ", line 59, in <module>
    list1 = [re.sub(str(item), "this", item) if item in range(10, 41) else item for item in list1 ]
  File "c :\ Users \ ASUS \ Desktop \ Crazy Programmer Work \ test.py ", line 59, in <listcomp>
    list1 = [re.sub(str(item), "this", item) if item in range(10, 41) else item for item in list1 ]
  File "C: \ Program Files \ Python382 \ lib \ re.py ", line 208, in sub
    return _compile(pattern, flags).sub(repl, string, count)
TypeError: expected string or bytes-like object

In this example, we are trying to replace some values in the list which are integers ranging from 10 to 40. We are performing this operation using sub() function in a regular expression.

As we can see that we have encountered with the same error. Whenever we are working with sub() function, then we have to cross check that we are passing the correct argument type else we will encounter the same error and it is a little bit difficult to find where the exact error is.

As we can see that we are passing the third argument as an integer that why we have encountered the error.

Solution:

We can resolve this error by passing the third argument as string type by converting it into a string.

Let’s see the corrected code and its output.

import re
list1 = ['Alpha', 'Beta', 'Gamma', 40, 30]

list1 = [re.sub(str(item), "this", str(item)) if item in range(10, 41) else item for item in list1 ]

print(list1)

Output:

PS C: \ Users \ ASUS \ Desktop \ Crazy Programmer Work > python -u " c : \ Users \ ASUS \ Desktop \ Crazy Programmer Work \ test.py "
['Alpha', 'Beta', 'Gamma', 'this', 'this']

As we can see that after passing the third argument as a string, we have successfully fixed the error which was shown earlier.

Conclusion

This type of error mostly occurs when we are working with sub() function in a regular expression. This work of this function is to replace a given pattern with some string. We have to be careful when we are passing its arguments. We have to check which type of argument is required to perform the operation. Whenever we pass the argument of other type which is not required then we will encounter this type of error.

The post Solve TypeError: expected string or bytes-like object in Python appeared first on The Crazy Programmer.


from The Crazy Programmer https://ift.tt/TNdb79B

In this article we will go through the Type Error: only integer scalar arrays can be converted to a scalar index and what causes this error and how can we overcome this error and get some changes in the code so that we can get the proper solution to resolve it. This normally tells about that when we are trying to convert a simple array into a scalar index. The other reason why this error comes is that when we are trying to concatenate and that time we are not passing tuple or list for concatenation and this becomes a major problem.

In the examples we are taking we are trying to concatenate two arrays by function then the function will always concatenate two or more arrays of the same type as always. Concatenation is always done row-wise and column-wise and by default it always takes row-wise.

Case 1:

Suppose we are taking two arrays which are having the fruits name and then we are trying to concatenate the two arrays and for the concatenation function we are assigning other variables.

import numpy
array1 = numpy.array ( [ 'Apple' , 'Orange' ,  'Grapes',  'Chiku' ] )
array2 = numpy.array ( [ 'Papaya' ,  'Banana' ] )
array3 = numpy.concatenate ( array1 , array2 )
print(array3)

When we are trying to concatenate, we are getting an error as we need to convert array1 and array2 into tuple or list.

Output:

PS C : \ Users \ ASUS \ Desktop \ TheCrazyProgrammer Work > python .\ test.py
Traceback (most recent call last) :
  File " .\test.py ", line 4, in <module>
    array3 = numpy.concatenate ( array1 , array2 )
  File "<__array_function__ internals>", line 5, in concatenate
TypeError: only integer scalar arrays can be converted to a scalar index

Solution:

To solve this error we will convert both the arrya1 and array2 into Tuple for concatenation so that the Tuple function will run the code without giving any error. Here the output is the list and we got the solution to remove the error and the revised code.

import numpy
array1 = numpy.array(['Apple', 'Orange', 'Grapes', 'Chiku'])
array2 = numpy.array(['Papaya', 'Banana'])
array3 = numpy.concatenate((array1, array2))
print(array3)

Now we have assigned tuple for concatenation then we are getting the output.

Output:

PS C : \ Users \ ASUS \ Desktop \ TheCrazyProgrammer Work > python .\ test.py
['Apple' 'Orange' 'Grapes' 'Chiku' 'Papaya' 'Banana']

Case 2

Suppose we are taking a particular list in which we are assigning some range and then we are doing some indexing operation so that we can get the random choice of the spices.

import numpy as np

par_list = list(range(500))
spices = np.random.choice(range(len(par_list)), replace=False, size=200)
print(par_list[spices.astype(int)])

But when we are running this code then we are getting the error.

Output:

PS C : \ Users \ ASUS \ Desktop \ TheCrazyProgrammer Work > python .\ test.py
Traceback (most recent call last):
  File ".\test.py", line 4, in <module>
    print(par_list[spices.astype(int)])
TypeError: only integer scalar arrays can be converted to a scalar index

Solution:

To solve this error we are trying to convert the simple array into numpy array. Here the output is the list and we got the solution to remove the error and the revised code.

import numpy as np

par_list = list(range(500))
spices = np.random.choice(range(len(par_list)), replace=False, size=100)
print(np.array(par_list)[spices.astype(int)])

Output:

PS C : \ Users \ ASUS \ Desktop \ TheCrazyProgrammer Work > python .\ test.py
[396  80 279 404 411  52 321  95 430 196 462  39  43 200 178 275 307 387
  89 454  59 175  23 360 458 198 492 453 186  35 137 432 306 173 415 248
  56 284  85 327  73 197 277 324 358 421 334 191 374 144 308 208 268 372
 210  19 294 274  67 250  70 185 354 305 150 273 316 129  69 391  11  32
 496 136 470 436 126 383 361 389  45 145 450 386  28  25 259 328 364   1
  36 452 446 116 152 207 146 141   9 177]

Conclusion

As we have seen two cases above in which first we are given two arrays and when we are assigning the tuple then we are getting the output for the error only integer scalar arrays can be converted into scalar index. We will have to see whether we have assigned the tuple or list for the arrays for the concatenation as the list catenation can be done for the arrays.

For the next case, we have to convert the simple array to numpy array for the running of code error free. This way we are solving the error and the error most occurs for the row-wise arrays concatenation done normally in the python codes. And lastly, about the error, we have to see that by a single numpy.concatenate() method we get the error removed and for converting the arrays we use np.array () by which error gets removed.

The post Solve TypeError: only integer scalar arrays can be converted to a scalar index appeared first on The Crazy Programmer.


from The Crazy Programmer https://ift.tt/GetJknI

In our daily life whenever we are trying to solve any real life problems then we may have to write some conditional statements very often. A simple if condition takes 2 or 3 lines if we want to process a statement in it. Suppose we have to write more than 10 conditions in a program. We can see it will take approx 40 to 50 lines of code where we are just repeating the things.

So, python allows us to write the if conditions in a single line which is often called one liner if in Python. This will make our code more readable and less redundant. By using this functionality, we can reduce some spaces in our python code.

Now we will see all the types by using which we can write a one liner if condition in python.

Also Read: Python One Line for Loop

First, we will see a general method of if condition and its output.

# General Method for If Condition in Python
num = 6
if num % 2 == 0:
    print("Even")

Output:

PS C: \ Users \ ASUS \ Desktop \ TheCrazyProgrammer Work > python - u " c: \ Users \ ASUS \ Desktop \ TheCrazyProgrammer Work \ test.py "
Even

In the above example, we are trying to write a condition to print “Even” if the input number is Even. We can see that if takes 2 lines of code to write this single condition.

Now we will see how we can write the same example in a one liner. There are 2 ways to write it. We will go through both ways one by one.

Python One Line if Statement

Method 1:

# One Liner which is mostly same as general Method
num = 8
if num % 2 == 0: print("Even")

Output:

PS C: \ Users \ ASUS \ Desktop \ TheCrazyProgrammer Work > python - u " c: \ Users \ ASUS \ Desktop \ TheCrazyProgrammer Work \ test.py "
Even

Explanation:

In the above one liner we can see that it is the same as general method, the only difference is there that we did not give the indentation in the code.

Method 2:

# One Liner where first we write what we want to do 
# if the conditions are met and after that we write the condition
num = 6
print("Even") if num % 2 == 0 else None

Explanation:

In this type of one liner first, we write the statement we want to perform when the conditions are met and after that, we write the condition. We are also writing the else block as Node because in this type of one liner only if statements are not supported, we have to write else statement also. If we do not want to perform any operation in the else block we simply write None after else.

We can use one liner to assign a value to a variable when certain conditions are met.

Example 1:

# Set salary to 10000 if age is greater than 18
age = int(input("Enter Age : "))
cond = age > 18

salary = 10000 if cond else None
print(salary)

Output:

PS C: \ Users \ ASUS \ Desktop \ TheCrazyProgrammer Work > python - u " c: \ Users \ ASUS \ Desktop \ TheCrazyProgrammer Work \ test.py "
42

Example 2:

# Set salary to 10000 if age is greater than 18
age = int(input("Enter Age : "))
cond = age > 18

salary = 10000 if cond else None
print(salary)

Output:

PS C: \ Users \ ASUS \ Desktop \ TheCrazyProgrammer Work > python - u " c: \ Users \ ASUS \ Desktop \ TheCrazyProgrammer Work \ test.py "
Enter Age : 19
10000

If we input age less than 18 then it will print None.

Explanation:

In above example, we can see that we can use one liner to assign a value to the variable if the certain conditions are met. In the example we are setting the salary value to 10000 if the age is greater than 18 otherwise, we are setting the value of salary to None.

Conclusion

In python, we can use one liner if conditions to write some conditions in a better way in our programs. These one liners will helps us to make our code less redundant and more readable.

We can also use one liners to assign a value to a variable if a certain condition is met otherwise we can set it to None value.

The post Python One Line if Statement appeared first on The Crazy Programmer.


from The Crazy Programmer https://ift.tt/xZ109VF

Today, game development is one of the biggest industries in the world with thousands of developers creating games in every niche. By 2025, the game development market size is expected to reach over USD 250 billion.

Game development is complex and involves many complicated components in its development workflow due to which game developers struggle to build high-quality gaming experiences. Virtual Assist aims to help you make the most of your development workflow.

In this blog, we’ll discuss everything about optimizing game development workflows, guiding game developers and designers to build better games.

What is Game Development?

Game development is the process of designing, modeling, developing, and updating games. It is a lengthy and complex process that includes pre-production, production, and post-production phases. While creating a game, player levels, stage design, engagement, game mechanics, and input functionalities of the game should be a game developer’s top priority.

People prefer playing games that are more user-friendly and effortless, which relieves their stress and are easy to play. Game developers try to make a less complicated user interface while developing complex game functionalities simultaneously.

Game Development Workflow

What is Game Development Workflow?

A game development workflow is the step-by-step production of any game. It’s about how the development and production of a game will be managed. While a game is in creation, some basic steps must be followed:

  1. Planning is the most important phase of game development as it will give a rough idea of what the game will look like. A game developer should begin with planning the game, its graphics, cost, game engine, timeframe, characters, target audience, features, and release. 
  2. The second stage of a game development workflow is pre-production. This stage includes the meeting of all team members that are involved in the production of the game.
  3. Production is the next stage in the game development workflow. All of the ideas are brought to fruition in this stage, from graphics to functionalities, characters, and sound effects, everything is designed and built.
  4. Testing is a very crucial phase in game development. When a game is produced, it is essential to test it and scrutinize it for any bugs or errors. 
  5. For game developers, the pre-launch period is a difficult time. To advertise the game, marketers launch a combination of animated cutscenes and demo games to generate audience interest.
  6. The game launch has to be the most anticipated stage for game developers. By now, every bug and error is removed and the game is perfected to be released in the market.
  7. During the post-launch period, game developers are devoted to detecting and resolving issues. Players are also asked to send bug reports or give feedback about the game through web forums. An additional aspect of post-launch is the provision of frequent game upgrades and patches.

How Can You Get Started in Game Development?

Game development is not straightforward. To get started in game development you should follow these steps:

  • In the beginning, an aspiring game developer should learn at least one programming language. Pick whichever programming language suits you best and start writing codes in it.
  • When you are adept in coding, start experimenting with different game development engines like Unity, Unreal, or CryEngine.
  • Begin with simple 2D gaming projects that work with built-in tools and objects.
  • After you are an expert in 2D game development, start learning about 3D graphics and game development.
  • Take small steps and don’t rush things.

How Can You Make the Most of Your Game Development Workflow?

Being a game developer means you have several different projects to work on. You should learn to make the most of your game development workflow to make the most of your time. Below are some tips on how you can do that.

Divide Tasks

If a single game developer is managing all of the tasks of game development then it could get extremely hectic which can result in missing project deadlines. To avoid this from happening, focus on one task at a time and hire people for other development tasks.

A game development project should have a developer, a designer that could design 2D and 3D game assets, and a quality assurance resource that could analyze and test the gaming functionalities. This will make the workflow quicker and more manageable. It will also save time and energy, and all of the projects will be delivered beforehand.

Be Consistent

Consistency is the key to success. Taking long breaks while working on a project will make it more lengthy and tiring. Write code constructs regularly as consistency and practice will result in the rapid development of game tasks, saving you valuable time. When time is used most efficiently, game development workflow will improve automatically.

Set Working Hours

Having a proper work routine is very important otherwise you could face extreme procrastination. Set up specific work hours in the day and strictly follow them.

During work hours, try to avoid any distractions and manage tasks efficiently which results in the rapid progress of the game development workflow.

Develop Different Prototypes

Prototyping is a vital component of the game development workflow. Different prototypes must be created before the actual production of the game to make sure minimum errors occur and every aspect of the game is assessed.

Developing prototypes at the start of the game production makes the workflow less complicated and saves a lot of time because when different prototypes are tested, a game developer has an idea of which errors may emerge.

Set a Healthy Budget

For an effective game development workflow, you should always set aside a healthy budget to pay from. On average, a game requires USD 50,000 to USD 1 million[2] to create. This amount depends on the size of the game and the development team. A team with more experienced game developers will cost more but the workflow will be maximized.

A major game development expense is wages to your team, whether they are programmers, designers, testers, or marketers. Game development and marketing necessitate effort and hard work from a large number of people who spend a significant amount of time and practice a fair bit of innovation.

Ready to Maximize Your Game Development Workflow?

Unexpected complications may cause chaos during game development. In this article, we have shared game development tips to save developers from frequently recurring issues and empower them to launch the finest games imaginable!

To maximize game development workflow, you should be consistent, and diligent. If you want to make the most of your game development workflow but lack programming dexterity then we recommend using Virtual Assist. It will examine and rectify your code, refactor its intricacy and provide assistance that will help in the creation of high-quality game scripts.

The post Game Development Workflow – Getting the Most Out of It appeared first on The Crazy Programmer.


from The Crazy Programmer https://ift.tt/coV50xp

Distributed tracing is a method used to trace messages flowing through your business applications built using various Azure services, where they are well-suited for tracking and identifying any unexpected performance failures.

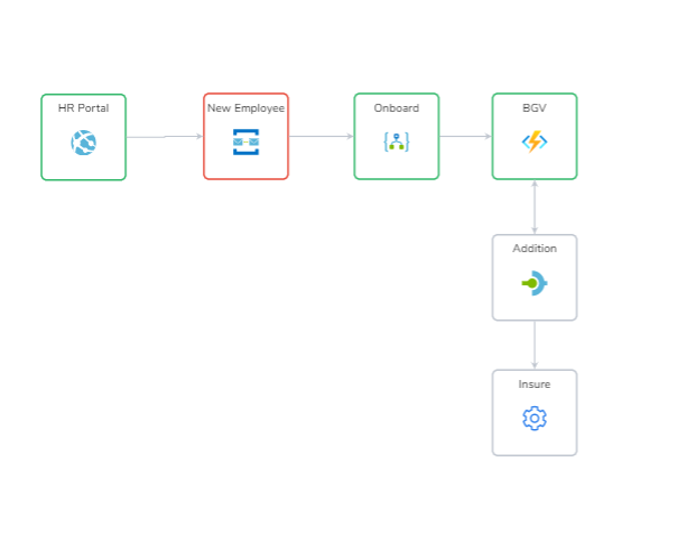
For instance, consider an employee onboarding application that involves multiple Azure services and on-premises components. Then, it might be challenging to trace and get complete visibility of data transferred between those services. That is where exactly distributed tracing can help you!

Serverless360 1

Hence, this blog aims to provide you with an ultimate solution that can meet all your logging and tracing needs, especially for cloud-native and hybrid applications involving Microsoft Azure.

Why Distributed Tracing for Azure and Hybrid Applications?

Distributed tracing is one best way to achieve ‘real-time’ visualization of how the message flows within your system, helping your Azure operations team better analyze your business process’s performance.

In all business sectors, including finance, healthcare, logistics, retail, telecommunications, and more, end-to-end tracing is widely used to address visibility challenges. Similarly, tracking is necessary for Azure and hybrid solutions to quickly understand the message flow, maximize visibility, pinpoint bottlenecks, eventually reduce the overall application downtime.

But wait, if you are relatively new to phrases like business processes and transactions, then it is better to understand them since they will be constantly used as we dig deeper into the topic.

The business process represents your entire application workflow and will have a group of business transactions that are nothing but a set of activities within a workflow.

Significant Benefits of End-to-end Distributed Tracing

  • You will be able to get a unified view of your message workflow
  • Intuitive dashboards to visualize the correlation between messages
  • Monitor the performance of your business processes in real-time
  • Track every stage in your business flow
  • Resolve business failures before they affect the end-customer
  • Reduce or eliminate the need for manually generating historically based reports

Do Organizations Still Build End-to-end Logging and Tracking Custom Tools?

Application Insights of Azure Monitors does offer a feature called Application Map, which helps you understand the relationship between the distributed Azure Services. Still then, it would be challenging to visualize how your message flows through those services.

When connected with Log Analytics, it is even possible to log the monitored data, but everything is more for individual Azure services and not for an entire application. 

That is why organizations generally build their logging and end-to-end tracing tools for Azure-focused solutions.

But the actual problem is it involves too many manual tasks, requiring an additional workforce, which forces even the Azure developers to write code to develop custom tracking tools instead of letting them focus on developing business applications. That is how third-party monitoring tools became inevitable to avoid the complexities of building custom tools.

There are many options available in the market, and each has its benefits. We will exclusively focus on Serverless360 BAM and how it stands out from the rest.

Serverless360 – A Comprehensive End-to-end Tracking Solution

Serverless360 BAM allows the business users to track, visualize and identify failures in the message flow across the distributed Azure services. Here is an outline of how you can set up tracking in Serverless360 for your applications involving different Azure services.

  • Configure Azure SQL Database and Blob Storage to store the tracked data and the message details.
  • The next step is defining the business processes to visualize their flow and configure the stages in each business transaction to capture the necessary properties. 
  • Then, instrument your business process for message tracking. You can leverage the custom connectors if you have Logic apps involved in your integration. If there are other services like Custom Apps, Function Apps, APIM, you can track the messages using the .Net library and SDKs from Serverless360.

Serverless360 is all set for tracking your business applications with these quick steps. You can check out their documentation to clarify the above process.

Key Features of Serverless360’s Business Activity Monitoring (BAM)

Visualize Message Flow

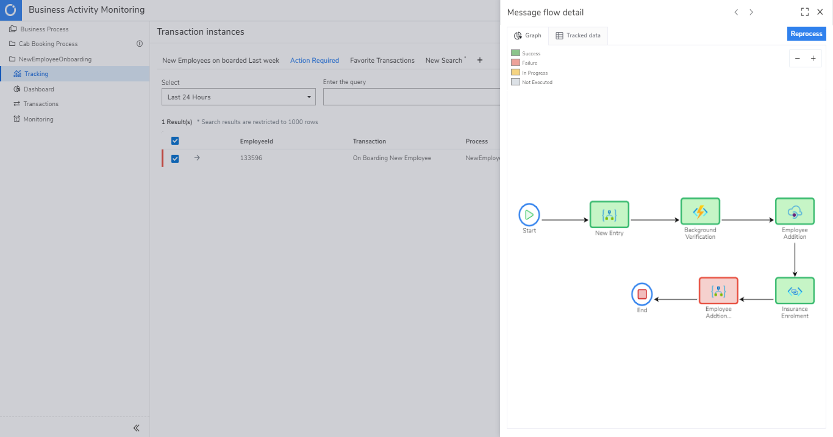
Serverless360’s BAM visually represents your business workflows, making it easier to correlate the messages flowing through various Azure services of your complex integrations.

In addition to that, each stage in your message flow will be depicted in different colors indicating their status (success, failure, In-progress, Reprocessed, etc.), so you will spot the failures at a glance.

Serverless360 2

Repair and Reprocess Failed Transactions

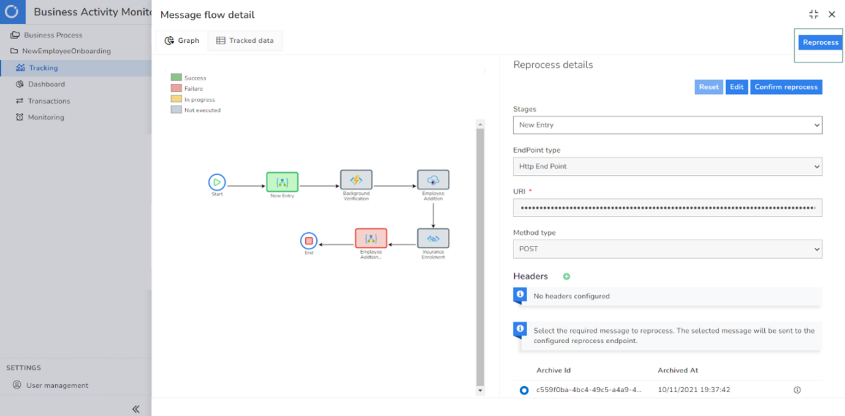
Each transaction in your business workflow will be tracked, which helps to identify the root cause and resolve the transaction failures at ease. But, among the many transactions involved, it might be hard to spotlight the failed ones alone. Under such circumstances, Serverless360 brings the faulty transactions in a separate tab, “Action required.”

This way, you can easily segregate the failed transactions, modify the necessary value and reprocess them for a successful resubmission.

Serverless360 3

The platform further supports Bulk reprocessing and Dynamic reprocessing.

Query Search

Serverless360’s BAM lets you fetch business-critical data from many transactions using simple queries, which you can then save, and re-use whenever needed.

Serverless360 5

Out-of-the-box Monitoring Support

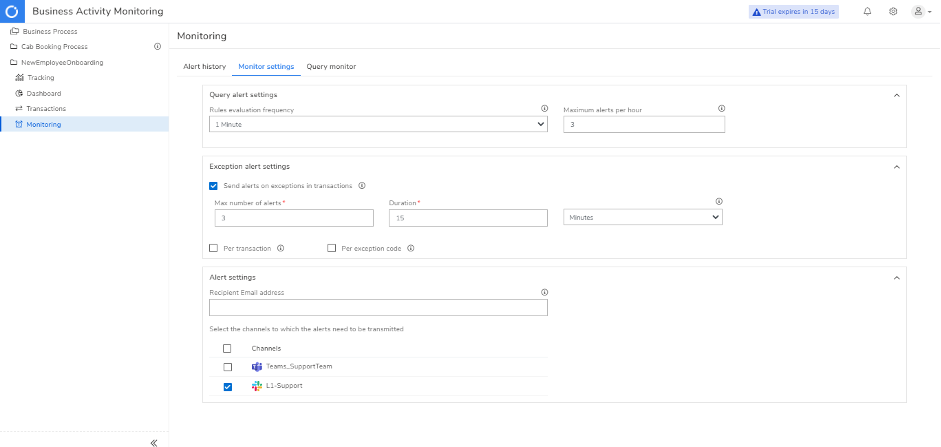
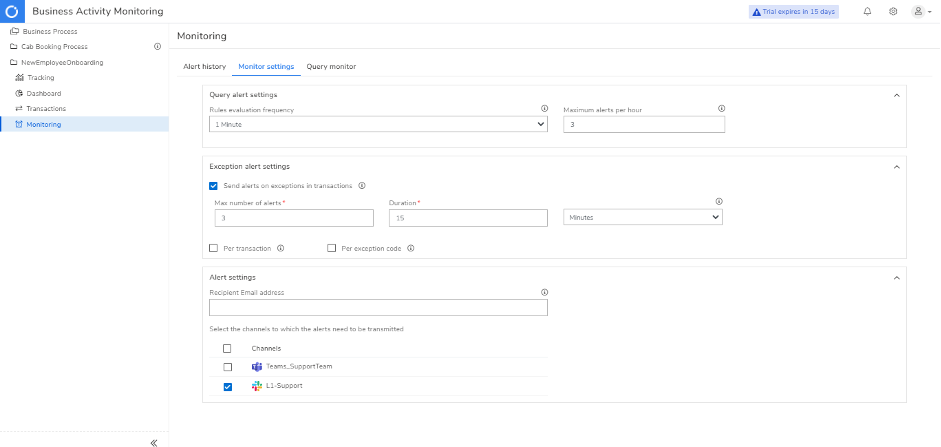
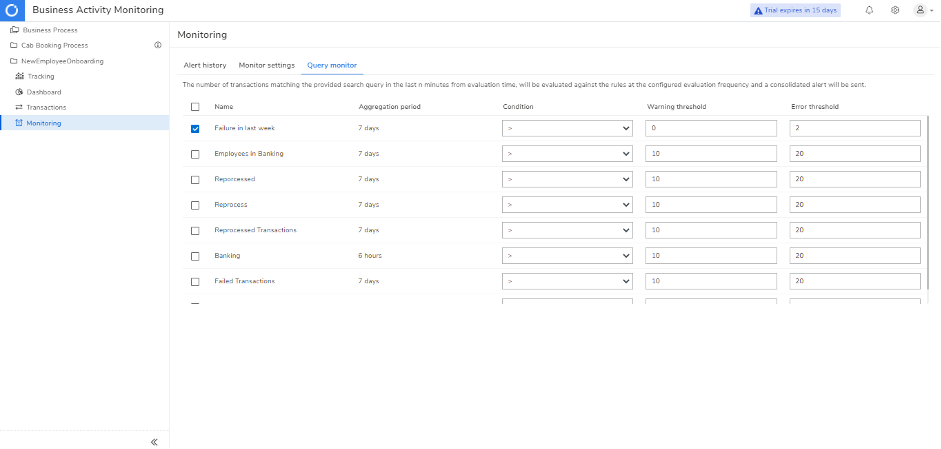
Monitor your business processes on various aspects and instantly alert via different notification channels by setting up maximum thresholds. There are two primary monitoring types offered by Serverless360 BAM – Exception Monitoring and Query Monitoring.

Exception Monitoring: Any exceptions occurring within a specified period will trigger an alert. For example, if there are any exceptions within the last 20 minutes, you will be notified.

Serverless360 6

Query Monitoring: This keeps you informed about the performance of your business processes by monitoring them based on different queries. For example, you can choose to get either a warning or an error alert when failures detected within a specific time duration reaches the threshold limit.

Serverless360 7

There is also an alert history tab, which lists all the alerts generated by Query and Exception Monitoring so that you can view all the alert details and figure out the failed ones.

Dashboard

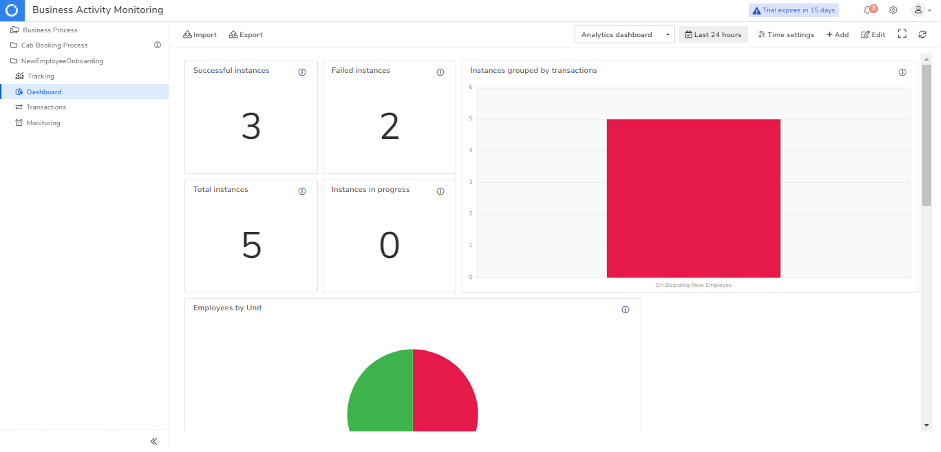
You can view and analyze the tracked data using Serverless360 BAM’s real-time dashboard, which gives you a visual representation of the data in charts and reports. You can quickly detect anomalies and visualize data trends that can help take appropriate corrective measures.

Below is an example of Serverless360’s BAM dashboard, allowing you to instantly see when there is a spike in failed transactions to find out what the problem is and fix it.

Serverless360 8

Conclusion

As mentioned above, in a real-time business scenario, any Azure or hybrid application will incorporate several services, making it difficult to visualize the flow of messages. In this blog, we discussed how Serverless360 BAM (15-day free trial) could be used to achieve end-to-end visibility, visualize message flow, monitor business processes, detect failures, perform root cause analysis – all in a single platform. Further explained how distributed tracing can be helpful and why using third-party BAM tools can be more effective than building custom tracking tools.

The post Serverless360 – Ultimate Solution for All Custom Logging and Tracking Needs appeared first on The Crazy Programmer.


from The Crazy Programmer https://ift.tt/OeJ9uFi

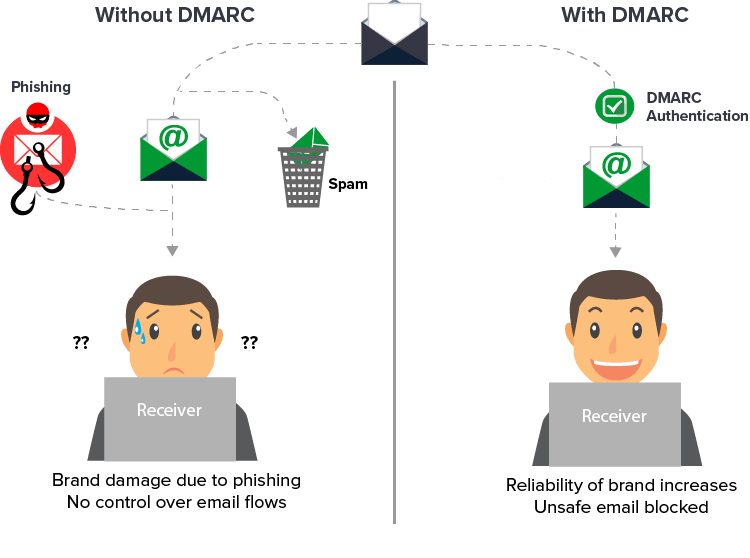
The email validation system, known as DMARC (Domain-based Message Authentication, Reporting, and Conformance), is meant to safeguard your company’s email domain from being exploited for phishing, email spoofing, and other cybercrimes.

For email authentication, DMARC records use SPF and DKIM. With DMARC, you can do reporting, which is a critical feature. By publishing a DMARC record in their domain’s DNS, domain owners may see who is sending emails on their behalf.

Using this information, you may receive further information about the email channel. A domain owner may take control of the email sent on his behalf using this information. Your domain may be protected against phishing and spoofing attacks by using DMARC.

You, as the owner of a website, want to be certain that only emails that you have sent will be seen by your visitors or customers. As a result, DMARC is a must for all domain registrants.

DMARC provides email recipients with the assurance that an email they receive from you is authentic and has come from you. In addition to improving email delivery, this prohibits others from utilizing your domain to send emails.

DMARC: A Brief History

In 2012, the DMARC standard was issued for the first time in an attempt to stop email misuse. The DMARC standard was produced by PayPal, Google, Microsoft, and Yahoo! in collaboration with each other.

In order to acquire official standard status, these industry experts joined together to produce an operational specification. The DMARC standard was built on the SPF (Sender Policy Framework) and DKIM (DomainKeys Interoperability Markup Language) authentication methods (Domain Keys Identified Mail).

At its inception, the DMARC system was designed to protect email communications. DMARC was first accepted mostly by finance sector security specialists. Since then, the use of DMARC has grown and expanded throughout the internet. DMARC is becoming more and more accepted by email marketers as a means of enhancing internet security and enhancing email delivery.

All major Internet service providers (ISPs) presently support DMARC. DMARC is now in the process of being accepted as an open standard by the Internet Engineering Task Force (IETF).

What is the Purpose of DMARC?

The email channel has the widest reach as compared to any other medium, with about 5 billion global email accounts. As a result, cyber thieves have a strong interest in using this route for their nefarious activities. Despite increased security measures in previous years, criminality on this channel continues to rise each year. Most hacking and data breaches occur via email.

In this context, domain-based authentication reporting and compliance (DMARC) is a valuable tool for organizations. DMARC makes phishing assaults transparent as well as providing comprehensive visibility into email channels. 

DMARC is more powerful: DMARC can mitigate the effect of phishing and malware assaults, prevent spoofing, guard against brand misuse, frauds, and prevent corporate email penetration. DMARC Analyzer makes it easier for organizations to implement DMARC and streamlines that process.

What can DMARC Accomplish For You?

DMARC can protect organizations and their clients against malicious emails sent on their behalf. DMARC provides an organization with access to its email channel’s information. Organizations may use this information to develop and enforce a DMARC policy.

Rejection of DMARC policy to reject protects companies from:

  • Customers of the organization are being phished.
  • Scams and misuse of a well-known brand
  • Ransomware and Malware assaults
  • Employees are at risk of falling victim to spear phishing and CEO fraud.

DMARC Analyzer provides enterprises with a comprehensive view of their email channel. DMARC’s ability to obtain complete visibility into the email channel is a major benefit since companies previously only had access to phishing assaults after they had already occurred. With DMARC, phishing attempts may be analyzed and prevented. As a result, clients are more prepared and aware of these threats.

When it comes to email fraud detection, DMARC is the most important tool in the toolbox. Phishing schemes, such as those that send emails on behalf of banks using legitimate-looking websites, are an example. In the minds of customers of that bank, an email claiming that their bank card is no longer valid is a legitimate one. 

The link you’re about to click will take you to a shady website. Logging on to this website, which is a perfect replica of the genuine thing, will provide hackers access to your credentials.

The post The Importance of Having Proper DMARC Records appeared first on The Crazy Programmer.


from The Crazy Programmer https://ift.tt/OyTZBSC

Currently, the HTML editor Windows has already undergone many developments. But with all these changes, there are still many people who do not know about the secrets of HTML editors for this operating system.

If you are one of them, then this article is for you. Here, we will tell you the best-kept secrets about HTML editors for Windows that will make your life easier.

The best part is that there is no need to install any software besides your current HTML editor to use these secret features. Many HTML editors for Windows have these hidden features built-in that make them far more valuable than a simple text editor.

But before we go ahead and tell you all about them, let’s look at some of the reasons why you should use an HTML editor for Windows.

What is an HTML Editor And Why Should You Use It?

HTML editor is an application that helps you create, edit, and publish your website. It supports all major web browsers and works with any Windows computer. You can use an HTML editor to create and edit web pages, online forms, and HTML documents.

The most important feature of this program is that it enables you to create your own website. An HTML editor allows you to publish your website on the web or local intranet with one click. You can also use it to compose file types such as PDF files, presentations, e-books, and any other printable encoding format.

What are the Best Kept Secrets of HTML Editors for Windows?

The Best Kept Secrets About Html Editors For Windows

1. Text Editor

HTML editors can easily take on the role of your text editor. With an advanced text editor in your hands, it will be much easier to write your own content or edit blog post written by others on your website.

Plus, there are many advanced features in HTML editors for Windows that can help make your work easier than ever before. These advanced features include undoing changes, adding links, comments, and inserting other code such as Inline Frames (IFrames) and Cascading Style Sheets (CSS).

HTML editors also have a preview feature, so you can also view your HTML document in a more “human-readable format”, meaning you can see the result of your editing with ease and fix your mistakes in advance.

2. Page Navigation

A common problem that arises when you are working on a website is the problem of page navigation format.

With an HTML editor for Windows, you can quickly and easily navigate through the different pages of your website. This makes it easy to go back to a previous page or go forward to a new page on your website.

An HTML editor for Windows also gives you the ability to copy text from one page to another or even copy the entire source code and style attribute of one page and paste it into another.

3. Build Basic and Advanced Websites

It is possible to build basic and advanced websites with a dynamic HTML editor for Windows. In addition to basic tasks like building web pages, you can also perform more advanced functions like managing contact forms, managing databases, and creating complex websites.

4. Easy to Learn

HTML editors for Windows are easy to learn and a great choice for both beginners and advanced users. Usually, they have WYSIWYG (What You See Is What You Get) web editor mode that is perfect for HTML beginners.

The interface of many HTML editors is also very easy to understand which makes it a piece of cake for people who are new to web designing or web development.

It also has a learning mode that allows you to take a look at how the interface works before you start using it. This makes it easier for you to learn how the interface works before you start editing the configuration values of your project file.

5. Advanced Design Features

HTML editors for Windows have advanced design features that can help you create even better websites.

A few of these features to explore are:

  • Creating an unlimited number of columns
  • Table and content formatting
  • Drag and drop functionality
  • Live previewing of content
  • Importing and exporting templates
  • Exporting HTML as a CSS (Cascading Style Sheets) file or as a JavaScript file

Once you have a grasp on the common features, you can also explore some more advanced features such as changing the page layout on the fly, adding comments to your website, working with multiple templates on one page, and many more.

These advanced features can help you create better websites than ever before.

6. Multi-Platform Support and Efficiency

Most HTML editors support multiple platforms such as Windows, Mac OS X, and Linux. This makes it easier for you to work on your website in the best way possible no matter what operating system you are using on any given day.

Command-line tools are also available with most HTML editors for Windows that allow you to work on your website in a much more efficient way.

7. Support for Plug-Ins

With an HTML editor for Windows, you can easily install plug-ins to make building and editing your web pages faster. Common choices are a spelling checker plug-in or an image insertion plug-in. This makes it easy for you to use the most advanced features that these plug-ins have to offer.

Source control systems such as Apache Subversion and GitHub are also supported. Many websites like Amazon and WordPress use source control systems to keep track of code changes on their websites.

8. High Compatibility

Configuration file compatibility varies between editors. Most of the tools in this category allow you to edit both CSS and HTML code at the same time. Most of them are useful in both Windows and Mac OS X operating systems.

The choice is up to you. Most HTML editors for Windows are compatible with other popular web browsers and for Internet Explorer versions earlier than version 9.

HTML editors are designed for editing code, but they can also be used for creating graphics, presentations, and even video clips with ease.

9. Fast and Reliable

Most HTML editors for Windows are fast and reliable. When you type a standard input, the text will display in a few seconds. These are also available for different types of documents such as emails, articles, forms, and more.

These editors can save you time and prevent you from having to write the same content again and again.

10. Easily Maintainable

With an HTML editor for Windows, you can easily maintain your website. This is because of the advanced features that these editors have to offer. You can easily make updates to your website by simply editing the source code and making changes to it in a very short time.

The security properties file that these editors offer is one of the best features. This is because you can easily make changes to your website without any worry about the possibility of any hacker making unauthorized changes to your website.

11. Multimedia Support

If you use an HTML editor for Windows, you can easily create multimedia like flash movies and animated gifs. You can also use the advanced features that these editors provide.

The project tree in HTML editors for Windows provides you with a comprehensive tree view of all the files. You can also select multiple files at once and copy, paste, or delete them.

12. Full Source Code Viewer

Full Source Code Viewer (FSCV) is a great tool that allows you to open and edit the source code of any web page. With this tool, you can edit your own web pages easily and quickly.

In addition, it has the capability to show all the cross-references and references in the file. This means that you can easily find what you are looking for in the source code of any web page.

Moreover, it supports syntax highlighting for HTML files and other markup languages like XHTML, XML, CSS, JavaScript and VBScript. With this tool, you can also save your edited files as HTML files for viewing on your computer or for sending to others by email.

It also has a spell checker that helps you correct mistakes in your source code. You can also preview pages as they will appear when viewed by others with this tool.

13. Image Compression

With an HTML editor for Windows, you can easily compress images to save space on your website.

Image compression is important because it allows you to reduce the amount of bandwidth that your website uses. Especially, if you have a large number of images on your website, you can use an HTML editor for Windows to reduce the size of images that your website needs to load. Having a fast load time is an essential component of any successful website.

14. Image Transfers

Image transfers are important to make a great presentation on your website. Many websites are now using image transfers to get a great look. This image transfer will be a great part of your website and it will make it look more professional.

How does it work? It will work on your website if you have proper web hosting. It will give you the right amount of speed so that your site can load quickly.

The file path will be automatically added to your website and you will not have to worry about it. The best thing about this is that it will work for all browsers and operating systems.

Ready to get started with a powerful HTML editor for Windows?

In this article, we have discussed the best-kept secrets about HTML editors for Windows. Hopefully, you will find this article useful and will be able to get a better idea about HTML editors for Windows.

UltraEdit is the most advanced HTML editor for Windows. It has a lot of advanced features that can help you to create and edit your website’s code. If you are interested in trying out these advanced features, download UltraEdit now!

The post The Best Kept Secrets About Html Editors For Windows appeared first on The Crazy Programmer.


from The Crazy Programmer https://ift.tt/VgTk3CP

In our daily life, we often write some big programs and some small level programs to solve the different problems. Whenever we try to solve a complex level problem, then we have to write so many lines of code.

In that code, we often use different types of loops like for, while, or any conditional statements like if, if-else or if-elif-else.

Sometimes we have to write the whole loop to process a single statement in the loop or a minimum of two or three statements. When we write this in our code it generally takes approx 4 to 5 lines to complete a general for loop in which we have to perform a single operation.

Case 1:

For example, I am showing you the code where we are trying to print whole numbers upto 5.

for i in range(5):
    print(i)

Output:

PS C : \ Users \ ASUS \ Desktop \ TheCrazyProgrammer Work > python -u " c : \ Users \ ASUS \ Desktop \ TheCrazyProgrammer Work \ test.py "
0
1
2
3
4

As we can see in the loop we are only printing the i value, it takes 2 lines to complete the loop and execute it.

If we want to process 2 or 3 statements in a loop, python allows us to do it in a single line only.

It is also called single liners in python. We can use a single line for loop to write the same program in less numbers of spaces. Although sometimes it increases the readability but if you are experienced with it then you will find it useful.

Now let’s see the one liner for the above example.

for i in range(5): print(i)

In the above example, we can see that we have written the same code in a single line only.

These single liners can be useful to quickly write a task in which we simply want to perform one or two operations.

Case 2:

In the above examples, we have seen how to write one liner for loop in which we have to perform a single operation. Now we will see how to write one liner for loop in which we have to perform some complex operations.

Let’s see the example where we are going to use a for loop and we will be using some if else conditions in that loop.

First, we will see how to write it in a traditional way, after that we will see how to write it in one liner way.

for i in range(10):
    if (i < 5):
        j = i ** 2
    else:
        j = 0
    print(j)

Output:

PS C : \ Users \ ASUS \ Desktop \ TheCrazyProgrammer Work > python -u " c : \ Users \ ASUS \ Desktop \ TheCrazyProgrammer Work \ test.py "
0
1
4
9
16
0
0
0
0
0

In this example, we are trying to print the square value of i when it is less than 5.

If it is greater than 5 then we simply print 0. As we can see in the example to write code for this problem, we use 6 lines to complete it. But using one liner we can complete it in a single line only.

for i in range(10): print(i**2 if i < 5 else 0)

We will get the same output in both of the cases. In one case we have written the code in 6 lines and in the second case we have written the code in 1 line only.

Although for a beginner I will recommend going with the traditional option only because as a beginner there will be some difficulty in understanding one liner.

The post Python One Line for Loop appeared first on The Crazy Programmer.


from The Crazy Programmer https://ift.tt/kdRIbJG

We know that in many languages like C, C++, Java, when we want to use any variable then first we have to declare that variable and after that, we can use that variable in our program.

The languages listed above are high-level languages that are compiled before it runs, but Python is a dynamically compiled language. In python, we don’t have to specify which type of variable we are going to use. Simply we have to write the name of a variable and we can use it as per our own like we can store an integer value or a string value in the same variable.

So the question comes, is it possible to declare a variable without value in python?

The answer is no, we cannot declare a variable without value in python. I will demonstrate an example to prove my point.

Let us see a basic addition of 2 numbers program in Python.

num1 = int ( input ( " Enter Number 1 : " ) )
num2 = int ( input( " Enter Number 2 : " ) )

print ( f " Sum is { num1 + num2 } " )

Output:

PS C : \ Users \ ASUS \ Desktop \ TheCrazyProgrammer Work > python -u " c : \ Users \ ASUS \ Desktop \ TheCrazyProgrammer Work \ test.py "
Enter Number 1 : 32
Enter Number 2 : 5
Sum is 37

Here, we are directly using the variable without declaring anything previously, because as python is a dynamic language it allows variables to be created at run time.

Now, we are going to see an example in which we will not assign any value to the variable in python, and let’s see the output in that case.

val

for i in range ( 10 ) :
    if ( val == None and i == 5 ) :
        print ( " I am in the if Block " )
    print ( i )

When we run this program then we will get an error.

Output:

PS C : \ Users \ ASUS \ Desktop \ TheCrazyProgrammer Work > python -u " c : \ Users \ ASUS \ Desktop \ TheCrazyProgrammer Work \ test.py "
Traceback ( most recent call last ) :
  File " c : \ Users \ ASUS \ Desktop \ TheCrazyProgrammer Work \ test.py " , line 47 , in < module >
    val
NameError : name ' val ' is not defined

We got NameError which tells us that the name of the variable we have used in our program is not defined.

We have not defined any value of that variable so the interpreter is not able to recognize the variable and it throws an error.

Python Declare Variable Without Value

We are going to see a trick to initialize any variable without a value, actually, this is not a trick but a way to initialize a variable when we do not want any value to set up at declaration time.

We can do it by setting the value of the variable to None.

We will modify our previous code to that it will be executed successfully.

val = None

for i in range ( 10 ) :
    if ( val == None and i == 5 ) : 
        print( " I am in the if Block " )
    print ( i )

Output:

PS C : \ Users \ ASUS \ Desktop \ TheCrazyProgrammer Work > python - u " c : \ Users \ ASUS \ Desktop \ TheCrazyProgrammer Work \ test.py "
0
1
2
3
4
I am in the if Block
5
6
7
8
9

We can see that our program is executed successfully.

In python, we cannot declare a variable without any value because python is a dynamic language and it does not allow variable without value. In python it is not necessary to declare the datatype of the variable, we can directly use the variable in our programs.

The post Python Declare Variable Without Value appeared first on The Crazy Programmer.


from The Crazy Programmer https://ift.tt/7ySszFQ

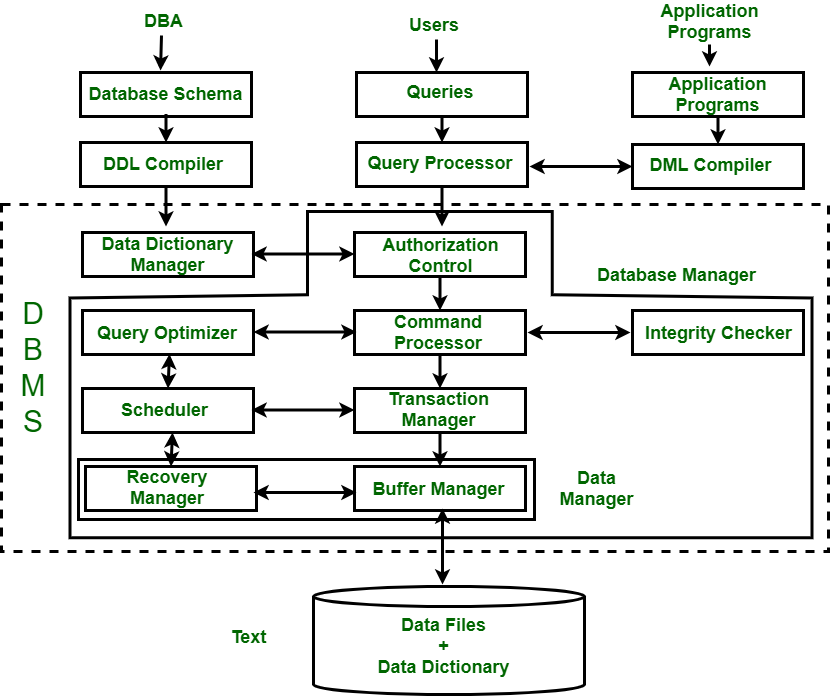
A database system is a very huge and complex application. To understand the complete structure of a database we should divide it into small modules. Let’s discuss them one by one in detail.

Users

Those who interact with the database. On the basis of how they use the database we can divide them into three categories:

  • DBA: Database administrator have full control on database. They may be a group of persons or a single person. They use Data Definition Language to pass on schemas and mapping constraints on database, which further passed to DDL processor.
  • Users: These are end users who actually use database for their own purposes. They pass queries with the help of interface system provided. These queries further passed on to the Queries processor.
  • Programmers: These are the persons who actually creates database and manages it technically. They use Data Manipulation Language statements to pass on application programs to database, which further goes to DML processor.

The Query Processor

In this section all the high level or user level commands, queries and statements are compiled or interpreted into low level language for further execution and storage.

Processors: These processors execute the different types of queries passed to them. As per the type of queries and statements passed on, we have three types of processors as per given below:

  • DDL Processor: These compile the data definition language statements passed by DBA and also convert the system generated output to the DDL statements for understanding of DBA. These are further divided in two segments as per given below:
    1. DDL Statement: Identify the DDL statements and convert them into the low-level language understandable to the data dictionary for further execution.
    2. DDL Compiler: Receive the data from DDL statements and compile them so that they can be executed by further processes.
  • Queries Processor: These compile the queries passed by end users and also convert the system generated output to the natural language for understanding of End users. These are further divided in two segments as per given below:
    1. Interactive Query: identify the Queries and convert them into the low-level language understandable to the data dictionary for further execution.
    2. Query Compiler: receive the data from Interactive Query and compile them so that they can be executed by further processes.
  • DML Processor: These compile the queries passed by application programmers and also convert the system generated output to the DML statements for understanding of Programmers. These are further divided in two segments as per given below:
    1. DML Statement: identify the DML statements and convert them into the low level language understandable to the data dictionary for further execution.
    2. DML Compiler: It compiled or translate the DML statements received by End users or programmers into a query language. This query language is consisting of low-level language so that query evaluation engine can understand it, execute it and performed the required or desired operation.
  • Query Evaluation Engine: This is the actual processor which executes all the translated or interpreted low level commands or queries received from above mentioned processors.
  • Embedded DML pre-compiler: It received the application embedded DML statements and converts them to normal procedure calls in the host language used. Also, the pre-compiler interacts with DML compiler to generate the appropriate code to remove conflicts.
  • DDL Interpreter: It interprets DDL statements and saves the data definitions in the data dictionary for further records.

Storage Manager

This is a specific program module that provides the interface between the low-level data stored in the database and the application programs along with the queries passed to the system by users or other processes of the database. It provides the interaction with the file manager and manages all storage available and try to optimize the use of storage. The further parts of the storage manager are as given below:

  • Data Dictionary: It stored meta data, means data about data. It helps the overall system to identify the data type received or generated. It’s also helps to separate the schemas data language, interactive queries passed by end user and the DML statements or application programs for better understanding of system and smooth functioning.
  • Authorization and Integrity Manager: As name implies its checks and allot the authority of the user and manages the integrity constraints applied on database.
  • Command Processor: Execute the commands received from the compilers.
  • Query Optimizer: This optimize the queries so that these queries can be processed in the minimum resource utilization.
  • Transaction Manager: It manages the over all transactions performed in the complete system for smooth and conflict free experience. Also, it ensures that the database should be remain in consistent state because each and every transaction affects the database.  
  • Scheduler: As name implies it schedules all the tasks in the system including queries execution and transaction management.
  • File Manager: It is responsible for allocation of space on disk storage and also manages data structures and techniques used in representation of the information stored on the disk.
  • Buffer Manager: This manages and controls that how the required data maybe fetched from storage and transferred to the main memory. Also manages the reverse operation as well.
  • Recovery Manager: It is like backup and restore option. All the operations and transactions and all the changes made are going through this section so that it can keep track and record of all these activities. So that whenever required it can provide the backup or roll back the operations.
  • Physical Database: This is actual physical storage where all the low level or real data is stored. This can only save the data and transfer it when ordered.

Disk Storage

This manages the overall storage available. This can be further divided into these below sections:

  • Data Files: It is actually the stored data. A data file is a storage block or bucket in which data can be stored. Data files have variable sizes.
  • Data Dictionary: It stores the data about data. Means what data is stored where at which time and how to reach there.
  • Indices: This works as a up to date index of all data items. It helps to fast access to all these data items.
  • Statical Data: As name implies it stores the statical information about any data present in database.

The post Overall Structure of DBMS appeared first on The Crazy Programmer.


from The Crazy Programmer https://ift.tt/skVul5F

Running a computer program takes some time to complete. If it is a big task then it can take more time and if it is a small task then it will take less time to complete.

For example, let’s consider our operating system and an application called WhatsApp which is a social media platform for communication. We all know that when we start an operating system then it takes some time to completely boot it up. Because an operating system consists of so many heavy tasks and programs, booting up means getting everything ready to work.

An application takes so much less time than an operating system because the application is not consisting the big tasks like an operating system.

How to Measure Execution Time in Python?

If we have written a program and we want to know the time which it takes to execute, then we can know the exact time duration by using some methods in python language.

We can perform this task by using the time module, which is an inbuilt module in python.

Example 1

from time import time

# We have Created a Function to find sum of First 1000000 Numbers
def first_func () :
    # Initialise the sum with 0
    sum = 0

    # loop through 0 to 1000000 and add previous value of sum to it and get the updated sum
    for i in range ( 1000000 ) :
        sum += i

    # return the sum value
    return sum

if __name__ == '__main__':
    init = time ( )
    ans = first_func ( )
    final = time ( )
    print ( f " Time Taken : { final – init } " )

Output:

PS C : \ Users \ ASUS \ Desktop \ TheCrazyProgrammer Work> python -u " c : \ Users \ ASUS \ Desktop  \ TheCrazyProgrammer Work \ test.py "
Time Taken : 0.05800580978393555

Explanation:

As we can see in the example above, we are going to find sum of first 100000 whole numbers using python.

First, we have imported time function from time module. After that we have written a function to calculate the desired sum. We have initialized sum with 0. After that we have used loop to iterate through 0 to 100000 and update the sum value with I and previous sum value, after the loop ends, we have returned the sum.

Now, coming to main function, we have init variable which holds the value of time at the particular time. After that we have called our function to calculate the sum.

Now we have stored the current time in variable name final.

As we can see that we are executing that function and calculated time before executing the function and after executing the function, then we can find the duration to run this program by subtracting the final value from initial value.

This gives time to execute the function.

Example 2

from time import time

# We have Created a Function to find multiplication of first 100000 natural numbers
def func ( ) :
    # Initialise the mult with 1
    mult = 1

    # loop through 0 to 1000 and multiply the previous value of mult with i and get the updated value
    for i in range ( 100000 ) :
        mult *= i

    # return the mult value
    return mult

if __name__ == '__main__':
    prev = time ( )
    ans = func ( )
    updated = time ( )
    print ( f " Time Taken : { updated – prev } " )

Output:

PS C : \ Users \ ASUS \ Desktop \ TheCrazyProgrammer Work > python -u " c : \ Users \ ASUS \ Desktop \ TheCrazyProgrammer Work \ test.py "
Time Taken : 0.005994319915771484

Conclusion

We can measure the execution time of any program using the time module, which is an inbuilt module in python. We can find the execution time using some basic logical operations as I have shown in the above examples.

The post Python Measure Execution Time of Function appeared first on The Crazy Programmer.


from The Crazy Programmer https://ift.tt/QAlpe8L

MKRdezign

Contact Form

Name

Email *

Message *

Powered by Blogger.
Javascript DisablePlease Enable Javascript To See All Widget