May 2021

In this article, we will look into an interesting problem asked in many coding interviews related to arrays: Dutch National Flag Problem. We will discuss the problem, the intuition behind it, and the application of the algorithm in certain scenarios. Along with this we will look at different approaches to solve the problem and analyze its complexities.

Dutch National Flag Problem is among the popular programming problems suggested by E. Dijkstra. So, from the name, it is clear that the problem is related to the Dutch or National Flag of the Netherlands. The flag of the Netherlands has three colors: Red, White and Blue in the same order. So the problem is if given a set of balls belonging to these colors we have to randomly arrange balls of red, white and blue such that balls of the same color are placed together and the order is maintained. In programming, we represent this problem as : Given an Array of 0’s, 1’s and 2’s we have to arrange them such that 0’s come before 1’s and 1’s come before 2’s. So we have to sort this array and arrange them in the order similar to Dutch National Flag.

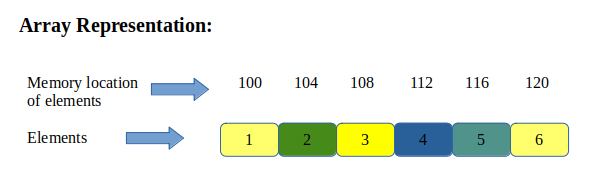
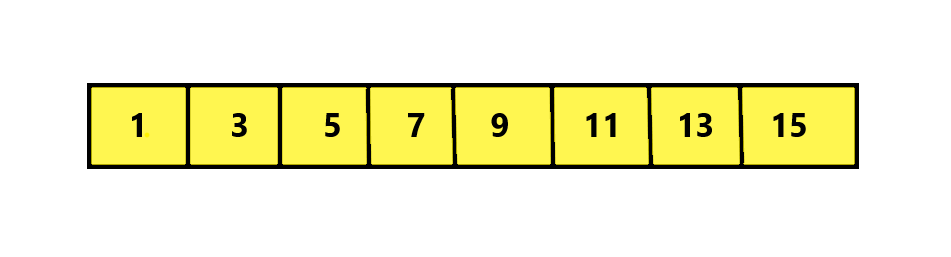
Let us understand this with an example. Consider this array:

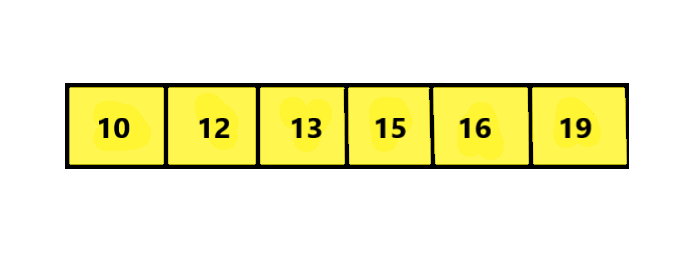
Also, consider the 0’s, 1’s and 2’s representing the colors Red, White and Blue of the flag. We have to sort this Array to look like this:

Now, let us discuss the Dutch National Flag Algorithm to do this but first also have a look at the other approaches before getting into the algorithm to get the idea of its necessity.

  • Naïve Approach: The naïve approach will be to count the number of 0’s,1’s and 2’s in the array at first. Then we have filled the array serially with the occurrences of each number. This will require exactly 2 traversals of the array so we need to think of an approach requiring only 1 traversal.

Dutch National Flag Algorithm

Basically, the main idea of this algorithm is to move the 0’s to extreme left and 2’s to the right of the array respectively. Doing this, the 1’s automatically end up in the middle of the array. Thus, sorting the array at the end. The algorithm mainly consists of these steps:

  • We maintain three pointers Low, Mid and High. At first we set, Low and Mid at start index (0) of the array respectively and the High pointer at end index (Size – 1) of the array.
  • Then, we start iterating the array we take decisions based on Value at index Mid for each Arr[Mid] there are 3 cases.
      1. If Arr[Mid] = 0 : Then we Swap values at Arr[Low] with Arr[Mid] and increment both Low and Mid pointers.
      2. If Arr[Mid] = 1: Then we do nothing and just increment mid by 1. This ensures that all 1’s are in the middle..
      3. Or, If Arr[Mid] = 2: We Swap values at Arr[Mid] with Arr[High], then decrement the High Pointer to replace the value at high with value at mid.
  • We repeat these steps considering the given conditions until Mid <= High.

Note: This Algorithm is only useful in sorting Arrays where Three-Way Partitioning can be applied.

Implementation in Java

public class DutchNationalFlag_Sample
{
  // Swap values for case 0 and 2.
  static void swap(int arr[],int i,int j)
  {
      int temp = arr[i];
      arr[i] = arr[j];
      arr[j] = temp;
  }
    
  static void sortArray(int arr[],int n)
  {
     int mid = 0;
     int low = 0,high = n-1;
     
     while(mid <= high)
     {
         switch(arr[mid])
         {
            case 0: swap(arr,low,mid);
                    low++;                       // we increment low and mid when we get 0
                    mid++;
                    break;
                    
            case 1: mid++;                       // we increment only mid to keep 1's in the middle.
                    break;
                    
            case 2: swap(arr,mid,high); 
                    high--;                      //we decrement high as we moved 2 to last index or high.
                    break;
         }
     }
  }
    
  static void printArray(int arr[],int n)
  {
      for(int i=0;i<n;i++)
      {
          System.out.print(arr[i]+" ");
      }
      System.out.println();
  }
      
  public static void main(String args[]) 
  {
    int arr[] = { 0, 1, 2, 1, 0, 2, 1, 2, 0 }; 
        int n = arr.length; 
    
    System.out.print("Array Before Sorting: "); 
        printArray(arr,n);   
        
        //Calling sort function.
        sortArray(arr,n);
        
        System.out.print("Array After Sorting: "); 
        printArray(arr,n);   
        
  }
}

Output:

Array Before Sorting: 0 1 2 1 0 2 1 2 0 
Array After Sorting: 0 0 0 1 1 1 2 2 2

Time Complexity: We do a single traversal of the array, so the complexity will be O(n) moreover we do this in only one traversal.

Application

The Dutch National Flag Algorithm can be used in implementing Quicksort efficiently for inputs with majorly repeated elements. Quicksort exhibits its worst-case performance in such inputs taking O(n2) time. The Dutch National Flag Algorithm with its 3-Way Partitioning method can help resolve the partition routine separating the values into three groups:

  • The values less than the pivot,
  • The values equal to the pivot,
  • And, the values are greater than the pivot.

The values equal to the pivot are already sorted, so only the value less than or greater than the pivot needs to be recursively sorted. This linear-time partition routine is similar to 3–way partitioning for the Dutch national flag problem. This will make Quicksort work efficiently in O(n) time for inputs having identical values.

Let us have a quick look at the Pseudocode for the Partition routine using DNF Algorithm.

partition(arr[],start,end)
{
 mid = start;
 pivot = arr[end];
 while (mid <= end)
 {
 if (arr[mid] < pivot)
 {
 swap(arr[start], arr[mid]);
 ++start, ++mid;
 }
 else if (arr[mid] > pivot)
 {
 swap(arr[mid], arr[end]);
 --end;
 }
 else 
 {
 ++mid;
 }
 }
 // mid contains the position of partition.
 return mid;
}

So, That’s it for the article you can try out the code with different examples and execute them for a clear idea. Feel free to leave your doubts/suggestions in the comment section below.

The post Dutch National Flag Problem appeared first on The Crazy Programmer.


from The Crazy Programmer https://ift.tt/3fxTP4b

In this article, we will take a look at the advantages and disadvantages of one of the most basic data structures in programming – Arrays. But before that, let us have a brief understanding of what arrays are.

An array is one of the most popular data structures in various programming languages like C, C++, Java, etc. It is used to store data in contiguous memory locations. Whenever we deal with an ordered set of data, arrays are the first and foremost choice to store this data. It can be used to store data of different data types like integer, float, char, double, etc, but a single array contains data of only a single data type. The values stored in arrays are identified by their indexes which generally starts from zero, i.e, the first element of an array will have index zero, the second element will have index one, and so on. These arrays are of great use while executing lengthy programs, but they have certain advantages and disadvantages too.

Array-representation

In the above representation, note that the next location is incremented by 4 and not by 1. This is because an integer takes 4 bytes of memory, therefore the memory location gets increased by 4. If you take any other data type, the memory address will vary accordingly.

Advantages of Array

  • Arrays help in code optimization. We can store a large number of values in a single array by writing a small piece of code rather than declaring each variable separately.
  • Arrays are easy to use as many algorithms like searching and sorting techniques, finding maximum and minimum values, reversing can be easily implemented using arrays.
  • The time complexity to access any element of an array is O(1), i.e, it takes a constant amount of time to access an element.
  • Arrays use indexes to identify their elements. These indexes starting from ‘zero’ and ending at ‘length of array – 1’ can be used to access all elements of an array.
  • Along with simple arrays, we also have 2- dimensional arrays, which are used to store elements of a matrix of any dimensions.
  • Since arrays store elements in contiguous memory locations, no extra memory is allocated outside this contiguous block, which prevents wastage of memory.
  • Being one of the most basic data structures, arrays can be used to implement other data structures like linked lists, stacks, queues, graphs, trees, etc.
  • Arrays can be used to implement many CPU Scheduling techniques.

Disadvantages of Array

  • The size of an array is fixed. Once the memory is allocated to an array, it cannot be increased or decreased. This prevents us from storing extra data in case we want to. These arrays of fixed size are called static arrays.
  • Allocating less memory than the required to an array leads to loss of data.
  • A single array cannot store values of different data types, i.e, an array is homogenous in nature.
  • The deletion and insertion operations in arrays are very difficult to implement as they store data in contiguous memory locations. To overcome this problem, linked lists are implemented which provide random access of elements.
  • In C language, the compiler does not perform index bound checking on arrays. So, if we try to access an element using an index that is outside the range of indexes of an array, the compiler shows a run time error, rather than an index out of bounds error.

Despite many of its disadvantages, arrays are largely used in big projects because of their vast number of advantages. So, this is all about the advantages and disadvantages of arrays.

The post Advantages and Disadvantages of Array appeared first on The Crazy Programmer.


from The Crazy Programmer https://ift.tt/3yQJXdJ

In this article, we will take a look at the two components of computer networking – Workgroup and Domain.

A domain is a collection of computers where one computer acts as a server and all others are connected to it on the same or different network. Domain networks ensure the security of data and allow encrypted sharing of information between devices.

A workgroup is a collection of computer networks where each computer is independent of other computers in its group in reference to their working and functionality. We need a unique login credential to access each computer in a workgroup. They are not much secure and are connected locally on a single network.

Domain networks are used by organizations and companies at the workplace while workgroups are used by individuals for personal use, like at homes. A domain acts as a client-server interface where the user can log in from any device under the domain, using his login credentials. While, in a workgroup domain, only a single user has access to the device. No other login credentials would work on that particular system.

Workgroup vs Domain

Workgroup Domain
The configuration and installation of the workgroup are easy. The configuration and installation of the domain are difficult.
It is hard to maintain a workgroup. It is easy to maintain a domain.
Remote login is not possible in a workgroup. It is a remote-login-based system.
A workgroup is based on a peer-to-peer network. A domain is based on a client-server network.
Each computer in a workgroup is maintained independently by a single user. All computers in a domain are governed and controlled by a centralized server.
Each device in a workgroup has its own local database. All devices in a domain have a single centralized database.
It has a unique login credential for each device. All the devices in a domain can be accessed by a single login credential.
The workgroup names of the devices are autonomous in nature. The names of devices under the domain are provided on basis of IP address.
A workgroup is formed by devices of a single local network. A domain can be formed by devices of one or more different networks.
A workgroup is less secure as compared to the domain. A domain is more secure as compared to the workgroup.
Data recovery is not possible in a workgroup as data is maintained locally on each device. Data recovery is possible in a domain as it has a centralized system of maintenance.
It is used to share personal data between devices. It is mainly used to share sensitive and confidential data between devices.
Only a small number of devices can be used to form a workgroup. A domain is formed by connected a large number of devices.
It is used by small local area networks like at homes, in schools, large buildings, etc. It is used globally by large multinational companies and organizations to manage information.

This is all about the domain and workgroup servers in our computer networks.

The post Workgroup vs Domain appeared first on The Crazy Programmer.


from The Crazy Programmer https://ift.tt/2Ss6uMS

In this article, we will study the two types of addresses in the operating system – Physical and Logical addresses and take a look at the differences between the two of them.

How do we define an address? In layman language, an address is used to uniquely identify a location in the computer memory. The two types of addresses also bear the same qualities and store addresses in a slightly different manner which we will study subsequently.

There are two main components of a computer system – the Control Unit (CU) and the Memory Unit (MU). CU is responsible for input and output operations while MU is responsible for processing and storing instructions and data.

The logical address is generated by the CPU and the physical address is generated by MU. The physical address is the real location in the memory unit which is virtual to the user, i.e., the user cannot view the physical address. But the logical address is generated in the perspective of the execution of a program and is visible to the user. A logical address has no physical existence and so it also called a virtual address.

The logical and physical addresses are generated through mapping.

The following figure shows how the addresses are generated in our computer system:

Address-mapping

The Central Processing Unit generates the logical address during program execution. The logical address passes through the Memory Management Unit (MMU) which translates the logical address into a physical address in two steps. First, it generates a relocation register ( a hardware component consisting of a constant which is added to the memory address). After this, the constant is added to the logical address to get the physical address which is stored in the memory unit. The need to perform mapping of address in MMU is that although the program can run in the logical address, it requires a physical address for its execution. And this physical address can be accessed indirectly with the help of a logical address after mapping.

Difference between Physical and Logical Address

Logical Address Physical Address
It is generated by the CPU. It is a location in a memory unit.
The set of all logical addresses is called Logical Address Space. The set of all physical addresses corresponding to the logical addresses is called Physical Address Space.
It can be viewed by the user. It is not visible to the user.
A logical address can be used to access physical addresses. A physical address cannot be used to access logical addresses.
It is also called a virtual address. It is also called a real address.

Comment down below if you have any queries related to physical and logical address in os.

The post Difference between Physical and Logical Address in Operating System appeared first on The Crazy Programmer.


from The Crazy Programmer https://ift.tt/3wDHn8Z

In this article, we will have a look at the two network configurations in computer networks – ipconfig and ifconfig. Before diving into the details, let us have a brief understanding of what is configuration and why is it necessary.

Network configuration is the process of assigning and arranging the network controls in a manner to perform specific tasks. Network configurations can be done either physically by using physical devices or virtually, by using the software. The virtual mode is easier to implement since it reduces the load of handling configurations manually.

To check these network configurations and make changes in these configurations, we use ifconfig and ipconfig commands. Ipconfig and ifconfig help us to enable, disable and manage network configurations by using certain commands in the terminal, also called the CMD or the command-line interface in our computers. There are many more commands under these two commands which help us to manage configurations of different devices.

What is ipconfig?

Ipconfig stands for Internet Protocol configuration. It is a command which enables us to view all the current TCP/IP configurations of our system. TCP/IP configurations are those which help us to establish communication between the application software and the computer networks and also ensure successful delivery of data packets from one place to another. Each data packet has a unique IP address which enables us to communicate and establish connections with the devices. Microsoft Windows operating system supports this configuration command. Other operating systems like React OS, Apple Mac OS, and some versions of Linux OS also support this command.

What is ifconfig?

Ifconfig stands for Interface configuration. This command is also used to view, change and manage all the current configurations of the computer network. This command is mainly used in Unix-based operating systems.

ipconfig vs ifconfig

                            Ipconfig Ifconfig
It stands for Internet Protocol configuration. It stands for Interface configuration.
This command is mainly used in Microsoft Windows operating systems. This command is mainly used in UNIX-based operating systems.
It shows the network configurations of all the active as well as non-active devices connected to the system. It shows the network configurations of only currently enabled interfaces connected to the system.
In a Microsoft Windows operating system, the “ipconfig/all” command is used to display all the network configurations on the system. In a Unix-based operating system, the “ifconfig-a” command is used to display all the network configurations on the system.

The below image shows the use of ipconfig command in Windows 7 OS. Observe that if you use ifconfig command in Windows, it will show an error. The same is depicted in the image below.

ipconfig

The below image shows the use of ifconfig command in Ubuntu 20.04 OS. Observe that if you use ipconfig command in Linux, it will show an error. The same is depicted in the image below. Note that if the ‘ifconfig’ command doesn’t work, then enable the command by using < sudo apt install net-tools > command in the terminal.

ifconfig

This is all about the two network configurations of our computer networks.

The post ipconfig vs ifconfig – Difference between ipconfig and ifconfig appeared first on The Crazy Programmer.


from The Crazy Programmer https://ift.tt/3yDNk7t

In this article, we will take a look at the Stop and Wait protocol of a computer networking system. In order to understand the mechanism of this protocol, we will first have a brief understanding of the error control mechanism.

The Stop and Wait Protocol is a sub-category of the error control mechanism. The error control mechanism ensures error-free receiving and sending of data from one place to another. It prevents the corruption of data by any external source.

As the name ‘Stop and Wait’ suggests, in this mechanism, the sender sends an instruction to the receiver and stops sending further instructions until it waits for the acknowledgment from the receiver.

The Stop and Wait protocol is a flow control protocol in which the data is transmitted over noiseless channels. The transmission is unidirectional in nature, i.e., either the data is sent or it is received at a time. The data sent by the sender is in the form of discrete packets and only one data packet is sent at a time. Similarly, the receiver receives only a single data packet at a time and sends the acknowledgment to the sender.

The following procedures take place at the sender and the receiver side:

At sender’s side:

  • The sender sends one data packet to the receiver at a time.
  • The sender then waits for the acknowledgment of the data packet from the receiver’s end.

At receiver’s side:

  • The receiver waits for the data packet to be received.
  • The receiver receives the data packet, uses it, and sends the acknowledgment to the sender.
  • The receiver waits for the next data packet to be received.

Diagramatic representation of stop and wait protocol

Image Source

The figure shows the working of the stop and wait protocol. The communication between sender and receiver takes place in this manner. The major advantage of this protocol is that it ensures the transmission of data in a simple manner.

Disadvantages of Stop and Wait Protocol

1. Data Loss: If the sender sends the data and in case the data is lost due to some external source, the receiver doesn’t receive it and keeps on waiting for it for a long amount of time. It does not send the acknowledgment and consequently, the sender doesn’t send further data packets.

2. Acknowledgement Loss: After receiving the data from the sender, if the acknowledgment is lost due to some external source, the sender doesn’t receive the acknowledgment and consequently doesn’t send further data packets to the receiver.

3. Time Loss: Since only one data packet is sent and received at a time, if there are a large number of data packets, it will take a lot of time to send all these data packets from sender to receiver side which results in time loss. To prevent time wastage, another protocol, namely, a sliding window is used to transmit data as we can send and receive large amounts of data at once using this mechanism.

4. Delayed Acknowledgement: There is a particular time frame under which the acknowledgment of data should be received by the sender. If the receiver fails to do so, the sender may consider this acknowledgment of some other data packet.

This is all about the Stop and Wait Protocol which exists in our computer networks.

The post Stop and Wait Protocol appeared first on The Crazy Programmer.


from The Crazy Programmer https://ift.tt/3bRNXkf

Run a startup and need a cool website or have a new project that requires web design & development? Either way, first thing you have to decide: whether to hire the specialists yourself or find a great outsource company to delegate it to them.

Both ways have their advantages and disadvantages, but recently outsourcing has become an emerging trend. Today, even tech giants like Apple outsource web development services. And there comes a reasonable question: why would a Fortune 500 enterprise, having all the resources to hire the whole team of outstanding developers and designers, will use the assistance of an outsourcing company? You will get the answer in this article and find out the 5 benefits of outsourcing web design and development. Let’s get down to business!

Reasons to Outsource Web Design and Development

Top 5 Outsourcing Web Design and Development Benefits

1. High Level of Expertise

Outsourcing companies are always ready to offer:

Impressive Experience

One of the main reasons for choosing an outsource web design and development company is its high expertise. Usually, specialists of an outsourcing company have a great many diverse and successful projects under their belt. They deal with various clients and most likely know how to make your ideas work.

Fresh Ideas

Besides, they are on the cutting edge of the game. I mean such developers and designers know what the current trends and innovations are. Being aware of that, they will most likely develop state-of-the-art solutions for your website too. Sometimes, such specialists even start trends themselves. If your website becomes a new word in the world of web design and development, get ready for the hype.

Expert Advice

In addition to that, you can learn a lot from them. It is especially important when you run a startup. In the future, the experience of collaborating with outsourcing web developers and designers will help you to hire remarkable in-house specialists. Plus, you’ll get familiar with all the steps of website creation.

Additionally, they will advise you on how to make every penny work and stay within budget.

2. Lower Expenses

Lower Cost of Labor

One of the sweetest advantages of outsourcing is that you can collaborate with foreign companies. Due to the differences in economics between countries, you can save a significant amount of money that can be directed on other business needs. For example, an hour for a web developer or designer in Eastern Europe will cost at least twice as low as in the USA. add a link. Meanwhile, the quality of the code & design stays the same or even increases. Specialists from CIS countries occupy many managing posts in such world-scale companies as Google and Tesla.

By the way, outsourcing companies from Eastern Europe are a sort of runway for big talents where they make great projects to get better opportunities abroad. So who knows, maybe a future Google developer will contribute to your project.

But still, to find an excellent outsourcing web development service from Eastern Europe, you should evaluate it by the accomplishments. As a rule, they have proved themselves by a plethora of successful projects and positive feedback from satisfied clients.

No Overhead and Operating Expenses

The process of hiring and onboarding a new team member goes far beyond the ordinary contract singing. To have a new employee ready to make a difference in your company, you should provide him/her with all the necessary equipment. Especially, it concerns web developers because, for productive work, they would need advanced hardware and software. There is no need to explain how much money it would cost. Apart from technical support, your newly-hatched team members may need some special training that will take time and money.

Reading all that stuff alone can stress you out. The good news is that outsource web development and design teams don’t need any of that. They have all the necessary technical equipment and know their job. Just tell them what kind of website you want to have and watch things get done.

3. Efficient Time Management

When delegating your web design and developing to an outsourcing team, you make time for other essential tasks. You can concentrate your efforts on what you do best while the outsource team creates your website from scratch. All you need to do is to let them know what you expect to get and give feedback on different stages of the project.

Besides, the team of experienced outsource developers and designers make the most of every minute because they know exactly what to do to bring your ideas to life.

4. Bright Web Designers & Developers

In-house staff tends to lose their touch. It doesn’t necessarily mean that they no longer do their job well, but they rarely come up with fresh and bold ideas. Warmed up by their salaries and hypnotized by habitual office routine, their muse can fall into a deep sleep.

In contrast, outsource agents always stay alert. The competition keeps their muse wide-awake to create top-notch products. Outsource companies have to offer state-of-art solutions to stand out in a battle for a customer. If they don’t, they will inevitably end up on the curb of the market. Thus, with other outsourcing companies, tagging them, they are more motivated to drive ingenious and swift decisions.

So to speak, hungry dogs bark louder than fed and cherished ones. It sounds just as hard as the competition among website development outsource companies.

5. Fast Turnaround Time

Outsource developers and designers are eager to meet the project’s deadlines you set or even finish it before. That’s, again, boils down to the competition. When a company fails to perform the work in time, it loses its reputation. Since reputation is a crucial asset to maintain long-term partnership and attract new clients, outsource web development companies take it seriously.

If your outsource web team is from another country, they also can work on holidays and national day-offs on which your in-house team won’t.

Wrap-up

To summarize, let’s take a quick look at outsource web development and design benefits to better etch them on your memory. Outsource web development & design companies:

  • Have a great deal of experience;
  • Come up with innovative and bold ideas;
  • Share experience and give you professional advice;
  • Less expensive to hire if they are from abroad;
  • Free you from overhead and operating expenses;
  • Create cutting edge solutions under budget;
  • Are motivated to meet deadlines;
  • Have got teams of talented specialists;
  • Work more swiftly and effectively than in-house teams.

Now you know how you can benefit from claiming the assistance of an outsourcing company to create a website or rebrand the existing one.

The post Top 5 Outsourcing Web Design and Development Benefits appeared first on The Crazy Programmer.


from The Crazy Programmer https://ift.tt/3eWPNlI

In this article we will have a look at an interesting Searching Algorithm: Interpolation Search. We will also look at some examples and the implementation. Along with this we look at complexity analysis of the algorithm and its advantage over other searching algorithms.

Interpolation Search is a modified or rather an improved variant of Binary Search Algorithm. This algorithm works on probing position of the required value to search, the search tries to get close to the actual value at every step or until the search item is found. Now, Interpolation search requires works on arrays with conditions:

  • The Array should be Sorted in ascending order.
  • The elements in the Array should have Uniform distribution. In other words, the difference between two successive elements (Arr[i] – Arr[i+1]) in the array for each pair must be equal.

Note: The second condition does not need to be true always. The given array cannot be fairly distributed sometimes. In that case, the probing index will help in search. We will look at the example for such case. The first condition has to be necessarily true.

In Binary Search, we used to get the index of our search element by dividing the array into two halves. So, We get the index of the middle element as mid = (low + high) / 2. If the index given by mid matches our key to search we return it, otherwise we search in the left or right half of the array depending on the value of mid.

Similarly, in the Interpolation search we get the index/position of the element based on a formula :

Index = Low + ( ( (Key – Arr[Low]) * ( High – Low ) ) / Arr[High] -Arr[Low] ).

Let us look at each term:

Arr: Sorted Array.

Low: Index of first element in Array.

High: Index of last element in Array.

Key: Value to search.

Note: The formula helps us get closer to the actual key by reducing number of steps.

Interpolation Search Algorithm

  1. At first, We calculate the Index using the Interpolation probe position formula.
  2. Then, if the value at Index matches the key we search, simply return the index of the item and print the value at that index.
  3. If the item at the Index is not equal to key then we check if the Key is less than Arr[Index], calculate the probe position of the left sub-array by assigning High = Index – 1 and Low remains the same.
  4. If the Key is greater than Arr[Index], we calculate the Index for right subarray by assigning Low = Index + 1 and High remains same.
  5. We repeat these steps in a loop until the sub-array reduces to zero or until Low<=High.

Explanation with Examples

Now, let us understand how the algorithm helps in searching with some examples. There are mainly two cases to consider depending on input array.

Case 1: When Array is Uniformly Distributed

Now, let us look at an example how this formula gets us the index of the element. Consider this Array:

Sorted Uniformly Distributed Array

We can see the above array is sorted and is uniformly distributed in the sense that for each pair of element, e.g. 1 and 3 the difference is 2 and so is for every pair of elements in the array. Now let us assume we need to search for element 9 in the given array of size 8, we will use the above formula to get the index of the element 9.

Index = Low + ( ( (Key – Arr[Low]) * ( High – Low ) ) / Arr[High] -Arr[Low] ).

Here, Low = 0, High = Size – 1 = 8 – 1 = 7. Key = 9 and Arr[Low] = 1 and Arr[High] = 15.

So putting the values in the equation we get,

Index = 0 + ((9 – 1) * (7 – 0) / (15 – 1)) = 0 + ( 56 / 14 ) = 4.

Hence, we get the Index = 4 and at Arr[4] value is 9 and the value is found at index 4. So, we can see we found our key in only one step taking O(1) or Constant time without having the need to traverse the array. In Binary Search, it would have taken O(log n) time to find the key.

Case 2: When Array is Not Fairly/Uniformly Distributed

There might be a case when we will be given a sorted array which may not be fairly distributed i.e. the difference between two elements  for each pair may not be equal. In such condition, we can search the value using Interpolation Search but the difference is the number of steps to get the index will increase. Let us consider understand this with an example.

Here, we can see the above array is Sorted but not fairly distributed as the absolute difference between 10 and 12 is 2 whereas for 12 and 13 is 1, and for every pair the absolute difference is not equal. Now let’s say we want to search for element 13 in the given array of size 6. We will get the index using the Probing Position formula.

Index = Low + ( ( (Key – Arr[Low]) * ( High – Low ) ) / Arr[High] -Arr[Low] ).

Here, Low = 0, High = Size – 1 = 6 – 1 = 5. Key = 13 and Arr[Low] = 10 and Arr[High] = 19.

Now, putting the values we get,

Index = 0 + ((13 – 10) * (5 – 0)) / (19 – 10) = 0 + (3 * 5) / 9 = 15/9 = 1.66 1 ( We approximate to Floor Value).

Now, Arr[Index] = Arr[1] = 12, so Arr[Index] < Key (13) , So we need to follow Step 4 of the Algorithm and we come to know that element exists in right subarray. Hence we assign Low = Index + 1 (1 + 1 = 2) and continue our search.

Hence, Low =  2, High = 5. Key = 13 and Arr[Low] = 13 and Arr[High] = 19.

So, Index = 2 + ((13 – 13) * (5 – 2)) / (19 – 13) = 2 + (0 * 3) / 9 = 2 + 0 = 2.

Now, At Index 2, Arr[Index] = 13 and we return the index of the element.

Implementation in Java

We will search for the element in the array and print the index considering 0 based indexing of array. We will consider both cases discussed above. Now, Let us look at the code for this:

import java.util.*;

public class InterpolationSearch
{
   static int interpolationSearch(int arr[], int low,int high, int key)
   {
     int index;
 
     while(low <= high)
     {
 
      // Calculating Exact Index or Closest Index to Key using Probing Position Formula.
      index = low + ( ( (key - arr[low]) * ( high - low ) ) / (arr[high] - arr[low]));
 
      // Condition when key is found
      if (arr[index] == key)
        return index;
 
      // If key is larger, key is in right sub array
      if (arr[index] < key)
        low = index + 1;
 
      // If key is smaller, key is in left sub array
      if (arr[index] > key)
        high = index - 1;
        
     }
        // if element does not exists  we return -1.
        return -1;
    }
 
  public static void main(String args[])
  {
        // We first perform search for a Sorted Uniformly Distributed Array -- Case 1
        int arr[] = { 1, 3, 5, 7, 9, 11, 13, 15};
 
        // Element to be searched
        int x = 9;
        int index = interpolationSearch(arr, 0, arr.length - 1, x);
 
        System.out.println("The Array is: "+Arrays.toString(arr));
        // If element was found
        if (index != -1)
            System.out.println("Element "+x+" found at index: "+ index);
        else
            System.out.println("Element not found");  
            
        System.out.println();
        
        // Then we perform search for Non-Uniformly Distibuted Array -- Case 2
        arr = new int[]{10, 12, 13, 15, 16, 19};
        
        // we search for value 13
        x = 13;
        index = interpolationSearch(arr, 0, arr.length - 1, x);
 
        System.out.println("The Array is: "+Arrays.toString(arr));
        // If element was found
        if (index != -1)
            System.out.println("Element "+x+" found at index: "+ index);
        else
            System.out.println("Element not found");  
            
  }
  
}

Output:

The Array is: [1, 3, 5, 7, 9, 11, 13, 15]
Element 9 found at index: 4

The Array is: [10, 12, 13, 15, 16, 19]
Element 13 found at index: 2

Time Complexity Analysis

Now, let us now quick look at the time complexity of the Interpolation Search Algorithm. There arise two cases when we consider the input array provided.

  • Best Case: When the given array is Uniformly distributed, then the best case for this algorithm occurs which calculates the index of the search key in one step only taking constant or O(1) time.
  • Average Case: If the array is not fairly distributed but sorted the average case occurs with runtime as O(log (log n)) in favorable situations, as we get close to the actual value’s index then we divide into subarrays. This is an improvisation over binary search algorithm which has O(log n) runtime.

So that’s it for the article you can try out the probing formula with different examples considering the two cases explained and execute the code for a better idea. Feel free to leave your suggestions/doubts in the comment section below.

The post Interpolation Search Algorithm – Time Complexity, Implementation in Java appeared first on The Crazy Programmer.


from The Crazy Programmer https://ift.tt/3fr7uce

Nearly all software developers of a certain generation learned to program with a version of the Pascal programming language. Niklaus Wirth designed the Pascal language with the intention of encouraging good programming practices using structured programming and data structuring. This made it perfect for teaching programming. Pascal has come a long way since it was first introduced in 1970, later evolving into Object Pascal, in much the same way and about the same time that C evolved into C++.

In celebration of the 26th Birthday of Delphi, the most popular evolution of Object Pascal, here are 26 things you didn’t know about Object Pascal. Or do you?

Niklaus Wirth

  1. Object Pascal has many modern implementations. A few of the modern implementations of Object Pascal include Delphi, Free Pascal, Oxygene, Smart Mobile Studio, and DelphiWebScript. All with regular updates and many new features from the original Object Pascal.
  2. Object Pascal is a multi-paradigm programming language supporting procedural, object-oriented, generic, imperative, event-driven, functional (partial), and structural programming.
  3. Delphi, the most popular evolution of Object Pascal, was introduced in 1995, the same year as Java, JavaScript, Ruby, and 4 years after Python.
  4. Object Pascal provides memory safety without the overhead of garbage collection, with optional reference counting. It also permits raw pointer functions and manual memory management, bypassing all abstractions.
  5. Object Pascal includes numerous concurrency features for asynchronous programming, such as thread pools, tasks, futures, and background threads.
  6. Object Pascal is self-extensible. It doesn’t require another language to add libraries, components, or interfaces. Delphi is written in Delphi, as are most other implementations. 
  7. Delphi combines native compilation to machine code with rich reflective functionality via Enhanced Run-Time Type Information (RTTI). 
  8. Object Pascal allows for object inheritance, polymorphism, interfaces, generics, closures, and dependency injection.
  9. Object Pascal has a strongly typed foundation, with support for variants, type inference, and duck typing.
  10. Embarcadero’s Delphi compiles modern Object Pascal to native 64-bit x86 for Windows, Linux, and Mac OS, with native 64-bit ARM support for Android and iOS.
  11. The RemObjects’ Oxygene compiler for Object Pascal adds targets .NET, WebAssembly, Cocoa, and Java.
  12. Free Pascal adds additional compiler platform targets like PowerPC64 and FreeBSD.
  13. Smart Mobile Studio and Free Pascal also transpile Object Pascal to JavaScript.
  14. The vast component library and property, method, event system made Delphi the first “Low Code” solution, while also giving you the freedom to write as much code as you want (see #6: Self-Extensible).
  15. Object Pascal is ahead of the curve: Object Pascal inspired many features of other languages such as C# and Java.
  16. Anders Hejlsberg, the architect of Turbo Pascal and Delphi, went on to architect C# and TypeScript, receiving the 2001 Dr. Dobb’s Excellence in Programming Award.
  17. PascalCoin is a cryptocurrency implemented in Object Pascal.
  18. Delphi supports building decentralized applications that interact with smart contracts on the Ethereum Blockchain.
  19. HeidiSQL is a very popular, open-source, database management client written in Delphi. Many other database management systems are written in Delphi thanks to its included database functionality.
  20. A 2017 research paper testing the energy efficiency of programming languages found Free Pascal to be the most memory-efficient programming language, and in the top tier for energy and performance.
  21. While Delphi continues to evolve, it is also committed to backward compatibility. Many 26-year-old programs can be recompiled with very few changes to gain access to new functionality and platforms.
  22. Object Pascal uses the source: The latest version of Delphi ships with 2637 source files, and 1258 sample files, for a total of 2,678,978 lines of Object Pascal source code.
  23. There is a component for that: Combining the shipping source with Delphi’s robust component model helps fuel the vibrant community of commercial and open-source components and libraries.
  24. Delphi supported building native apps for the Microsoft Store before Visual Studio.
  25. The best-known application written in Delphi was the user interface for the original Skype for Windows client. That technology was used when Microsoft acquired Skype for $8.5 billion USD — that is, they bought a Delphi application for that amount. Microsoft kept using Delphi for the Windows client until recently (for better or worse).
  26. There are multiple Delphi applications exceeding 10 million lines of Object Pascal source code that build to a single executable file, most with little to no dependencies. These compiled Delphi applications allow “xcopy” installation: no need for .NET runtime, JVM, language compiler or tools, runtime DLL, or any other file is required on the target platform. Your executable file is all you need. Delphi also allows for dynamic linking if that is your preference. 

Note: Unless otherwise specified, these facts are true at least for Embarcadero’s Delphi, and may vary for other Object Pascal implementations. There is such a huge variety in Object Pascal usage it is hard to make a single blanket statement that applies to all of them.

How many of these facts did you know? Have you kept up with Object Pascal as well as it’s kept up with the ever-changing demands of software developers like yourself? Not to worry if you’ve fallen behind; even if you are new to Object Pascal, it is surprisingly easy to learn and get up to speed as a productive programmer. Here is a list of free resources to get you started.

  • Free Delphi Community Edition – The IDE Runs on Windows but allows you to cross-compile to many other platforms
  • Free Pascal and the Lazarus IDE – Open source and runs on most platforms, even Raspberry Pi.
  • Trial of Oxygene – Part of the Elements family of languages, it runs in Visual Studio on Windows or its own Fire IDE on macOS
  • Smart Mobile Studio – The command-line compiler is free, or you can download the IDE Trial, and start transpiling Object Pascal to JavaScript.

The post Object Pascal – 26 Things You Didn’t Know About appeared first on The Crazy Programmer.


from The Crazy Programmer https://ift.tt/3bwjiZy

We all are well aware of Read-Only Memory, abbreviated as ROM, which is actually a memory chip used to store data permanently and retains it even when the system is turned off. In this article, we will take a look at the two modified versions of ROM – EPROM and EEPROM.

ROM is a type of non-volatile memory and the data once written on it cannot be erased, but the advanced versions of ROM – EPROM and EEPROM resolved this issue and allowed erasability and reprogramming of data.

Difference between EPROM and EEPROM

EPROM stands for Erasable Programmable Read-Only Memory. As its name suggests, the data written on an EPROM can be erased and reprogrammed. A strong light source of ultraviolet radiation, such as a Mercury-vapour lamp is used and the light emitted by it is concentrated on the EPROM chip to erase the data stored in it. Later on, after the data has been erased, it can be reprogrammed to store specific data.

While EEPROM stands for Electrically Erasable Programmable Read-Only Memory. Its working is similar to the working of EPROM, the basic differences exist only in its programmability and erasability methods as well as efficiency to perform. EEPROM uses electric signals to erase and reprogram data on a byte basis.

Difference between EPROM and EEPROM

EPROM EEPROM
It uses ultraviolet light to erase and program data. It uses electrical signals to erase and program data.
It has a transparent quartz crystal at the top of the chip. It is encapsulated inside a plastic case.
It can be taken out of the computer to reprogram data on it. The data is reprogrammed by keeping the chip inside the computer circuit itself.
It is a modern version of ROM and PROM. It is a modern version of EPROM.
The relative size of every cell in EPROM is 1. The relative size of each cell in EEPROM is 3.
It uses a transistor with a voltage supply of 12.5 Volts. It uses a transistor with a voltage supply of 5 Volts.
The data is erased when electrons are far away from the cell. The data is erased when electrons are trapped in the cell.
EPROM takes about 15-20 minutes to erase data from the chip. EEPROM took 5-7 milliseconds to erase data from the chip.

EPROM and EEPROM were developed to overcome the problems faced while using ROM and PROM. Using EPROM and EEPROM to erase and reprogram data ensures the reusability of the chips at a much faster pace and at low cost, which gives an edge over the limited advantages of ROM and PROM. While EPROM came out as a modified version of ROM and PROM, EEPROM is even a more advanced version of EPROM.

The post Difference between EPROM and EEPROM appeared first on The Crazy Programmer.


from The Crazy Programmer https://ift.tt/3eTPmZy

In this article, we will take a look at one of the most intriguing concepts which exist in our computer programming world – Spooling.

The word ‘SPOOL’ is derived from the old french word ‘espule’ which means a cylindrical container used to store information or data. Similar is the concept of spooling which is used in our Operating Systems.

To understand this concept thoroughly, we will first take a look at the basic operations that take place in our operating systems and subsequently, derive how the mechanism of spooling gives an edge to these operations.

So, the basic three functions that take place in our operating system are input, process, and output.

The system takes input from the user through the keyboard, mouse, or any other device, sends these instructions to the brain, i.e., CPU, where it is processed, and then returns the output on the screen. Now, if you observe that while taking inputs from the user, the CPU is not playing any role in the process and is in a null state (a state when it has no work to do), and also after the data is processed, it is again in a null state, until the result is displayed on the screen.

We observe that with such a scenario, it takes a lot of time to execute a single operation as the CPU is in a null state most of the time, and only performs its operations for a specific period. Why is the CPU even called the brain of the computer if we can’t use it to its fullest extent? To resolve this issue, the concept of Spooling comes into play.

Spooling in Operating System

The word ‘SPOOL’ stands for Simultaneous Peripheral Operations On-Line. It is a temporary storage space where the instructions are stored in the computer memory until the main memory takes up these instructions for processing. Through the process of spooling, we can get rid of the null state of the CPU. Spooling is the mechanism in which the system can take a number of instructions simultaneously using peripheral devices and store them in a secondary storage space or disk for further processing of data.

Let us understand this through a graphical representation:

Spooling in Operating System


From the above representation, we can conclude that the data from the input device goes to a type of secondary storage space where it gets stored and then the main memory fetches this data one by one and executes the instructions without any delay. In this way, the CPU will be put to work most of the time and it will save time too. Most of the devices use this space while sending instructions in bulk, which reduces execution time and makes our interaction with the operating system smooth.

The post Spooling in Operating System appeared first on The Crazy Programmer.


from The Crazy Programmer https://ift.tt/3op1gxj

Global variables are described at the top of a program, outside of all functions. The value of a global variable remains constant throughout the execution of the program. Every function that is declared in the program, can access the global variable.

#include<iostream>

using namespace std;

//global variable 
int a = 5;

void display() {
    cout<<a<<endl;
}
  
int main() {
    display();
    a = 10;
    display();
    return 0;
}

Output:

5
10

If a global variable is not initialized, then the default value is zero.

#include<iostream>

using namespace std;

//global variable
int a;

void display() {
    cout<<a<<endl;
}

int main() {
    display();
    return 0;
}

The output of the above program will be 0.

Using Scope Resolution (::)

If the name for the local variable and the global variable is the same, and we wish to access the global variable, then we make use of a scope resolution operator along with the name of the variable.

Syntax:

::variable_name

Program:

#include<iostream>

using namespace std;

//global variable
int a = 5;

void display() {
    int a=10;
    cout<<::a<<endl;
}

int main() {
    display();
    return 0;
}

Output:

5

​Advantages of Global Variables

When multiple functions need to access the same data, a global variable comes to the rescue. A global variable can be accessed from any function in a program. Outside of the functions, you only need to declare the global variable once. If we need to access the same data in multiple functions, then we can use a global variable instead of declaring the same data multiple times inside the functions. It’s perfect for storing “constants” because it helps to maintain continuity.

​Disadvantages of Global Variables

Any function can change the value of a global variable. Now, if we access its value without using the scope resolution operator, the changed value will be returned as output. So, to prevent any changes in its value, it becomes a necessity to use the scope resolution operator.

​Global Variable in C++ Vs Java

In C++, it is not necessary to use a class to write programs. But, in Java, all the functions and data members are declared inside a class. In C++, we declare global variables at the top of the program but, in Java, we cannot do the same because every declaration has to be done inside the class and if we declare it outside the class, then it would not be accessible by the object of that class.

So, in Java, to declare a global variable inside a class, we use the keyword static along with the name of the variable.

Program for global variable declaration in Java:

class staticVariable {
    static int a = 20;
    
    public void display() {
        System.out.println(a);
    }
    
    public static void main(String args[]) {
        staticVariable obj1=new staticVariable();
        obj1.display();
    }
}

Output:

20

In this program, we created a class named staticVariable and inside the class, we created a function named display. Inside the class, we created a static variable with a value of 20. In the main function, we created an object named obj1 of class staticVariable to access all the variables and functions of this class with the help of the object. Now we call the display function inside the main function using object obj1 to display the output of the program (here, the value of static member ‘a’).

The post C++ Global Variable with Examples appeared first on The Crazy Programmer.


from The Crazy Programmer https://ift.tt/3hvREjd

In this article, we will take a look at two of the most basic functions used in the C language and subsequently, we will compare them on the basis of their usage.

Both fgets and scanf functions are used to take basic user inputs in the program. The major difference between these two functions is that the scanf function takes the input of any data type (int, float, char, double, etc.) but falls behind while taking string inputs. The reason for this behavior is that string inputs contain whitespaces and as soon as the scanf function encounters these whitespaces, it stops scanning further, thus making the function less accessible for string inputs.

While, the fgets function is used to take inputs of any data type (int, float, double, char, etc.) as well as string inputs containing whitespaces. One more major advantage of using fgets function is that it can even read input data from a specified text file or console, which the scanf function cannot. fgets function even allows us to specify the size of user input to be taken, thus making it a user-friendly function.

scanf() in C

The format to take user input using scanf function is given as:

scanf (“<format specifier>”, &<variable_name>)

The format specifier to take integer input is “%d”, for float input, it is “%f” and for string input, it is “%s”. Let us understand this concept using a sample program.

#include <stdio.h>

int main(){
        int a ;
        float b ;
        char c[100] ;
        scanf ( “%d” , &a) ;
        scanf ( “%f” , &b) ;
        scanf ( “%s” , &c) ;
        printf( “%d” , a) ;
        printf(“\n”) ;
        printf( “%f” , b) ;
        printf(“\n”) ;
        printf( “%s” , c) ;
        return 0 ;
}

Input:

3
10.23
Welcome to The Crazy Programmer

Output:

3
10.230000
Welcome

In this program, we have initialized an integer ‘a’, a float number ‘b’, and a string ‘c’. Note that the data type of string is char and the numerical part written after the string variable ‘c’ is the maximum length of the string, user can input.

As we can observe from the output, the scanf function stopped scanning the string input after it encountered whitespace and therefore, displayed only the first word of the string.

fgets() in C

To remove this error, fgets function comes in force. The format to take user input using fgets function is given as:

fgets (<string_name>, <string_size to be printed>, stdin)

Here, stdin is a keyword used to take standard input from stdin stream. To understand this better, let us see a sample program.

#include <stdio.h>

int main(){
     char str[100] ;
     fgets ( str , 40 , stdin) ;
     printf ( “%s” , str ) ;
      return 0 ;
}

Input:

Welcome to The Crazy Programmer!

Output:

Welcome to The Crazy Programmer!

Here, we notice that fgets function read the full string and didn’t stop scanning the string even after encountering whitespaces. Therefore, using fgets function for string input is advantageous and handy.

One more usage of fgets function is that it is also used to take input directly from a text file. Let us understand this using a sample program.

Consider a text file named ‘file.txt’ containing the line “Hello World!” saved in your computer system. Now, study the following program :

#include <stdio.h>

int main(){
        char str[30] ;
        FILE *fp ;
        fp = (“file.txt” , “r” ) ;              // Line 3
        fgets (str , 20 , stdin) ;              // Line 4
        printf (“%s” , str );
        fclose(fp) ;
        return 0 ;
}

Output:

Hello World!

In this program, we created a pointer to a file ‘fp’ which is used to read the content from the file. The ‘r’ keyword in Line 3 is used to read the file. In line 4, the fgets function is used to take input from the file, which will print the string up to 20 characters. Remember to close the file after reading it at the end of the program using ‘fclose’ function.

Although scanf is mostly used to take user input, it is preferable to use fgets while taking string inputs as it makes the program error-free.

The post fgets() vs scanf() in C appeared first on The Crazy Programmer.


from The Crazy Programmer https://ift.tt/3okx6LU

Companies everywhere are handling more data than ever and all these terabytes of data need to be stored somewhere. Should you store the data in a database, a data warehouse, or a data lake? How do you know what is best for your company?

Choosing the right data storage solution will depend greatly on how the data is going to be used. While both a data lake and a data warehouse share the goal of the process data queries to facilitate analytics, their functions are different. This post will give you an overview and use cases to understand when to use a data lake or a data warehouse.

What is Data Lake?

A data lake is a repository that holds raw data, of which the purpose is not yet defined or requires a very high level of flexibility and agility. A data lake allows you to store all data, at its raw format, structured and unstructured in a central repository. You can store the data without having to structure it first.

The data lake may not use databases to store the data, using flat files or logs instead.

Data Lake

Image Source

Use Cases

A data lake is a good choice when you need to store a large number of records without knowing if you will need them in the future. Data lakes work great to store historical data and support compliance. One of the most common use cases is storing data coming from IoT sources for near-real-time analysis. Here are some examples:

Healthcare: Data lakes help healthcare organizations to comply with regulations on data storage and privacy. The lake allows them to store patient records and retrieve data for queries years later. These types of services for healthcare companies usually only store and retrieve, without analyzing the data.

Network Security: These types of companies collect raw data through the different endpoint devices, like routers and IoT sensors. The large numbers of data need to be stored somewhere in case someone wants to check an anomaly. Typically, the data is stored in the data lake for a few weeks. If there is no need to analyze it, the system destroys the data.

Pharmaceuticals: These organizations collect raw data when they conduct drug trials. They also report for regulation. In this case, organizations retain the data for a long time to help future research.

Querying a Data Lake

You need to take into account that you are querying raw data coming from disparate sources. This can make the process a bit challenging. To simplify this process, you can query the data lake using an Athena query. Amazon Athena is an interactive query service that allows analyzing data in a data lake in an easier way by using standard SQL.

The ability to handle all types of data makes data lakes very attractive for businesses. Industries from oil and gas, marketing, and smart city initiatives.

What is Data Warehouse?

A data warehouse is a repository of processed and structured data with a defined purpose. Some may define a data warehouse as a collection of databases since it receives data from relational databases and transactional systems.

Typically, a data warehouse stores optimized data. That’s why data warehouses are specifically designed for interactive data analytics.

Data Warehouse

Use Cases

Every industry that uses structured and unstructured data for analytical reporting and business intelligence, can benefit from a data warehouse. Let’s see some examples:

Banking and Finance: Financial institutions use the analytic powers of a data warehouse to identify risks and analyze products. They also can track the performance of accounts and services and interchange rates.

Government: A data warehouse can keep official records (tax, criminal, health policies). It can help government agencies to detect patterns and identify criminal activities, including threat and fraud detection.

Manufacturing: Data warehouses help simplify the supply chain and operations by allowing them to easily retrieve and compare data. For example, comparing sales and performance over regions.

Data Lake vs Data Warehouse

  Data Lake Data Warehouse
Data Structure Raw data Modeled / optimized data
Purpose of Data Flexible Defined
Easy to update Quick to update. Easy to access and change. Updates take more effort. More structured by design makes it more difficult to manipulate.

Wrap Up

While data lakes and data warehouses serve different purposes, some companies may need both. They’ll need to use a data lake to store raw and unstructured information, and a data warehouse to store structured data, analytics, and aggregated reports.

Ultimately, the choice of using one or another will depend on your company’s needs. That being said, the data lake vs data warehouse discussion just started, and choosing the right model (or both) for your company can be critical for growth and efficiency.

The post Data Lake vs Data Warehouse appeared first on The Crazy Programmer.


from The Crazy Programmer https://ift.tt/3o950TH

In this article, we will see how can we print a number in hexadecimal format using C language, but before that, we will take a look at what this format is all about.

In C language, a value in hexadecimal format is represented by a combination of 16 symbols, out of which 10 symbols are the standard numerical values ranging from 0 to 9 and the rest six are uppercase characters from ‘A’ to ‘F’. Here, the letter ‘A’ represent the numeric value 10, ‘B’ represents 11, ‘C’ represents 12, ‘D’ represents 13, ‘E’ represents 14 and ‘F’ represents 15. These numbers and characters when combined together to represent a value make up the hexadecimal format.

How to Print Hexadecimal in C

To print a number in hexadecimal format, the format specifier used is ‘%x’ or ‘%X’. Using the ‘%x’ format specifier converts all the letters contained in the hexadecimal representation of a number in lowercase and using the ‘%X’ format converts all the letters in uppercase.

Let us look at some sample programs for better understanding:

#include <stdio.h>

int main(){
      int a = 252 ; 
      printf (“%x”, a) ;
      printf (“\n”) ;
      printf (“%X”, a) ;
      return 0;
}

Output:

fc
FC

Diagramatic representation of hexadecimal format

Here, the hexadecimal representation of the number 252 is ‘fc’ if the format specifier used is ‘%x’ and ‘FC’ if the format specifier used is ‘%X’. The second print statement is used to insert a line break between the first and third print statements.

Now, let us understand how this conversion actually takes place in the system:

Step 1: Divide the given number by 16 and note the remainder of the operation.

Step 2: Keep repeating step 1 until the quotient becomes 0.

Step 3: Combine the remainders in the reverse order as they are obtained.

For example, in this program, we divide 252 by 16 and obtain 15 as quotient and 12 as remainder. Now, we divide 15 by 16 and obtain 0 as quotient and 15 as remainder. Note that after dividing 15 by 16, the quotient becomes zero. So, we stop our calculation here. The remainders obtained in the two steps are 12 and 15 and their hexadecimal representations are ‘c’ and ‘f’ respectively. We arrange the hexadecimal representation of remainders in the reverse order in which they are obtained. So here, the hexadecimal representation of 252 will be ‘fc’.

Let us take one more example:

#include <stdio.h>

int main(){
     int a = 36453 ;
     printf (“%x”, a) ;
     printf (“\n”) ;
     printf (“%X”, a) ;
      return 0;
}

Output:

8e65
8E65

Diagramatic representation of hexadecimal format

The hexadecimal representation of 36453 is 8e65 and it can be calculated in the similar method mentioned above.

The post How to Print Hexadecimal in C appeared first on The Crazy Programmer.


from The Crazy Programmer https://ift.tt/2SzMyI4

In this article, we will first look at how can we assign an address to a variable and then print the address using C language.

First of all, we will take a look at how addresses are assigned to any variable.

Whenever we declare a variable of any data type (int, float, double, char, etc.), some memory is allocated to the variable by the operating system which can be any random number but cannot be negative. This random number is called the address of that variable and every variable has a unique address.

To understand this concept in a more simple manner, let us take one real-life example. Suppose Rahul is a student of some university and lives in Hostel B, Room Number 32. Now, if someone asks me – Who lives in 32B? My prompt would be Rahul. Here, 32B is the address of a value named Rahul. Similar to this nature, addresses are assigned to variables in computer programs too.

There exist two methods to print the address of a variable in C :

  • Using address of (&), also called as ampersand operator.

  • Using pointers in C.

Method 1: Printing Address Using ‘address of’ Operator

To print any value in a program, C language uses the ‘printf’ function. The format to print output in C is given as – printf(“<format specifier>”, <variable to be printed>).

The address of a variable is an integer numeric quantity and the format specifier used to print such a quantity is “%p” (for printing address in hexadecimal form) and “%lld” (for printing address in decimal form). To print the address of a variable, we use ‘&’ along with the variable name.

Let us understand this with a sample program:

#include <stdio.h>

int main(){
        int num = 33 ;
        printf ( “%p”, &num ) ;
        printf(“\n”);
        printf ( “%lld”, &num ) ;
        return 0 ;
}

Output:

0x7ffe97f3e62c

140731447764524

In this program, our variable name is ‘num’. To print its address, the format specifier used here is ‘%p’ and ‘%lld’ and ‘&’ operator is used along with the name of the variable. The second print statement is used to insert a line break between the two outputs. Note that the output that gives the address of this variable is a randomly generated quantity. It can also take any other value than the one mentioned above.

Diagramatic representation of address of a variable using pointer notation.

Method 2: Printing Address Using Pointer

The address of a variable can also be printed using pointers in C. A pointer is an integer component that stores the address of another variable. To use a pointer, it must also be declared just like any other variable. A pointer in C is declared using the ‘*’ operator, also called the asterisk operator.

Pointer declaration – <datatype> *<variable_name>. Here, variable_name is used to store the address of the other variable.

Let us understand this with a sample program:

#include <stdio.h>

int main(){
        int num = 33 ;
        int *p ;
        p = &num ;
        printf ( “%lld”, p) ;
        return 0 ;
}

Output:

140731447764524

In this program, a pointer ‘p’ is initialized which stores the address of the variable ‘num’. As we have seen earlier, the ampersand operator is used to access the address of a variable, we use the ‘address of’ operator and store the variable’s address in ‘p’. Now, to print the address of the variable, we use the printf function along with the format specifier and the variable to be printed ( i.e., ‘p’ ).

Diagramatic representation of address of a variable using pointer notation.

In this way, we can make use of any of the two methods to print the address of a variable.

The post How to Print Address in C appeared first on The Crazy Programmer.


from The Crazy Programmer https://ift.tt/3w1K9UT

MKRdezign

Contact Form

Name

Email *

Message *

Powered by Blogger.
Javascript DisablePlease Enable Javascript To See All Widget